Temptation …

The Temptation

I have belonged to Kathy Tracy’s “Small Quilt Talk” yahoo group for simply ages.  They have recently moved to a different platform and I joined.  While looking around the new site, I saw the photos and files of the new MYSTERY quilt.  I LOVE mystery quilts.  They stretch me.  You don’t have to join the group – her mystery is available FREE (until it’s over) if you click HERE.  And then click on the Mystery Quilt tab.

Of course, since I’m working on my Quilting PHD in 2018, everything I start in 2018, has to be finished this year.  So, if I was to start this Mystery quilt – I’d have to finish it.  It’s small 30″x 30″.  I could rationalize it … my need to start something NEW … to use up some of my stash.  I’m sure I could come up with lots of other reasons to start this quilt!

Of course, I’m going to resist this temptation.  I’m just writing about it on my blog in case **YOU** want to participate.    Image result for Free face winking Clip Art

Design Wall:

IMG_1456Quilting:

This is the Queen Size Beginner mystery quilt that we did with the guild.  The bobbins are wound – I’m going to stitch in the ditch around the multitude of 4 patches … I’ll decide later what I’ll put in the negative spaces.

Piecing:

After debating which quilt I wanted to finish piecing, I decided to work on Orca Bay #2. Mostly because it has the most piecing left to do and it is still February.  That gives me 10 months to finish the top, sandwich it, quilt & bind it.  The worst parts are already done (the blue and red string blocks).  If I calculate correctly, I think I have 6 billion more pieces to sew together for this quilt.  (Yes, that is a slight exaggeration!)  I originally did Orca Bay #1 as a mystery quilt in 2011.  That quilt was gifted and I want one of my own.  And, I want it bigger …  This quilt can be found in Bonnie Hunter’s book, “String Fling” available at the Quiltville website.

You can see a picture of Orca Bay HERE.

Linking to:

To see what other’s in the quilting world are working on – click on the following links:

Happy Quilting!
Gail


SaveSave

Sunday Stash – Feb. 25, ’18

Summer Envy is complete! Including label and binding!  The quilting was pretty quick – just an easy swirl. I used 6 ½ bobbins of thread and while watching 7 episodes of “When Calls the Heart” on Netflix.  Season 3 is now available in Canada.  And – just for the non-Canadians reading my blog who have watched this series: the Mounties (also called RCMP: Royal Canadian Mounted Police) do NOT wear their red serge outfits for normal work, only for special ceremonies.

feb-18-62.jpg

IMG_1452

The binding is the left-over trimmings from the back of “On Ringo Lake.”  It is a perfect match!  (Probably because it’s from the same fabric line! ~grin~ )

PHD in 2018 Update

On Ringo Lake and Summer Envy were both completed this week!  WhooHoo!!!  That makes for a total of 12 UFOs completed this year.  And 2 big quilts this week! (Yes, I did complete a retreat bag, but that was started this year, so it’s not a UFO and doesn’t count towards my PHD in 2018!)

Screen Shot 2018-02-24 at 9.30.34 PM

Stash Report

  • On Ringo Lake: Used 23 yards
  • Retreat bag: 1.25 yards
  • Summer Envy: Used 16 yards

Image result for images fabric stash clip artI went shopping yesterday … just for some med-heavy weight interfacing.  I’m out and there’s a sale on.  Of course, I had to check what else is in the store and ended up buying 1 ½ yd of flannel for backing and ½ yd for accent.  This is for a baby quilt that I NEED to make.  I hope the baby is a girl, ’cause I bought pink.  If the baby turns out to be a boy, I will have to go shopping again, uh, shop my stash! Image result for Free smiley Clip Art


Fabric Used this Week:    40.25  yards  
Fabric Used year to Date:  92.1  yards
Fabric Added this Week:    1.5  yards 
Fabric Added Year to Date: 10 yards
Net Fabric used for 2017:  82.1  yards 

Linking to:

To see what other’s in the quilting world are working on – click on the following links:

Happy Quilting!
Gail

Brrr … and a finish

Image result for Free Quilting Clip ArtIt’s cold for here …  and this picture is exactly what I want to do!!!

Yesterday, I puttered around, ironing pieces of fabric … pressing a zillion blocks …

I decided to take a break from quilting and binding and started working on the one project I started this year that I have to finish … a retreat bag – similar to one I made for my sister.

Then I realized that I cut 4″ corners, not 3″ corners … I did check the pattern and I know I saw 4″ … but that was for the distance up from the bottom for pocket placement.  Grrrr ….  Then, I came to terms with the fact that it will be a boxier bag … Then, I couldn’t find the zipper … I added the pockets to the lining … and decided that I should work on binding my “Summer Envy.”  But, I didn’t want to.

SEW … I found the zipper (it had fallen on the floor under my cutting table) … and I finished the retreat bag. The one on the left is the one with 4″ corners, the one on the right has the 3″ corners (which is how it’s suppose to be).


This bag was not a UFO – so I can’t count it as one … but I can include the fabric on my tally: 1 ¼ yards!

Linking to:

To see what other’s in the quilting world are working on – click on the following links:

Happy Quilting!
Gail


SaveSave

Impressive Speaker!

Last night at our guild meeting, we had Barb from Coach House Designs as our guest speaker.

WOW!

Barb designs quilts for Moda – before the fabric is in the stores.  I’m not sure how many patterns she has – but it’s safe to say that she has designed a plethora of patterns.  A few have similar themes, but all are unique.  Many of her patterns have crap-lique (appliqué) on them – but she kept saying “it’s easy.”  I’m not sold on that (yet) .  Image result for wink smiley face free image  She showed many of her quilts that she made from her patterns. A few were made by her friend.

And … she gave every attendee a free pattern and a list of the quilts that she showed at our meeting.  SEW FUN!

Another BONUS, her website has an app that helps with colour placement and change.  It’s FREE and FUN!  (link below)

You can take one of the patterns, choose a different fabric line and make your own changes.

The first is a picture of the original pattern “Bee Inspired”.   The others are done with other fabric lines (French General & Kansas Troubles.)

SEW …. go to Coach House Designs (click HERE)

Click on Fab Switch App … download it and start having fun!

*** WARNING *** this app can take up your time!

AND – you can order the pattern as well!

Please NOTE:  I have no affiliation with Coach House Designs.

My Progress:

I’m almost finished quilting “like Gina’s Comma.”  As I was trimming it, watching the odd snowflake fall, I decided to call the quilt “Summer Envy.”  I knew that the backing was just about the same size as the front.  Here’s what’s left of the trimming of the back: Not even enough for one 2″ square!  That’s what I call “cutting it close!” Hopefully the quilt will be finished tomorrow  … with binding??  maybe.

IMG_1449

Linking to:

To see what other’s in the quilting world are working on – click on the following links:

Happy Quilting!
Gail

Feb. 19, ’18: Monday Design Wall

SaveSaveSaveSaveSaveSave

Sunday Stash – Feb. 18, ’18

 IMG_1429.JPG

The binding is going on “On Ringo Lake.”  It should be finished later toady!

Yes, the binding is glued down and has dried – so it’ll be an easy finish!  I hope!

It snowed last night, so if I hurry, I might get a picture of the quilt with some snow!

PHD in 2018  Update


And once On Ringo Lake is finished – that will be 11 UFOs.  AND there will still be 1 ½ weeks left in Feb.!   My initial goal was to complete 3 UFOs in the first few months of the year and then complete 2 a month for the rest of the year.  If I keep this up – I should be able to get more than 28 done!  Which will lower my UFOs for next year!  WooHoo!  But, I should quit talking, about what might happen and get on with what is happening! (More quilting!)

Stash Report

There was no pop-up store at the retreat – so I wasn’t tempted to shop.  A couple of the ladies drove out to Hamels in Chilliwack  … now that was tempting!  And another group went to A Great Notion in Abbotsford … I stayed at the retreat and sewed and resisted temptation! The Charming Bag used 2.6 yards of material

Fabric Used this Week:     2.6  yards  
Fabric Used year to Date:  41.85  yards
Fabric Added this Week:    0  yards 
Fabric Added Year to Date: 8.5 yards
Net Fabric used for 2017:  33.35  yards 

Linking to:

To see what other’s in the quilting world are working on – click on the following links:

Happy Quilting!
Gail

Friday – MORE …

MORE photos from the retreat

These photos were taken by our guild photographer, Irene Hamilton.  She’s one talented lady!  She had posted these on the guild’s Facebook page and gave me permission to copy them, giving her credit for the photography.  

This slideshow requires JavaScript.

The slide show with pictures I took can be seen in Wednesday’s post HERE

MORE about PHD in 2018

My 10th UFO is finished!  Woohoo!!! And it’s just past the middle of February!  I may be able to get 28 UFOs done this year … if I keep going at this rate!

This is a picture of the “Charming Bag” – a front view and a side view.  It uses Soft & Stable or a foam as the base. It is a fairly large bag – which is wonderful! And the foam helps it to sort-of stand up.   You can get the pattern at Fabric Expressions.  They also have kits available.  Check HERE.

MORE of My Progress at the Retreat

Remember this picture?

Here’s what I got done:

  • On Ringo Lake – about half of it is quilted
  • Charming Bag – done (see picture above)
  • Retreat Bag – the strips are sewn onto the foam.  I forgot the lining and my pockets at home – so couldn’t finish it. This is a new project – sew – it has to be finished this year in order for me to receive my own PHD!
  • Fractured Paint Box – made progress on 10 blocks

MORE Links:

To see what other’s in the quilting world are working on – click on the following links:

Happy Quilting!
Gail


Retreat Fun!

I got back from a fabulous retreat this afternoon.  Oh – what fun we had!  Lots of sewing got done!  Unfortunately, I didn’t get any pictures of my projects in progress.  And, I’m sure that I missed a few of the projects that were being put together.

And approximately 4″ of snow fell … snowball snow … and for some reason, some of it ended up down my nightgown … but we weren’t really fighting!

IMG_1383 2


This wall hanging was spectacular!  It included crayon (heat set), embroidery and piecing.

The expertise and talent at the retreat was amazing!

A few quilters “webbed” their quilts together.  It was the first time they had tried it.  I believe it won’t be their last time!

Another quilter did her first machine quilting and did an fantastic job!


There were a few guild mystery quilts put together.  Totally different jelly rolls were used, and the effect is somewhat similar (because they both had red in similar locations), and yet totally different!

And yes, the quilt on the right was getting fixed as I left!

Each one of the pictures has a story to tell.  But I’m tired and about to go to bed.  Enjoy the Show!

Linking to:

To see what other’s in the quilting world are working on – click on the following links:

Happy Quilting!
Gail

SaveSaveSaveSave

Sunday Feb 11

Image result for quilt retreat clipart free

I’m off to a retreat again!  I am so blessed to be able to attend retreats!  They are a lot of fun! And I get lots done. Usually, as long as I sit and sew! Ummm …. ya right … hmmm :  there’s the visiting, the eating, the games and all sorts of other distractions!

As usual, I’m taking way more than I can possibly get done!  Here’s what I’ve packed and am dreaming of completing.  All, except for one are UFOs.

  • On Ringo Lake – quilt & bind it
  • Charming bag – get it completed
  • Retreat bag (new project, but like the one I left for my sister) starting from the beginning
  • Fractured Paint Box – get blocks completed and top assembled.

Another finish!!!  WooHoo!!!
Feb '18-3

This was a quilt that was languishing on top of my filing cabinet.  I was not wanting to deal with it because I had to piece the back.  (See HERE.)  Well, it got quilted this week.  I had to make an adjustment to one of the corner blocks …  the flying geese are suppose to be pointing into the quilt, not at this angle.  I realized it when I was quilting these 4 corner blocks.   Thankfully, it was an easy fix as I hadn’t quilted the border yet.  It was fun to do the quilting in the negative space.

Feb '18-2

This is a pattern by Carol Doak … it was a mystery quilt in 2012/13 … but I didn’t do it as a mystery.  A friend had shown me how to paper piece without sewing on the paper and I figured this was a good quilt to try it out on.  I started this quilt in 2014.  I’m not a huge fan of purple, but I do like this quilt!

Sandwiching Marathon!

Feb '18

My husband helped me sandwich 5 quilts over the last couple of days.  I spray baste and since I’m using Hobbs 80/20, I have some pins in each one.  (I find that with the big quilts – the batting shifts way more than when I use warm and natural – but I like how the Hobbs drapes).

From Top to bottom they are:

  • Guild Mystery Quilt – Queen
  • Scrappy Bargello
  • Labyrinth #2
  • “Like Gina’s Comma” (don’t have a better title yet)
  • On Ringo Lake

I’m thinking that if they are sandwiched and the labels made – they may get quilted.  Ha! Ha! Ha!

PHD in 2018  Update

Screen Shot 2018-02-10 at 2.22.47 PM

Stash Report

No shopping = no fabric added!!!   And 2 finishes this week : the Charm Star and the Carol Doak purple quilt.

Fabric Used this Week:     15.5  yards  
Fabric Used year to Date:  39.25  yards
Fabric Added this Week:    0  yards 
Fabric Added Year to Date: 8.5 yards
Net Fabric used for 2017:  30.7  yards 

Linking to:

To see what other’s in the quilting world are working on – click on the following links:

Happy Quilting!
Gail

Happy Friday

On Ringo Lake

I was sandwiching my ORL today with the help of my husband.  His hand found a hole and he ripped a 9 patch out.  I couldn’t figure out what happened until I looked close:  one of the seams was about 1/32″ … not very thick!  At least it’s an easy fix! And it was found before it was quilted …

Binding Tutorial

Due to a few request – Here is a PDF file  Quick Machine Binding Tutorial

Linking to:

To see what other’s in the quilting world are working on – click on the following links:

Happy Friday

Happy Quilting!
Gail

SaveSave

Donation Quilt – Done!

PHD in 2018

Another baby quilt for the guild is Done, Done, Done!  This quilt has been sitting in my “to-do” pile since last fall.  The guild had a “Baby Quilt Kit Making” day.  It’s always fun to go and kit up fabric that is not my own!  I made a couple of kits, but I brought this one home with me.  While I was at my sister’s, I realized that I needed an Easy Angle to make the half-square triangles.  I had cut strips that were 5″ wide and didn’t have enough to sew squares in half … My sister phoned her neighbour to ask if she had an Easy Angle.  She did!  BONUS!  I quickly put on my parka, my mitts, my extra leggings, extra socks and  went over to her house to get the ruler.  It made short work of the half square triangles.

This is UFO #8!!!!

BBQG.jpg

Quick Machine Binding Tutorial.

Did you see my Quick Machine Binding Tutorial?  You can find it HERE.

Linking to:

To see what other’s in the quilting world are working on – click on the following links:


Happy Quilting!
Gail

SaveSave

SaveSave

Quick Machine Binding Tutorial

For awhile, I’ve been saying that I would post a tutorial for binding using your machine.  No hand sewing.  I’ve highlighted the “Quick Tips“.  Some of the steps will be familiar to you, some may be totally “what???” … sew … here goes:

Step 1: Cutting the Binding

Figure out the circumference of your quilt.  (Measure both sides of your quilt, multiply that number by 2),   Add 14 – 20″ to the circumference.  If you want – you can use this handy app from Robert Kaufman.

IMG_1287Decide on the width of your binding.  If there are points on the sides of the quilt that I don’t want to lose, I cut my binding at 2″.  If there isn’t, I cut it at 2 1/4″.  For this tutorial, I cut the binding at 2 1/2″ because it’s flannel on both sides and a little thicker than most quilts and I don’t want to have to fight with it.

IMG_1292Step 2: Joining the binding

Join binding into one long piece with a 45 degree angle.  You can mark it or “eyeball” it.  Chain each piece of binding to the next.

IMG_1294

Quick Tip #1:  Do NOT cut the chains apart (unless you want a huge tangled mess.)  Leave the chain joined together.  I know this is not the way most people do it – but try it!

IMG_1295

Quick Tip #2: Do NOT fold binding in half

Do NOT press the binding in half

Your quilt is about 1/16th of an inch thick.  By folding and pressing the binding in half – you are forcing the binding to fold in a position that is actually pulling it to one side.  It will naturally lie smoother if you do not press it in half.

Step 3:  Sewing the binding onto the quilt

Fold the binding in half (DO NOT press the binding).

Leave approximately 8-10″ of a tail on the binding.  Start attaching the binding to the BACK of the quilt. Use a ¼” seam.  Sew about 3″. Cut the thread.  Check to see where the fold lands on the front.  It should cover the stitching, but you don’t want a lot of extra binding with no batting in it.  On this quilt I moved the needle over to the left so it was a wide ¼” seam.  {Janome 6500 – needle position 3.0, using the ¼” foot}

Quick Tip #3: ***   It’s a good idea to put a pin in approximately 16″ from where you started so that when you sew around the quilt, you leave a good amount of space for joining the binding. ***

When approaching the corner, stop ¼” from the edge.  (First picture below). Cut the thread.

The middle picture shows me folding the binding up at a 45 degree angle.  Place a ruler on the side of the quilt and line the binding up along the ruler.  This will help to ensure a perfect 45 degree angle.  The last picture above, shows the binding folded down.  Begin sewing approx. 1/8″ from the end and sew to the next corner.

IMG_1304Quick Tip #4As you reach the joined edges of the strips, use a pair of scissors and trim at approximately ¼” from the seam.

Finger press the seam open (sometimes it helps to hold this in place with a pin)

Continue to sew binding on, stopping approximately 16″ from where you started.


Step 4: The final joining of the binding

Pin the original tail in placeIMG_1313


IMG_1310 Quick Tip #5Take a piece of binding and place the width of it over the tail – having ~ 1/8″ over.  (This helps the binding to be “tight” and not loose and sloppy when you sew it on the quilt.

You can measure this if you want … it’s the width of the binding, subtracting 1/8″


IMG_1311  Bring the left over binding down to the bottom of the overlapping width of binding.  Trim the left-over binding at the bottom edge.

Join the binding together with a 45 degree seam (as you did when originally joining the binding strips).  Finger press seam open and finish sewing the binding onto the quilt.


Step 5: Clipping the Corners

IMG_1320

Quick Tip #6:  On each of the corners, fold back the binding and clip the quilt top, batting and backing.  It’s a small clip, but it makes the world of difference when you are turning the corner of you binding!

***  Just be careful to not clip the binding  ***


Step 6: Press the Binding

IMG_1318Quick Tip #7: On the back side of the quilt, press the binding away from the quilt, ensuring that you do not press a fold in the binding.


Step 7: Glue the Binding in Place

I use Elmer’s School Glue (diluted 1:1 with water).   Start at a corner and on the right side of the corner (middle picture) run a stream of glue on the binding.  It tends to “bead up” as you can see in the picture.  Fold the binding over and iron in place.  IMG_1326

Ensure that you fold all of the corners in the same method. This will ensure that you don’t have a “bump” as you sew the binding down .


Step 8 Sewing the Binding onto the Front

With the binding glued into place, this step is simple, simple, simple!

You can use a variety of stitches to finish the binding.  When I first started sewing binding on by machine, I used a serpentine stitch.  It’s like a curvy zig-zag.  Other choices include a zigzag, a blanket stitch and a straight stitch or ??? Your choice.  IMG_1329

Step 9 Congratulate yourself – your binding is on and DONE!!!


Monday’s Design wall: Feb 5 ’18

The New Quilter’s Blog Hop 

2018-New-Quilt-Bloggers-Blog-Hop

Registration is now OPEN!

If you are a new Quilt blogger (less than 3 years), go and register.  They are limiting registration to 100 … so register soon!

This is what it’s about: The goal of the 7th annual New Quilt Bloggers Blog Hop is to provide advice, tech help, and introduce new quilters to the online community.

I joined this last year.  It was a great experience!  I learned a ton.  I’m joining again this year as I still have a ton to learn!

if you want to register go HERE.

Design Wall / Quilting

IMG_1262 
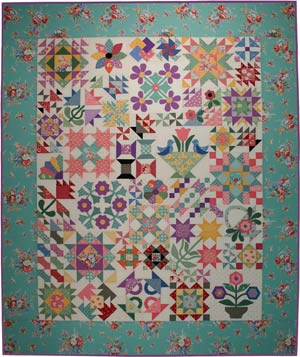
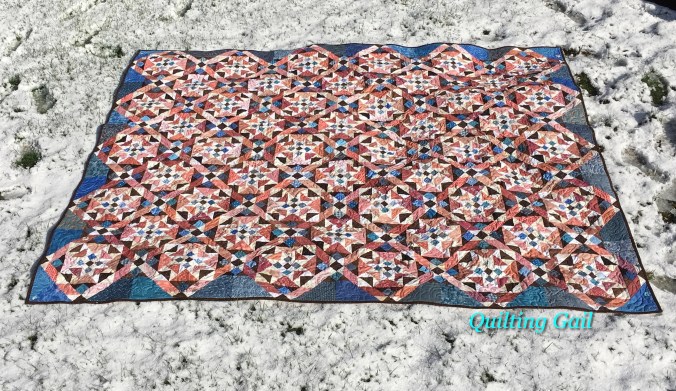
I’ve started quilting my Carol Doak paper pieced quilt.  This is one of the quilts that was on top of my filing cabinet and I was reluctant to tackle them.  I made the pieced back and sandwiched it in early January.    I’m looking forward to having this UFO done!  So why am I FMQ stitch in the ditch?  Its so slow …  but then again, it’s what this quilt is calling me to do.

Fractured

I’m sewing with friends today!  YEAH!!!   I will be working on more of these blocks.  The pattern is “Fractured Paint Box” by Judy Niemeyer.   It’s a paper-pieced pattern that I’m doing without sewing on the papers. I started on this one in 2016.

Linking to:

To see what other’s in the quilting world are working on – click on the following links:

Happy Quilting!
Gail

SaveSaveSaveSaveSaveSaveSaveSave

PHD Update – Feb. 4, 2018

Well, as much fun as it was being at my sister’s.  I’m glad to be home.  It was -20 C and snowing when I left Edmonton.  +9 C and raining when I landed in Abbotsford! (Need I say more about that?)

My sister is working very hard on her physio.  It takes her about 5 hours a day to run through all the exercises and leg elevation ice treatments.  And she has hourly exercises as well.  She’s a busy gal!  I know that my sister will be well taken care of with me gone.  She has a friend (who is a quilter), that is willing to drive my sister to appointments – so now that she’s well on the way to recovery – it’s about all she needs now.

And the Super Bowl is on today.  I’m not a sports fan.  There will be eating and yelling downstairs, but I’ll be happily listening to the hum of my sewing machine.

Striped Retreat Bag (Large)

This was finished before I left my sisters.  I gifted it to her.  She then said, “why do I need to learn to quilt if you are going to give me everything I need?”  Ha!  She’ll catch the bug and be addicted pretty soon. Smiley Face Clip Art Free Download | Clipart library - Free Clipart

IMG_1354

Necessary Clutch

The button is now on the Necessary Clutch.  I realize that I should have put the magnet in before I sewed the flap together.  Lesson learned.  Anyhow, my husband and I tried threading thread through under the magnet.  That did”t work.  So, he got out some epoxy glue … it seems to have done the trick.  It should hold since it can glue steel, glass, wood  and a million other things together.

img_1356.jpg


PHD Update


So far this year, I have completed 7 UFOs.  That is way more than I expected by this time of year!  Now, I do realize that I took a lot of small projects to my sister’s – so progress will slow down now as I work on bigger projects.

Screen Shot 2018-02-03 at 7.07.37 PM

PHD in 2018 Participants’ Progress

As I compiled the following list, I was thrilled and excited and overwhelmed by the progress that each participant has made.  You have all worked extremely hard!  Well done ladies!   Here’s Snoopy doing a Happy Dance in the snow!!

  • Terry has 3 quilts done!  Check it out @ Quilting a Legacy
  • Roseanne @ Homesewn by Us has her update for January posted
  • Elizabeth (Beth) has her list and goals updated on her blog Appliqué and ...
  • Kate @ Life in Pieces has complete her OMG for January.
  • Ann @ Laughing Gas Quilts has her list updated!  She’s hoping that she doesn’t get in trouble for changing a table runner into a tote.  To me it doesn’t matter – it’s off the UFO list – so therefore it’s DONE.
  • Emily also has 3 projects done.  You can check out her post @ The Darling Dogwood
  • Deana’s finishes and goals are posted at Dreamworthy Quilts.  She made Bonnie Hunter’s “Grand Illusion” and I LOVE how she finished it!  (The checkerboard blocks were suppose to be the sashing … she used it for a top and bottom border!  Great idea!)

Stash Report

I haven’t been diligent at adding up my fabric used. So, here’s a list to make sure I’ve got it correct.

  • Scrappy Irish Chain – 7
  • Flannel Fat Quarter – 9
  • House Quilt – 2.5
  • Small retreat Bag – 1.25
  • Large retreat bag- 1.5
  • Mice – 0.5
  • Necessary Clutch – 1

Fabric Used this Week:     3  yards  
Fabric Used year to Date:  23.75  yards
Fabric Added this Week:    0  yards 
Fabric Added Year to Date: 8.5 yards
Net Fabric used for 2017:    15.25  yards update: my math was out the window with “9” yards … sheesh …

Linking to:

To see what other’s in the quilting world are working on – click on the following links:

Happy Quilting!
Gail

Mice

I finished 2 mouse pincushions.  I started them several years ago with scraps that I had been given by a friend.  One was intended for me and the other for my sister.  I brought them with me to my sisters and finished them.  Yeah!  Another UFO done.  That makes 5 UFOs completed for my PHD in 2018.  One UFO for February!

IMG_1911

My sister is a research scientist – so she picked the one with “atoms”.   She only had 2 glass pins for the eyes – so I’ll add the “eyes” to mine when I get home.  They are more like flying mice as they refuse to stand up … oh well.

Edit: My sister said that she just wiggled the aquarium gravel around to make the mouse stand up. (I put aquarium gravel in a little pouch to give the mouse some weight … I really didn’t want a flying mouse pincushion!)

PHD in 2018

This weekend, I will provide links to all of the bloggers that joined in the PHD in 2018.  I had planned to do this at the beginning of each month, but working on an IPad mini is not easy, so it will have to wait until I get home and work on my computer.

Leaders and Enders

IMG_1913

While I’ve been at my sisters for the past 2 weeks, I have been working on Leaders and Enders and have about 40 4-patches done.  I love making progress on a project without doing a lot of mindless work!

Linking to:

To see what other’s in the quilting world are working on – click on the following links:

Linky Tuesday @ Free Motion by the  River

WIPs on Wednesday @ Esther Quilt Blog 

Let’s Bee Social @ Sew Fresh Quilts

Midweek Makers @ QuiltFabrication

Happy Needle  and Thread @ My Quilt Infatuation

Can I get a Whoop Whoop? @ Confessions of a Fabric Addict

Amanda Jean @ Crazy Mom Quilts  

Finished or Not Friday  Busy Hands Quilts

Sherry @ Powered by Quilting

Happy Quilting!
Gail