I love making quilts. Just had to tell you that, in case you weren’t aware of my passion! But I also like to play!
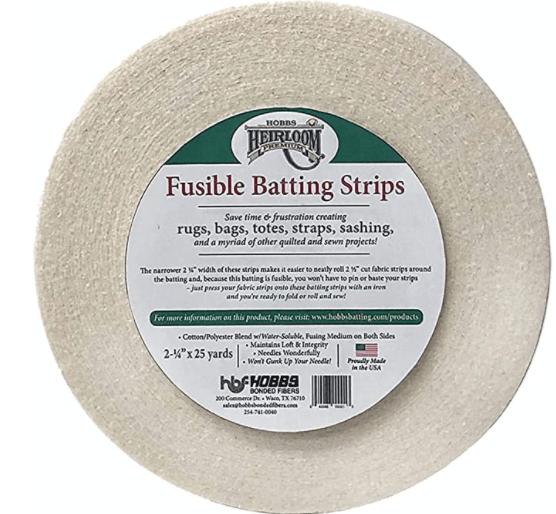
As an Island Batik ambassador, I have received a couple of rolls of Fusible Batting Strips from Hobbs Batting.
I posted about making these bowls HERE. But I figured that I should do a proper tutorial for them.
Last year we received a roll of Fusible Batting from Hobbs. These strips, cut at are 2 ¼” are perfect for 2 ½” fabric strips … but I didn’t want to make another rug … so I got to thinking. My thoughts brought me back to when I originally took a Jelly Roll Rug class (taught by Dawn F. at the Boundary Bay Quilt Guild) and I remember one lady had a horrible time trying to keep her rug flat and she quipped, “I made a bowl.”
Sew … this got me thinking and asking, “Could I make a bowl?” Well, the only way to tell is to try it out!
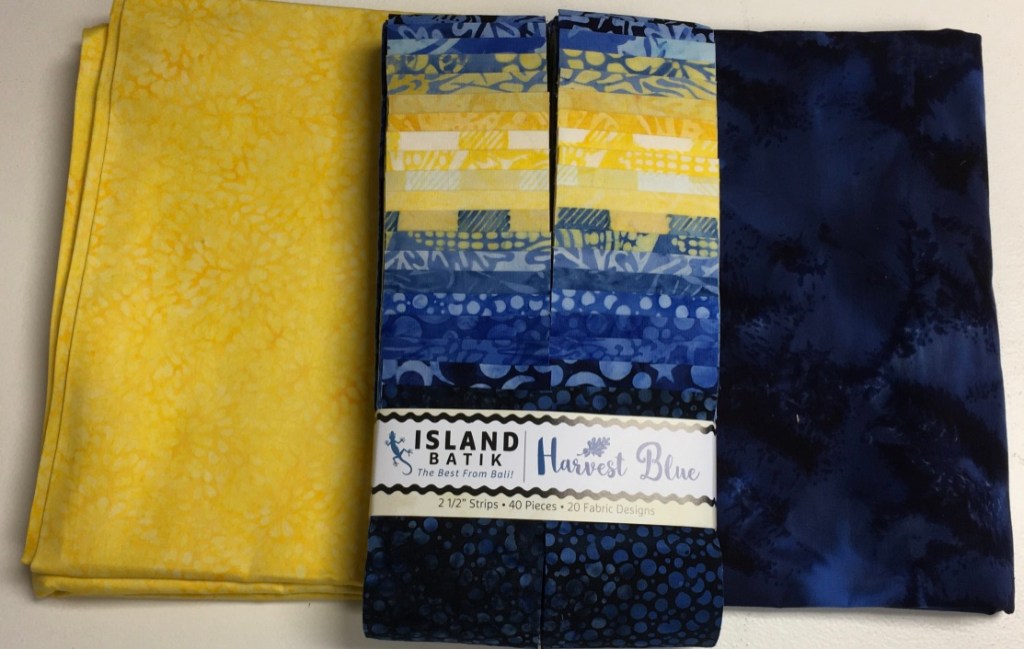
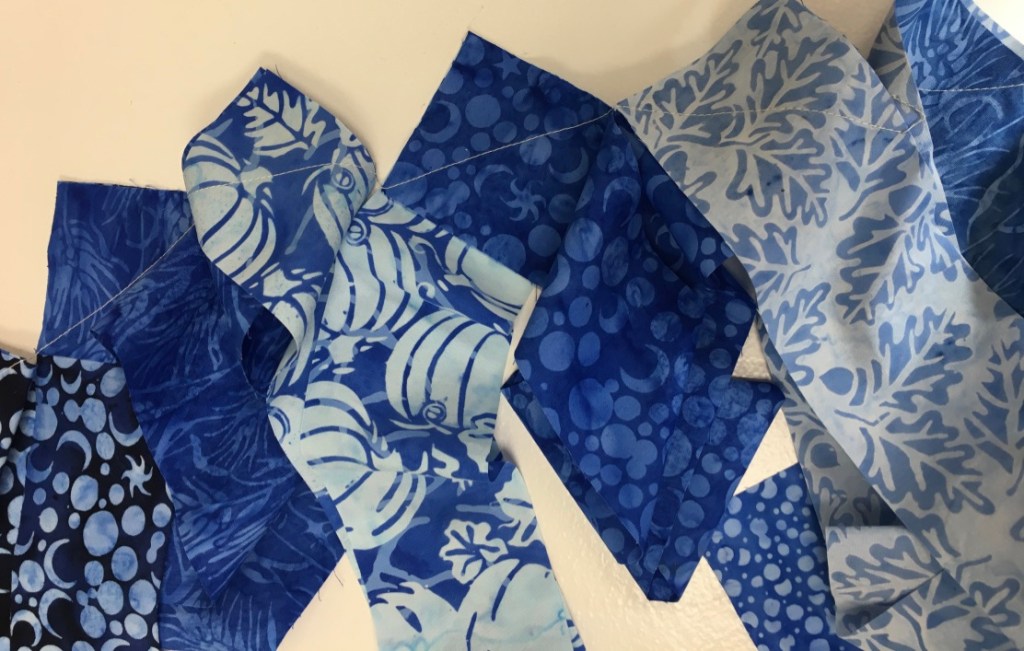
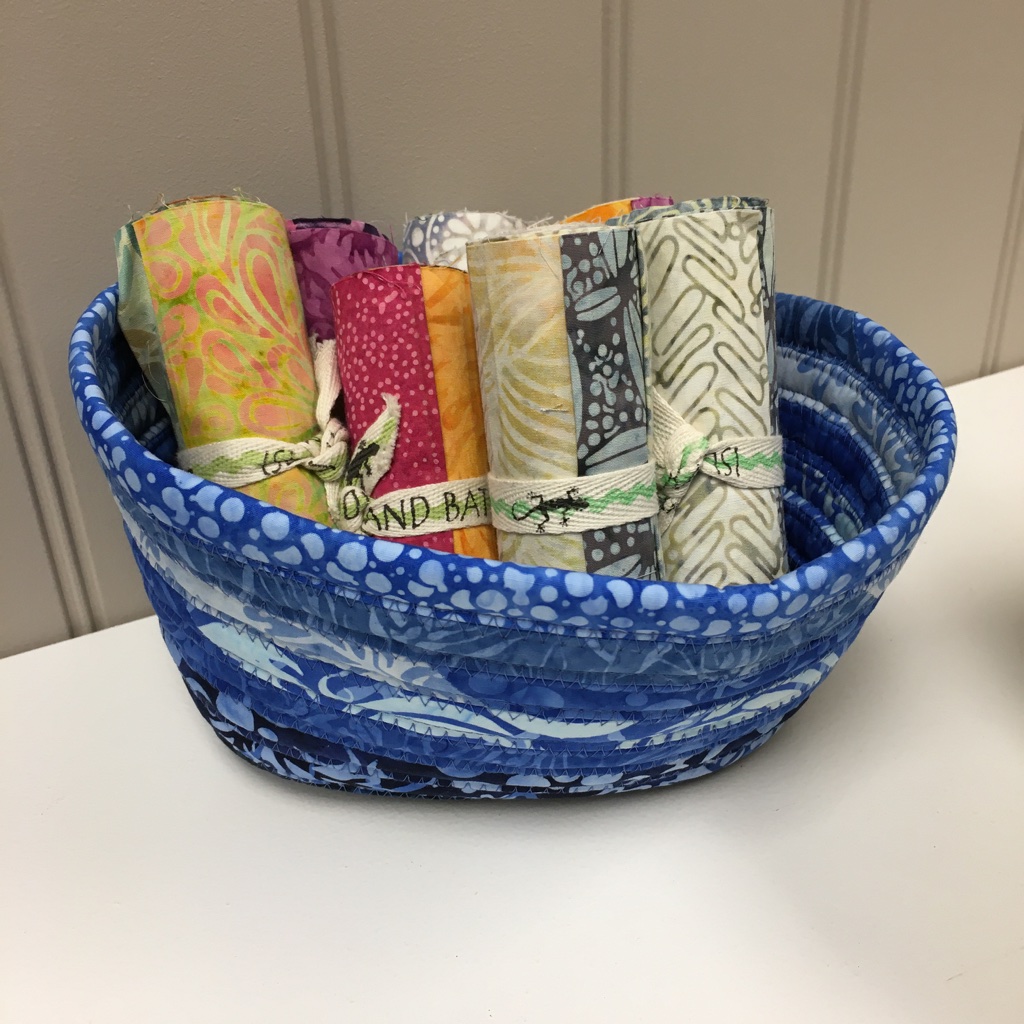
In my January Island Batik box, I received a strip set of the Harvest Blue collection. What a perfect collection to try out a bowl or 2 with.
A Tutorial for YOU!
I took half of the strips and cut them in half. and divided them into a “yellow” and a “blue” pile.
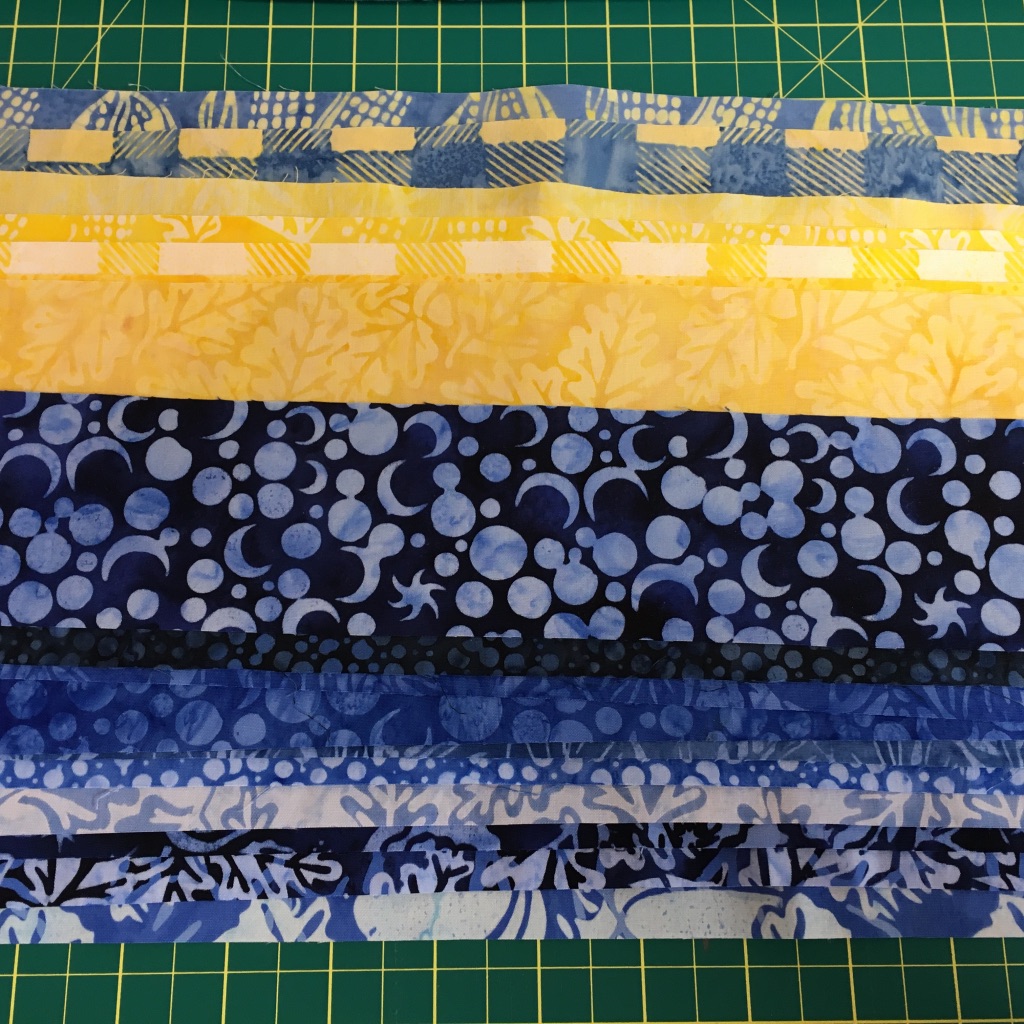
I sewed them lengthwise with a 45 degree angle.

Taper the end. On the Taper one end. On the strip that you wish to use at the end of your bowl, fold the strip in half and cut a piece that is approximately 3” and tapered to ½”.
Place the batting on top and trim the same.
Fold over the ½” end and pin in place.
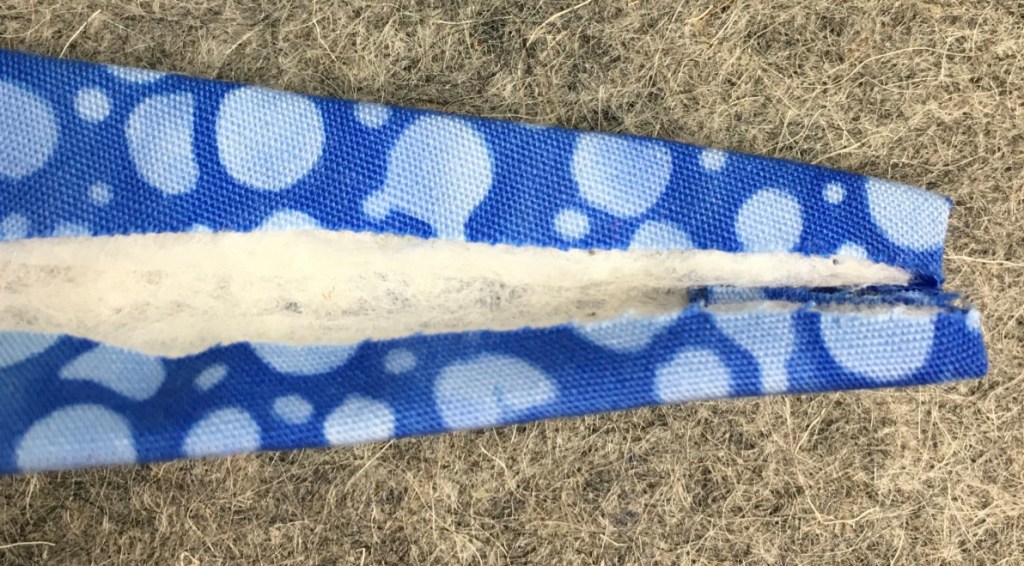
Place the fusible strip on the wrong sides of the fabric. Fold each edge of the fabric strips towards the middle so that no batting shows. Press. DO NOT press directly on the batting!!!!!!!!

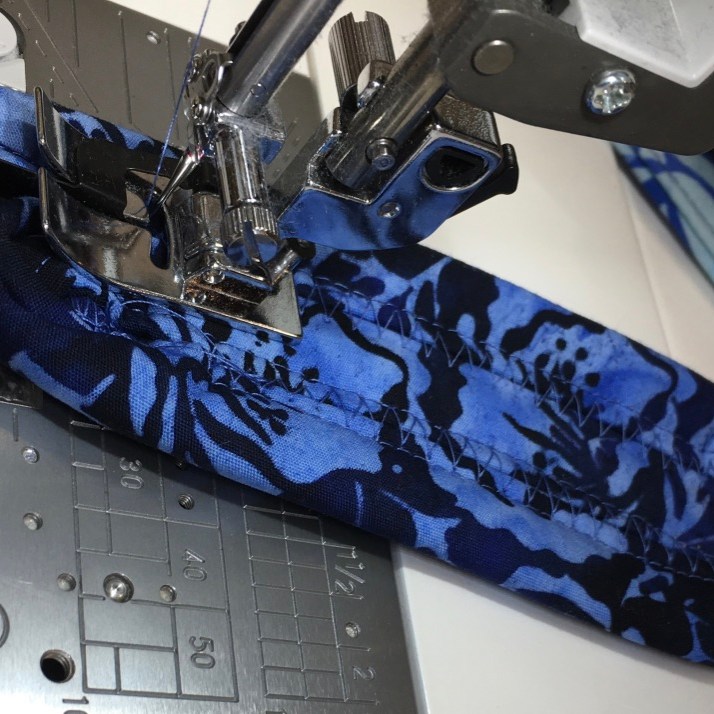
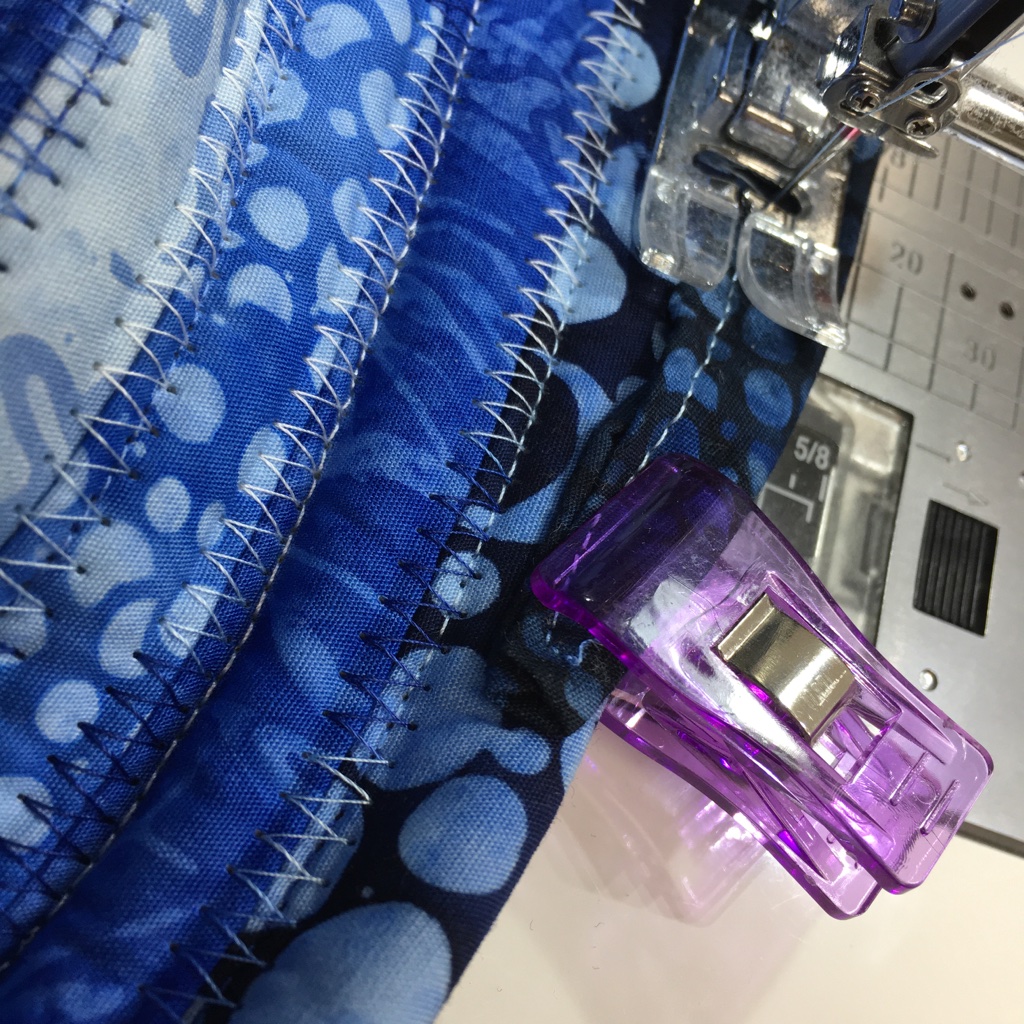
Next, the strip was sewn, using a 1/4″ foot. I wanted a heavier needle for this step, since it would be going through 2 layers of fusible batting and 4 layers of batik. Schmetz Quilting Needle 90/14 to the rescue! On the Yellow one, I used Aurifil #2000 (Light Stand) and on the Blue I used # 1128(Light Blue Violet).

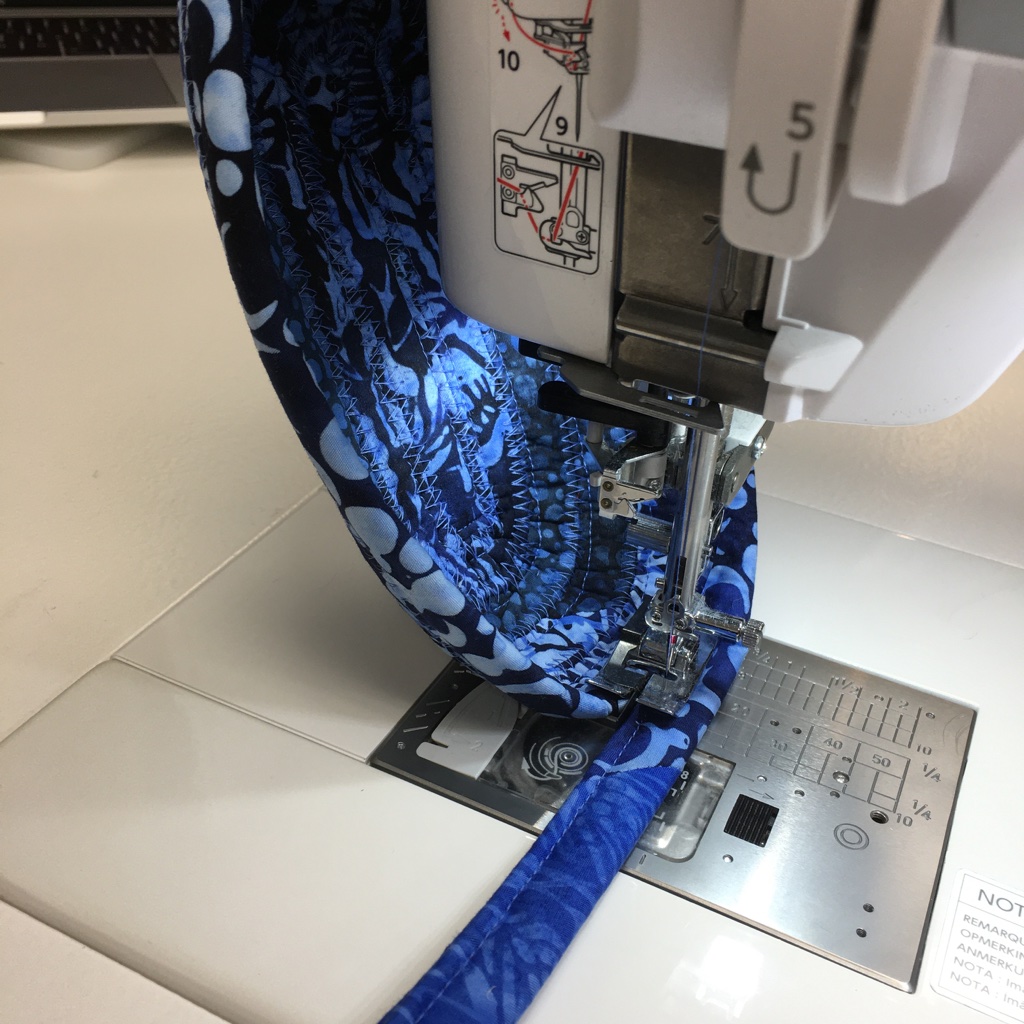
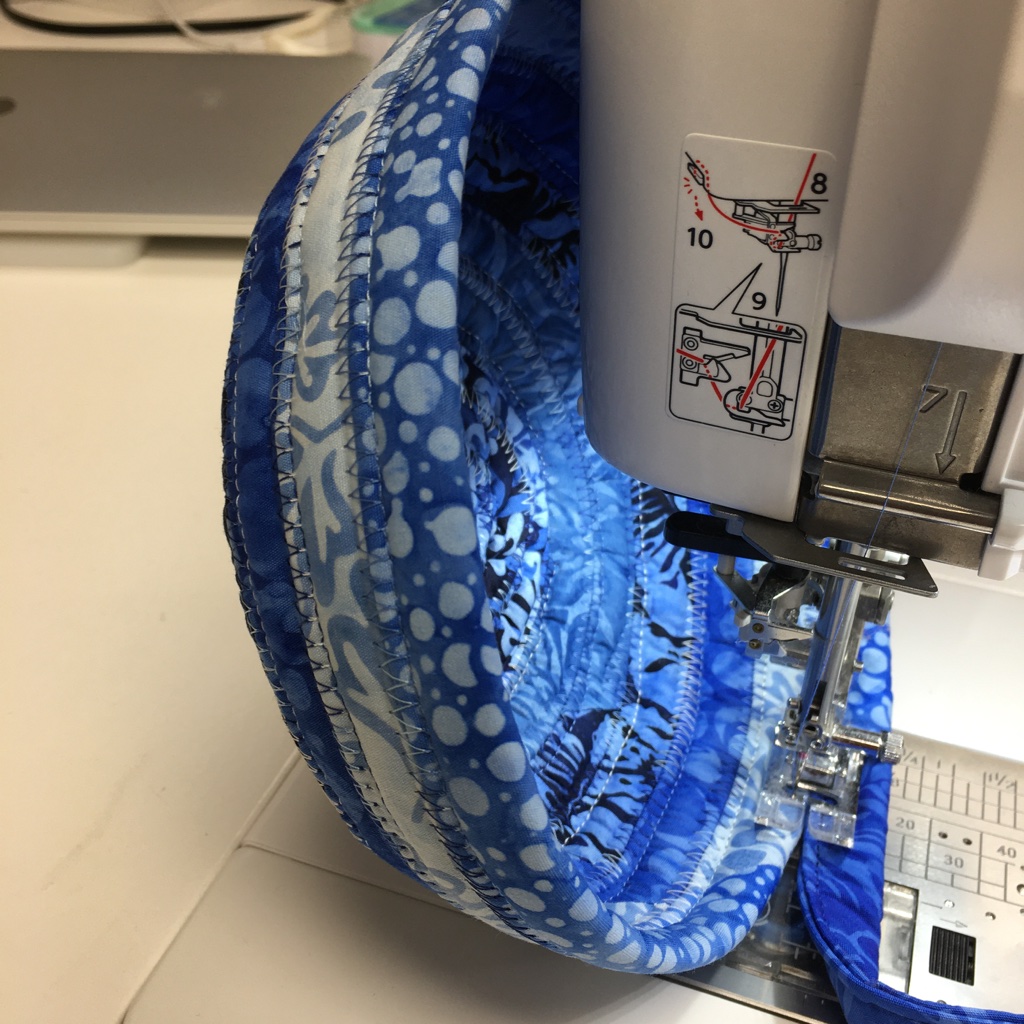
The “putting it together” was started. I used a 7mm wide zigzag and a stitch in the ditch foot. The foot flange was kept between the “new” and the old piece. I attempted to keep it flat. This involves some squishing on the corners and ignoring the wrinkles that appear. The first time the bottom was too rounded and I had to take the whole thing apart. On the 2nd attempt, I managed to keep it flat for about 1.5″ … then I allowed the bowl to curve up. All the time, I worried if I’d be able to keep it going out … I didn’t want the bowl caving in on me! But, it seemed to just go nicely.
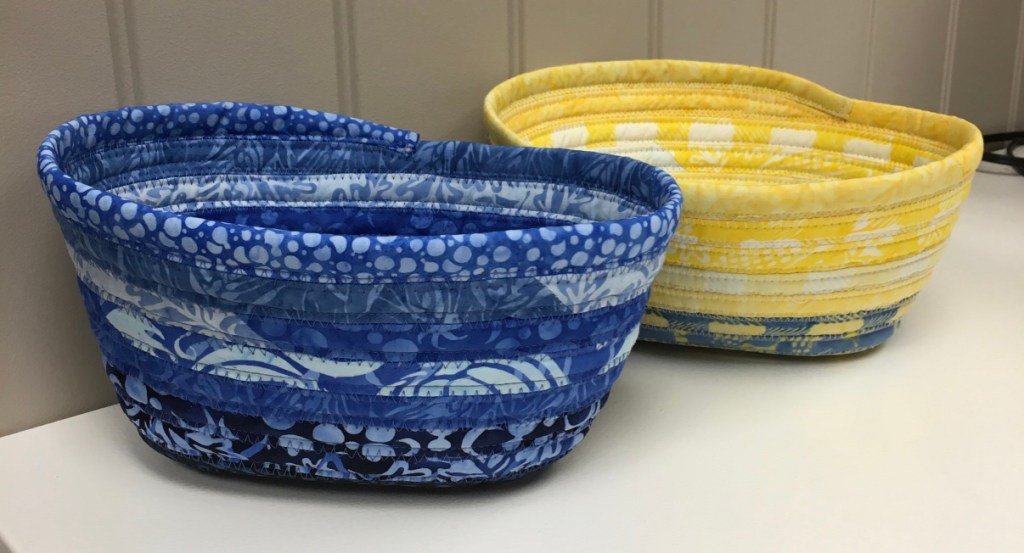
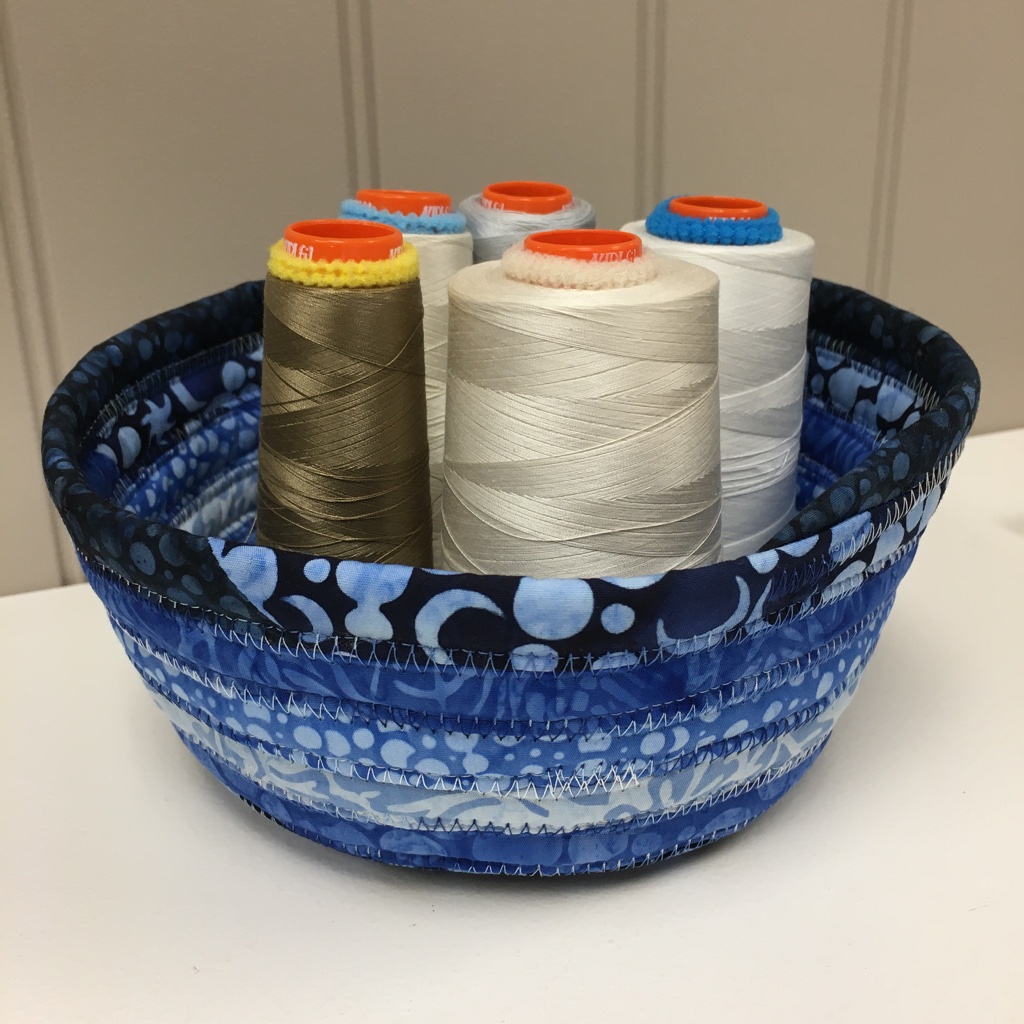
And now I have 2 cute bowls or containers! I love them!
And the basket is perfect for holding Island Batik Stashbuilder rolls!
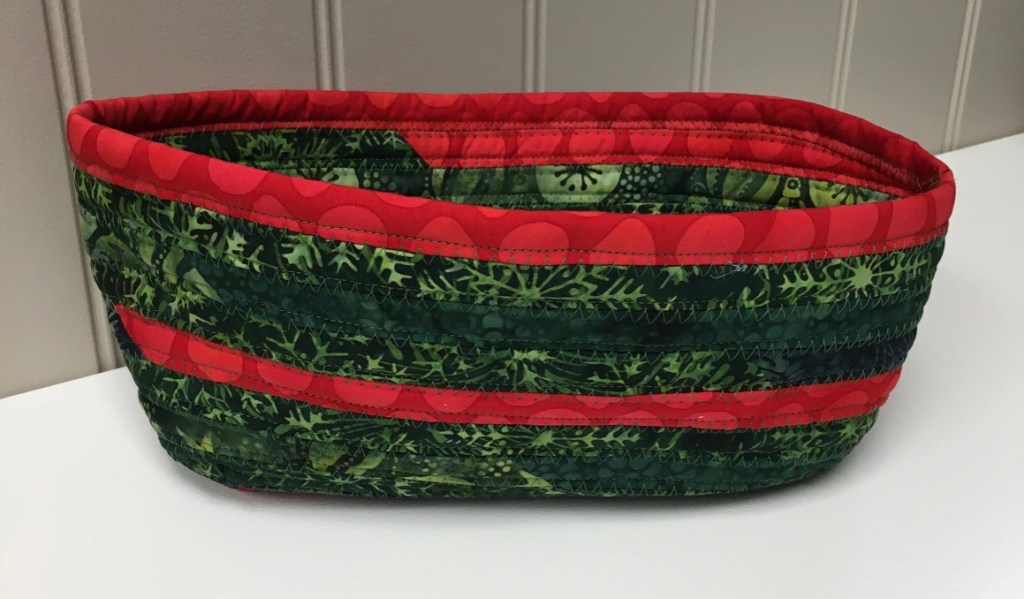
And I made another one for Chirstmas!
Round Bowl
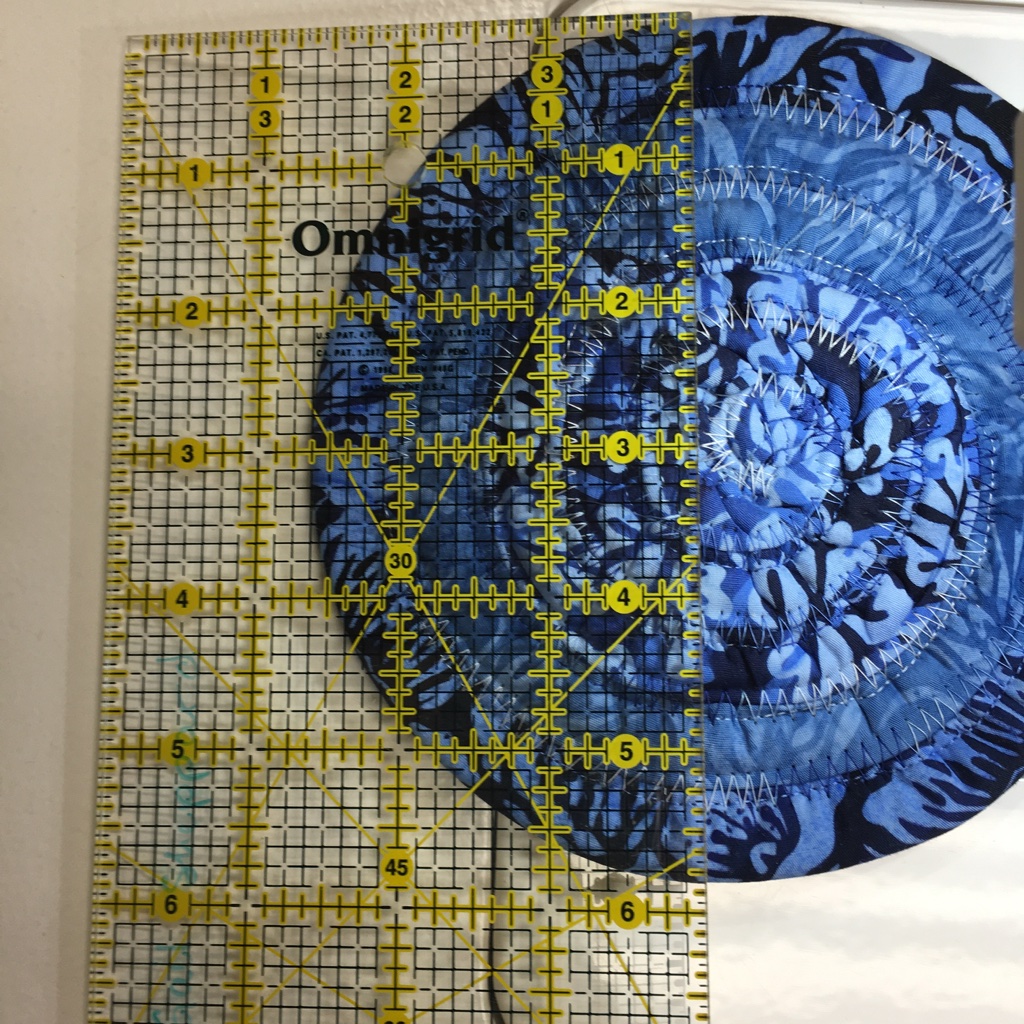
I decided to make a round bowl. For this bowl, I used 9 – 2 1/2″ strips that were 21″ long. I followed the beginning process as outlined above.
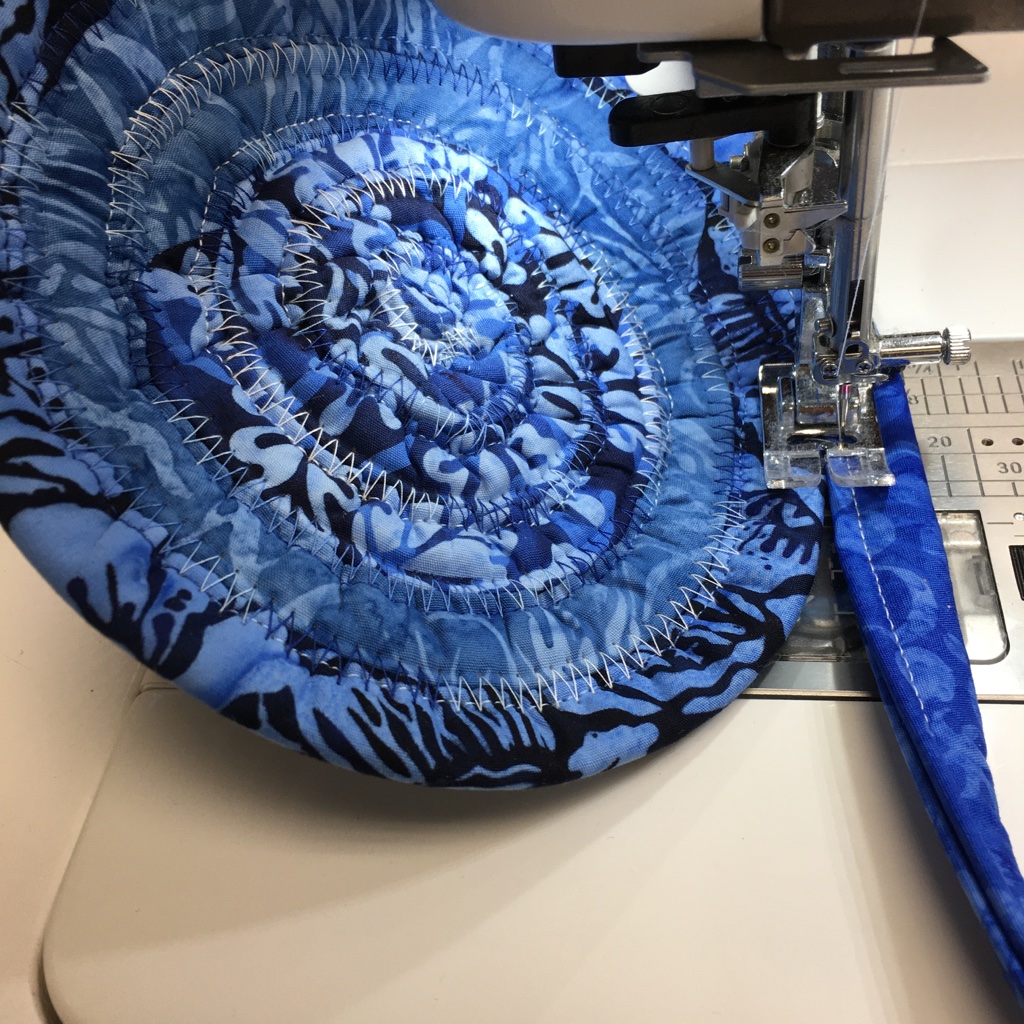
Once the long tape was made, I started sewing in a circle. I made it tight, squishing it in and not worrying about wrinkles. The main goal is to keep it flat. I continued sewing in a circle, squishing it as needed to keep it flat.
Once I made about a 6″ circle, I started to go up the sides. This meant I held the circle up and continued to zig zag the pieces together.
To finish the end, I simply folded the tapered end over the previous row and continued to zig-zag. At the end, I backstitched a couple of stitches and secured the end with a lock stitch.
The end basket is 6″ round and about 3 1/2″ high.
Questions:
Do I have to use fusible batting strips?
No … you can use left-over batting from your quilts. Just make sure that it is the same type of batting. Don’t mix Hobbs 80/20 with Hobbs Polydown. The results will not be the best. If you are using left-over batting, make sure that you cut your strips at 2 1/4″. It will make it much easier.
TGIFF

Link up and show us what you have done!
One who sleeps under a quilt is covered by LOVE!
Happy Quilting!
Gail
******************
Linking to:
- Midweek Makers @ QuiltFabrication
- Wednesday Wait Loss @ Inquiring Quilter
- Happy Needle and Thread @ My Quilt Infatuation
- Andrée / Free Motion Mavericks @ Quilting & Learning – What a combo!
- Put your Foot Down @ For the Love of Geese
- Can I get a Whoop Whoop? @ Confessions of a Fabric Addict
- Finished or Not Friday @ Alycia Quilts
- Sherry @ Powered by Quilting
- Michelle @ From Bolt to Beauty
- Off the Wall Friday @ Creations – Quilts, Art, Whatever
- Peacock Party @ Wendy’s Quilts and More
- Tips and Tutorials on the 22 @ Kathleen McMusing

What an interesting technique, Gail!
LikeLiked by 1 person
Thank you!
LikeLike
I have to find some time to make these! They are so cute. Thanks for the tutorial, and for sharing on Wednesday Wait Loss.
LikeLiked by 1 person
Hi Jennifer,
They don’t take a lot of time to make, but I do know that you are a super busy lady … so finding the time can be a challenge.
Thanks for hosting Wednesday Wait Loss! 🙂
LikeLike
Hi Gail, those are really great bowls. Thanks so much for your tutorial. Now I have something to make with all those strips of batting that I have!. Thanks so much for linking up to Free Motion Mavericks.
LikeLiked by 1 person
Hi Andrée,
I hope I get to see the bowls that you make!
And thanks for hosting Free Motion Mavericks! 🙂
LikeLike
Great tutorial! I especially appreciate the tip of what to do with the ends. I have batting, just need to decide what fabric to try it with!
LikeLiked by 1 person
Hi Emily!
I’m glad you now know what to do with the ends! Have fun picking out your fabric! 🙂
LikeLike
Your bowls are so beautiful! They would look great on any shelf anywhere. Whatever you put in them will be wonderful!
LikeLiked by 1 person
Thanks, Sue! I think the bowls will all be used in my sewing room! … or should I say studio? 🙂
LikeLike
Pingback: Transparent Building Blocks {Finished Quilt & Pattern Release} – Quilting Jetgirl
Very fun bowls, I might have to try one some day! I have done a few rope ones and they were fun to make.
LikeLiked by 1 person
Hi Vicki,
Apparently these are easier to make than the rope ones … I can’t say for sure, I haven’t made a rope one, but a friend of mine told me! 🙂
LikeLike
Your bowls are too pretty for words! Thank you Gail for a great tutorial. I can actually follow what you are doing so I might be brave enough to try one after I go to my LQS and get some fusible batting.
LikeLiked by 1 person
Hi Carol,
Thank you!!! You can also use regular batting … cut the strips 2 1/4″ and follow the same process. It will involve more clips – but the end result will be the same!
Happy Quilting! 🙂
LikeLiked by 1 person
What a great use for that fusible batting!! Love the bowls.
LikeLiked by 1 person
Thanks, Brenda!
LikeLike
They are really cute bowls! What a fun way to use up batting, too!
LikeLiked by 1 person
Thanks, Wendy! And they are easy to make! 🙂
LikeLiked by 1 person