Oh ya!!! I started ANOTHER new project. When my cousin, Connie and I were shopping at the Cloth Shop, we saw these super nifty bowls. I fell in love!!! However, they did not have the pattern in stock. But a couple of weeks later, I was at Chitterchatter fabrics and they had the pattern. Of course I had to buy it! There are 7 different sizes included in the pattern. The pattern is “Goodness Bowl” by Jean Paccagnan. There is even a great youtube video to go with the pattern! And BONUS: Jean Paccagnan is a local designer!!!
I know it’s English Paper Piecing, but if I only sew for about 10 minutes a day, I’ll eventually get it done!
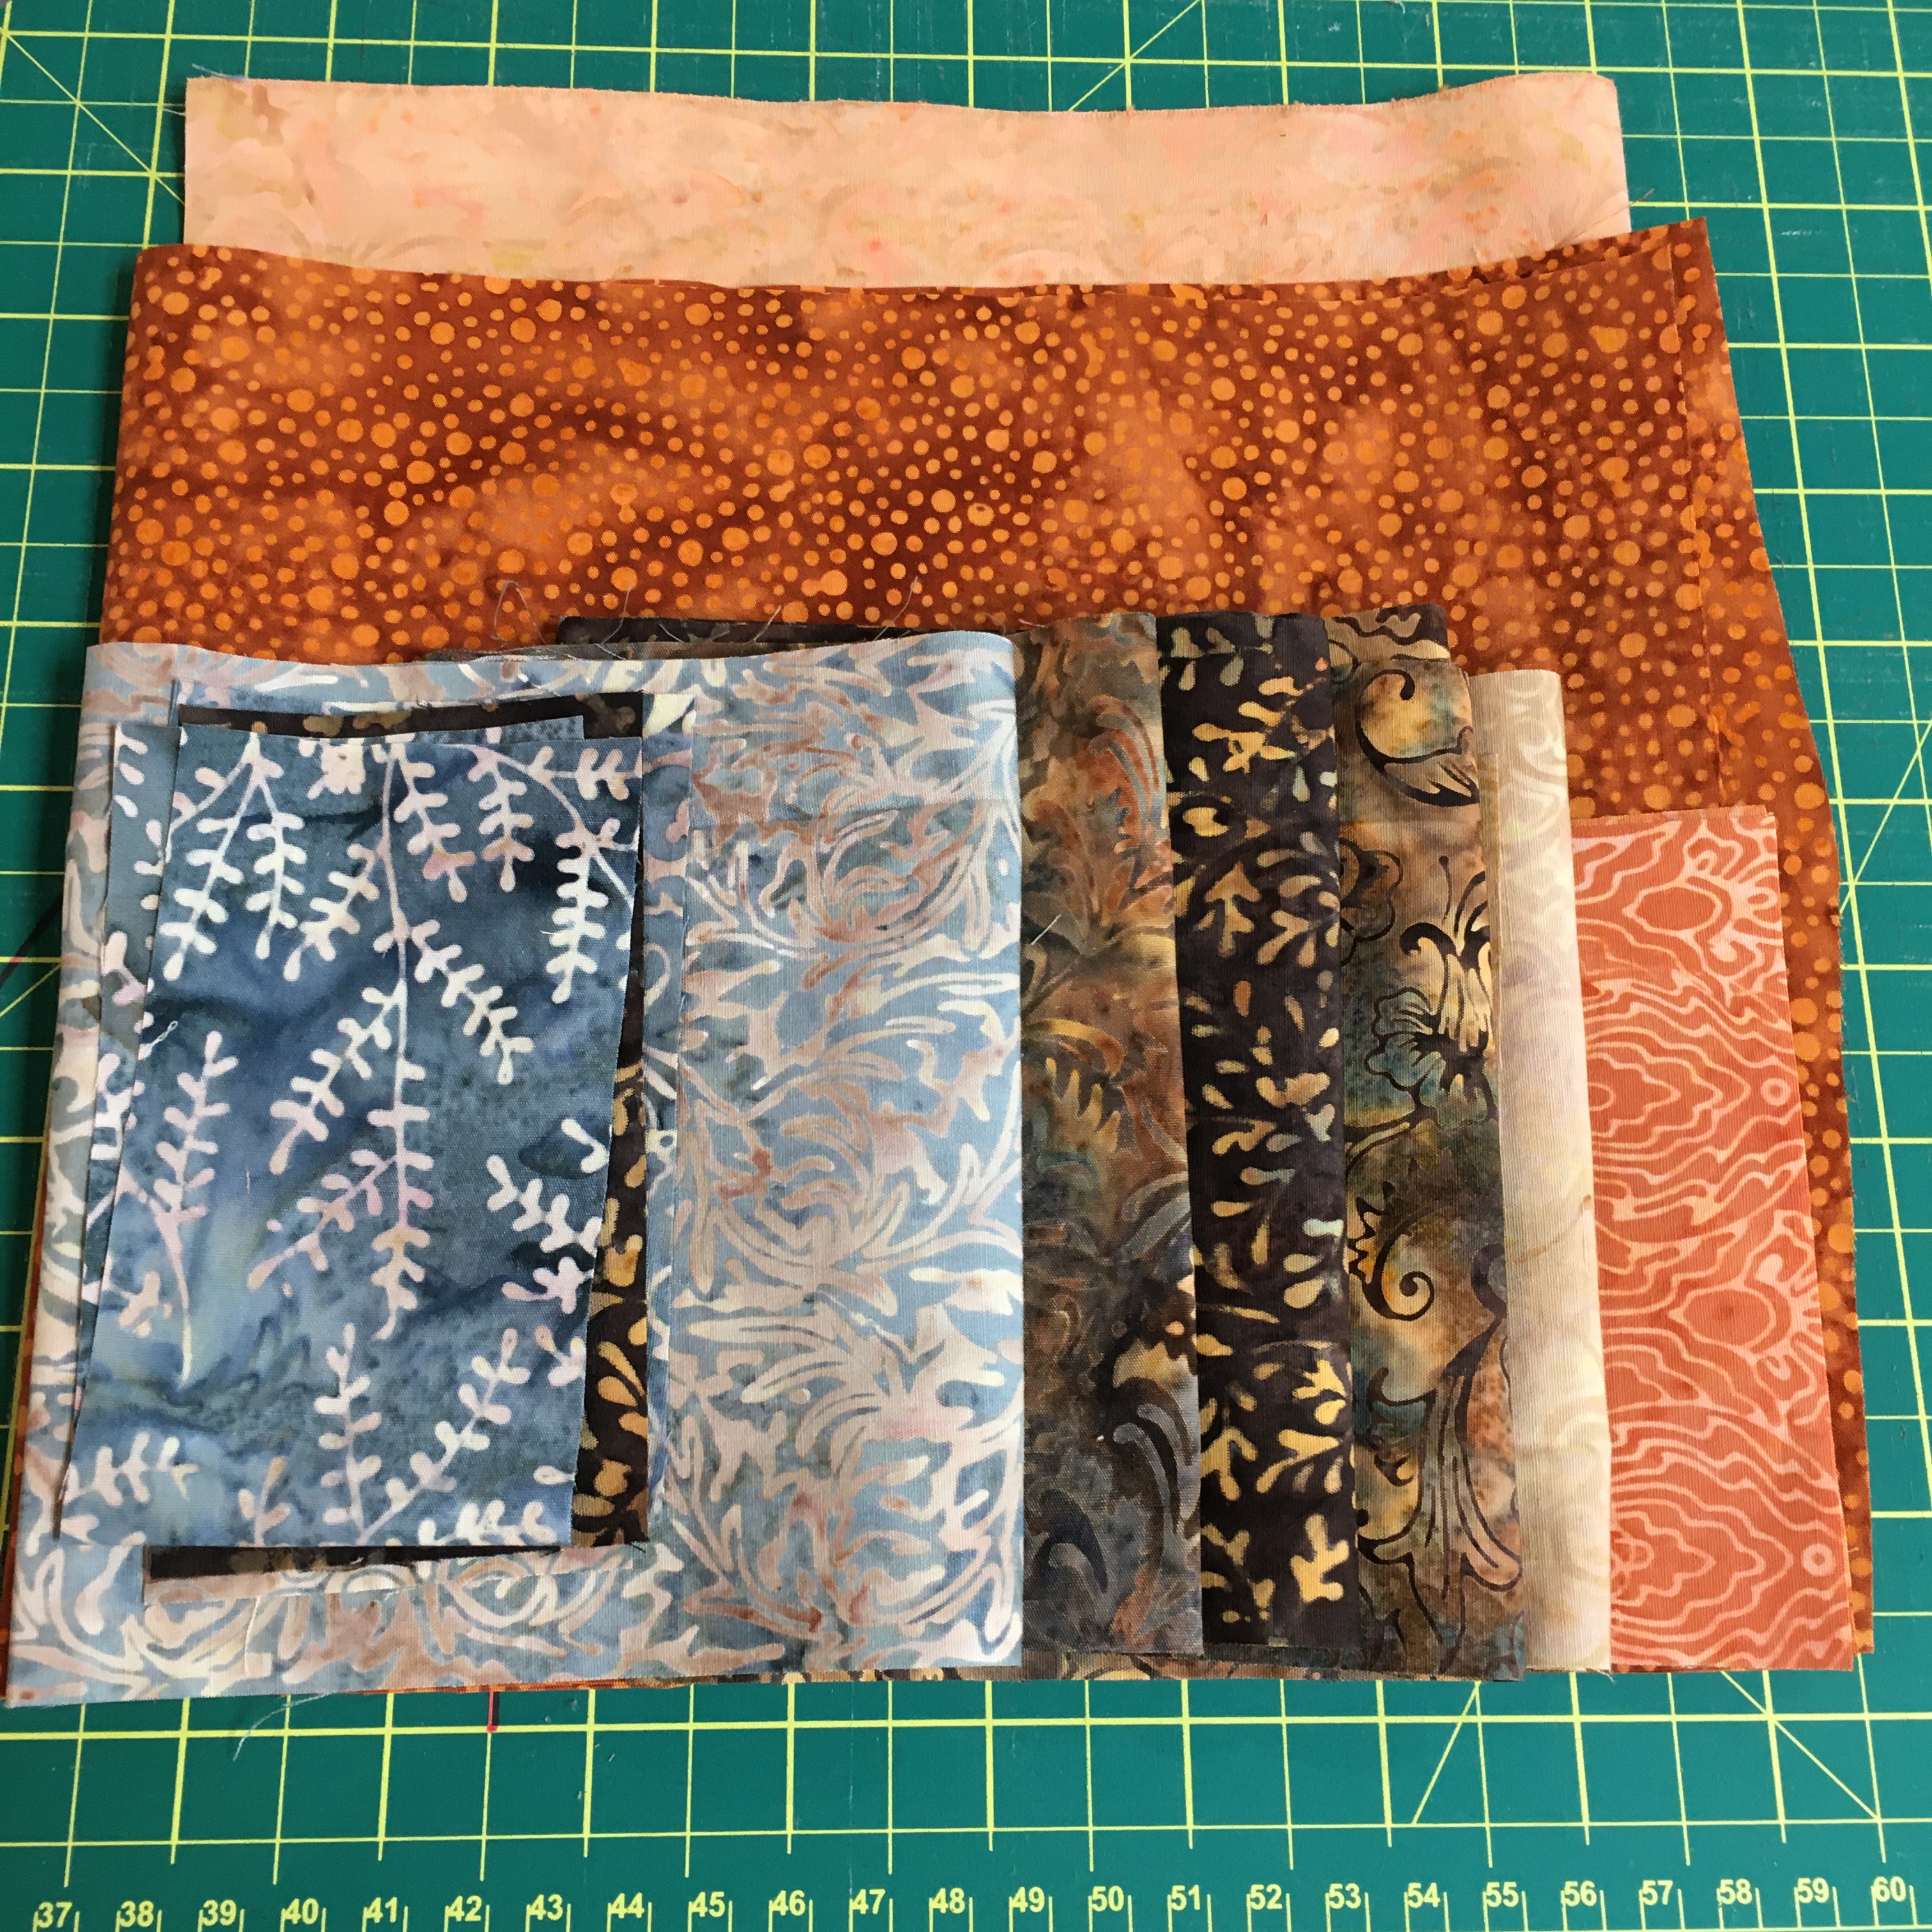
I decided to use some beautiful blue scraps of Island Batik fabric.
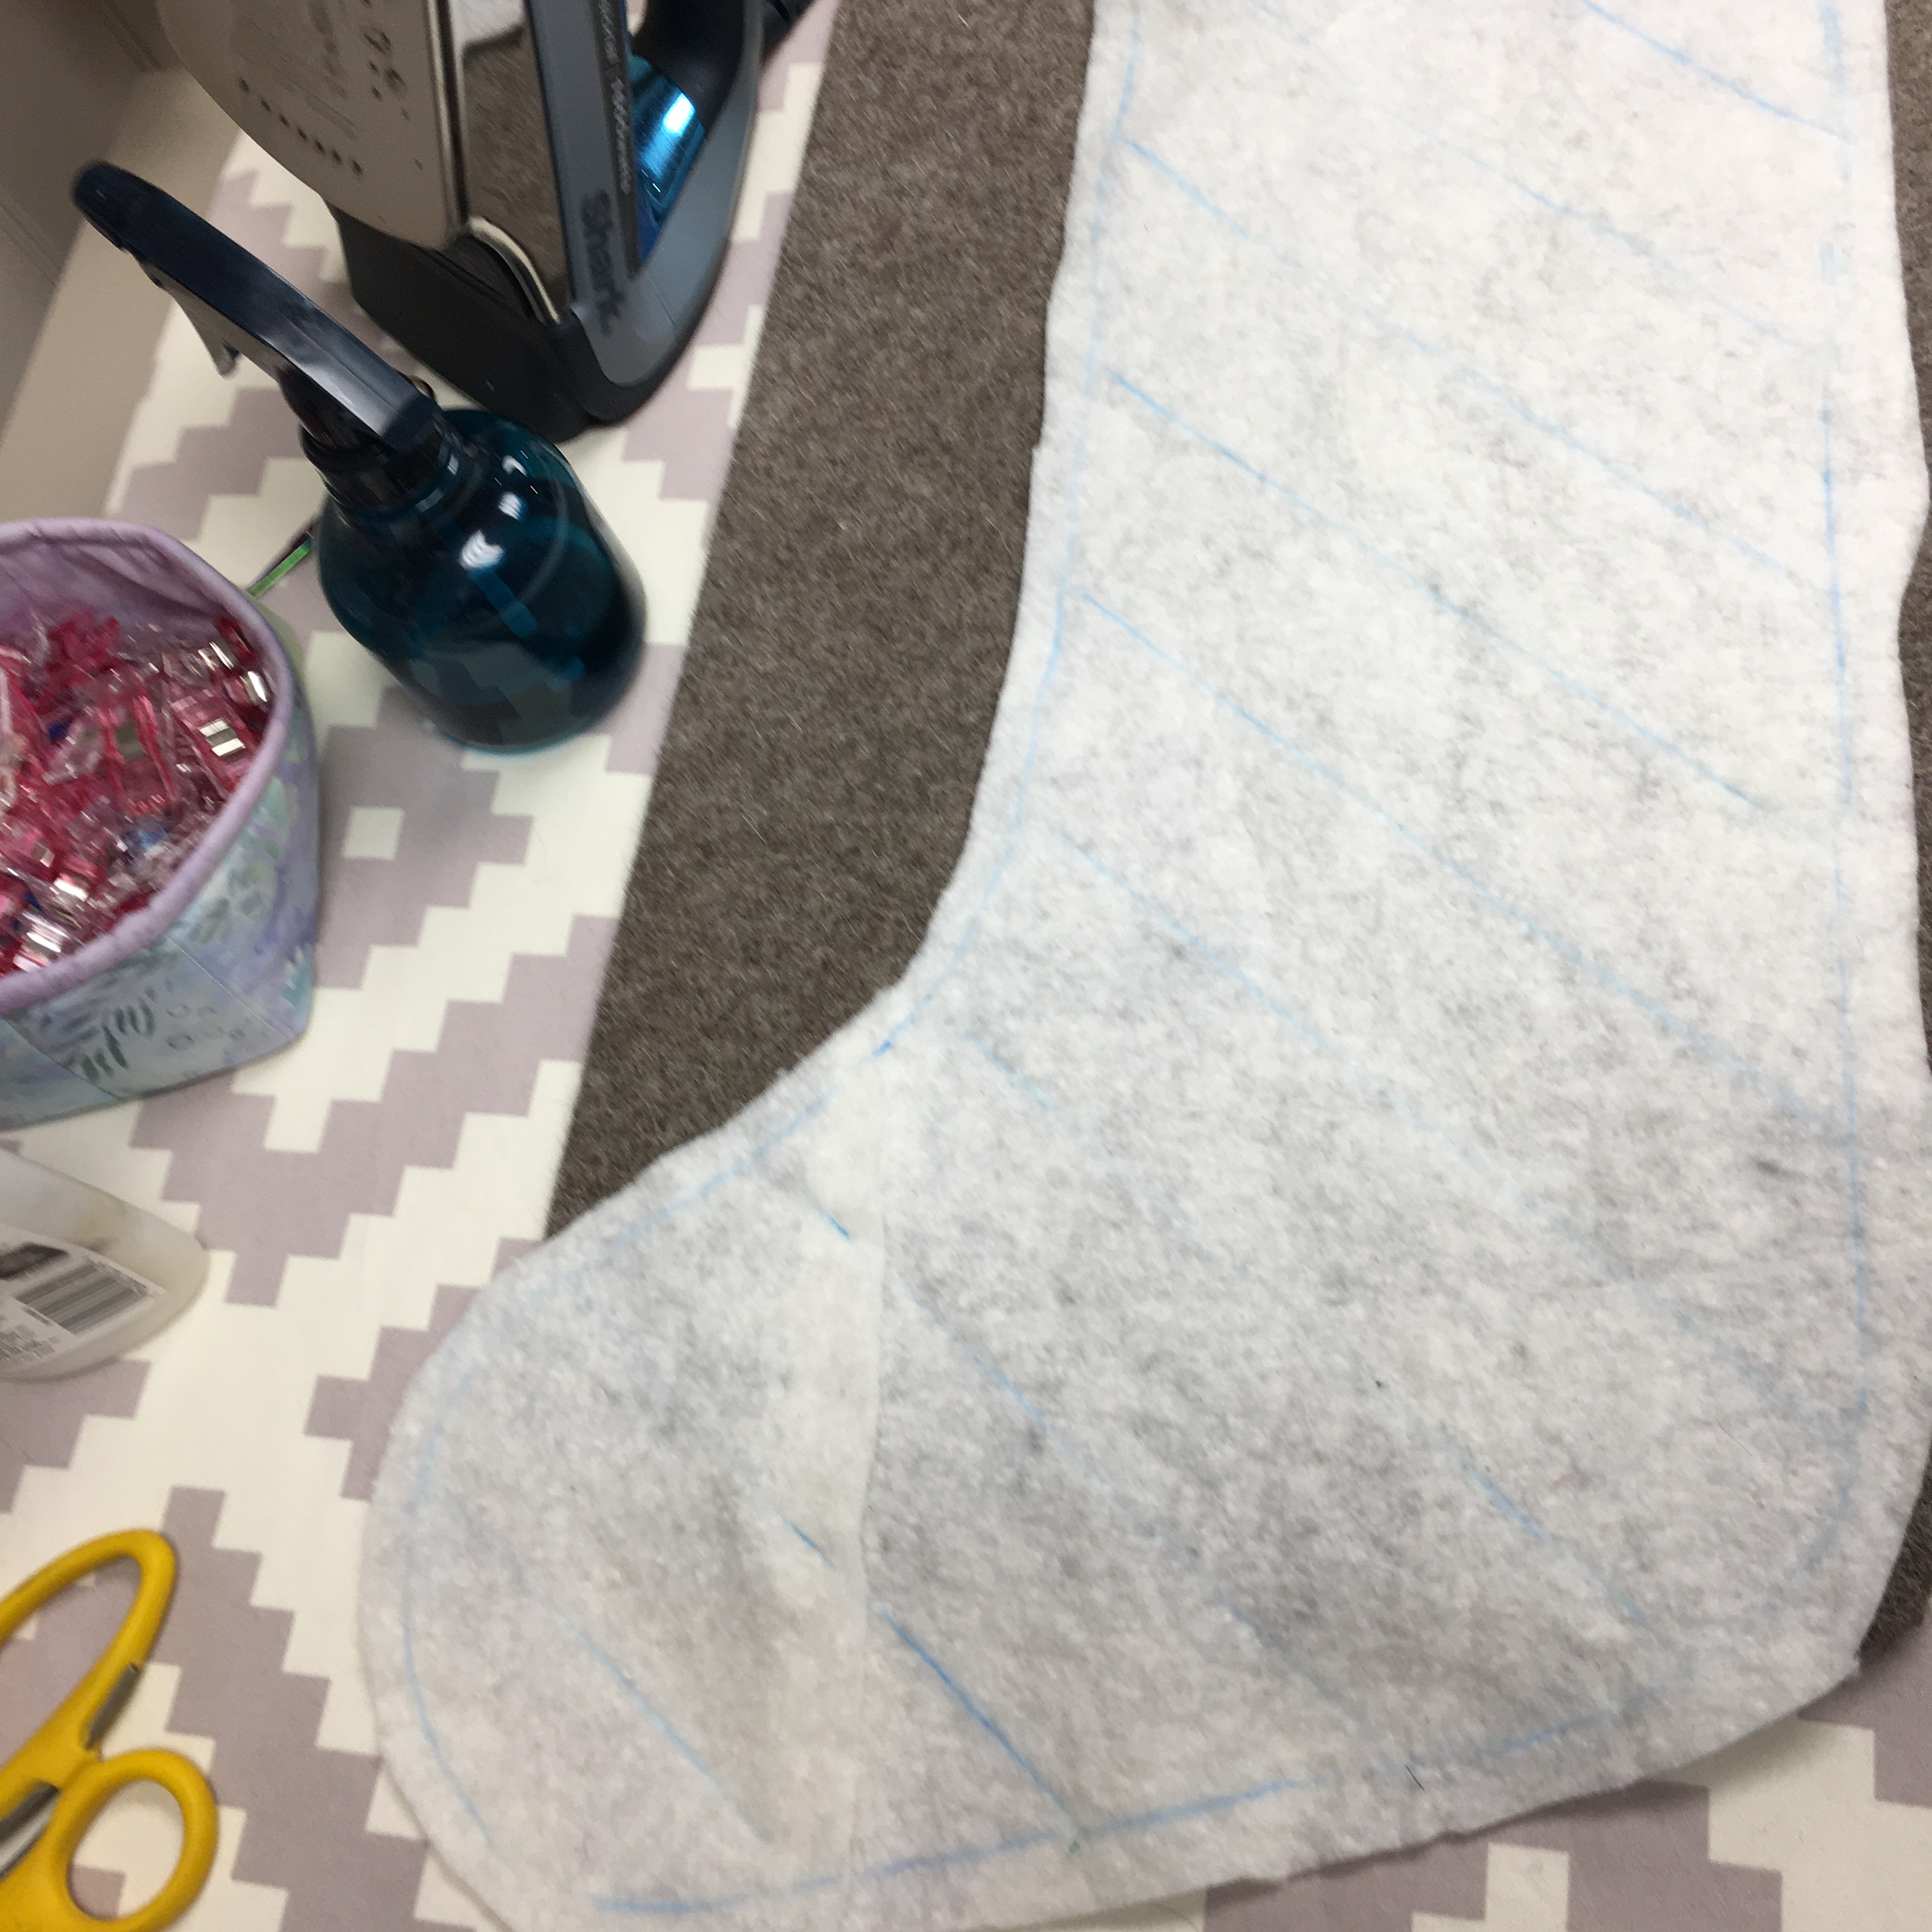
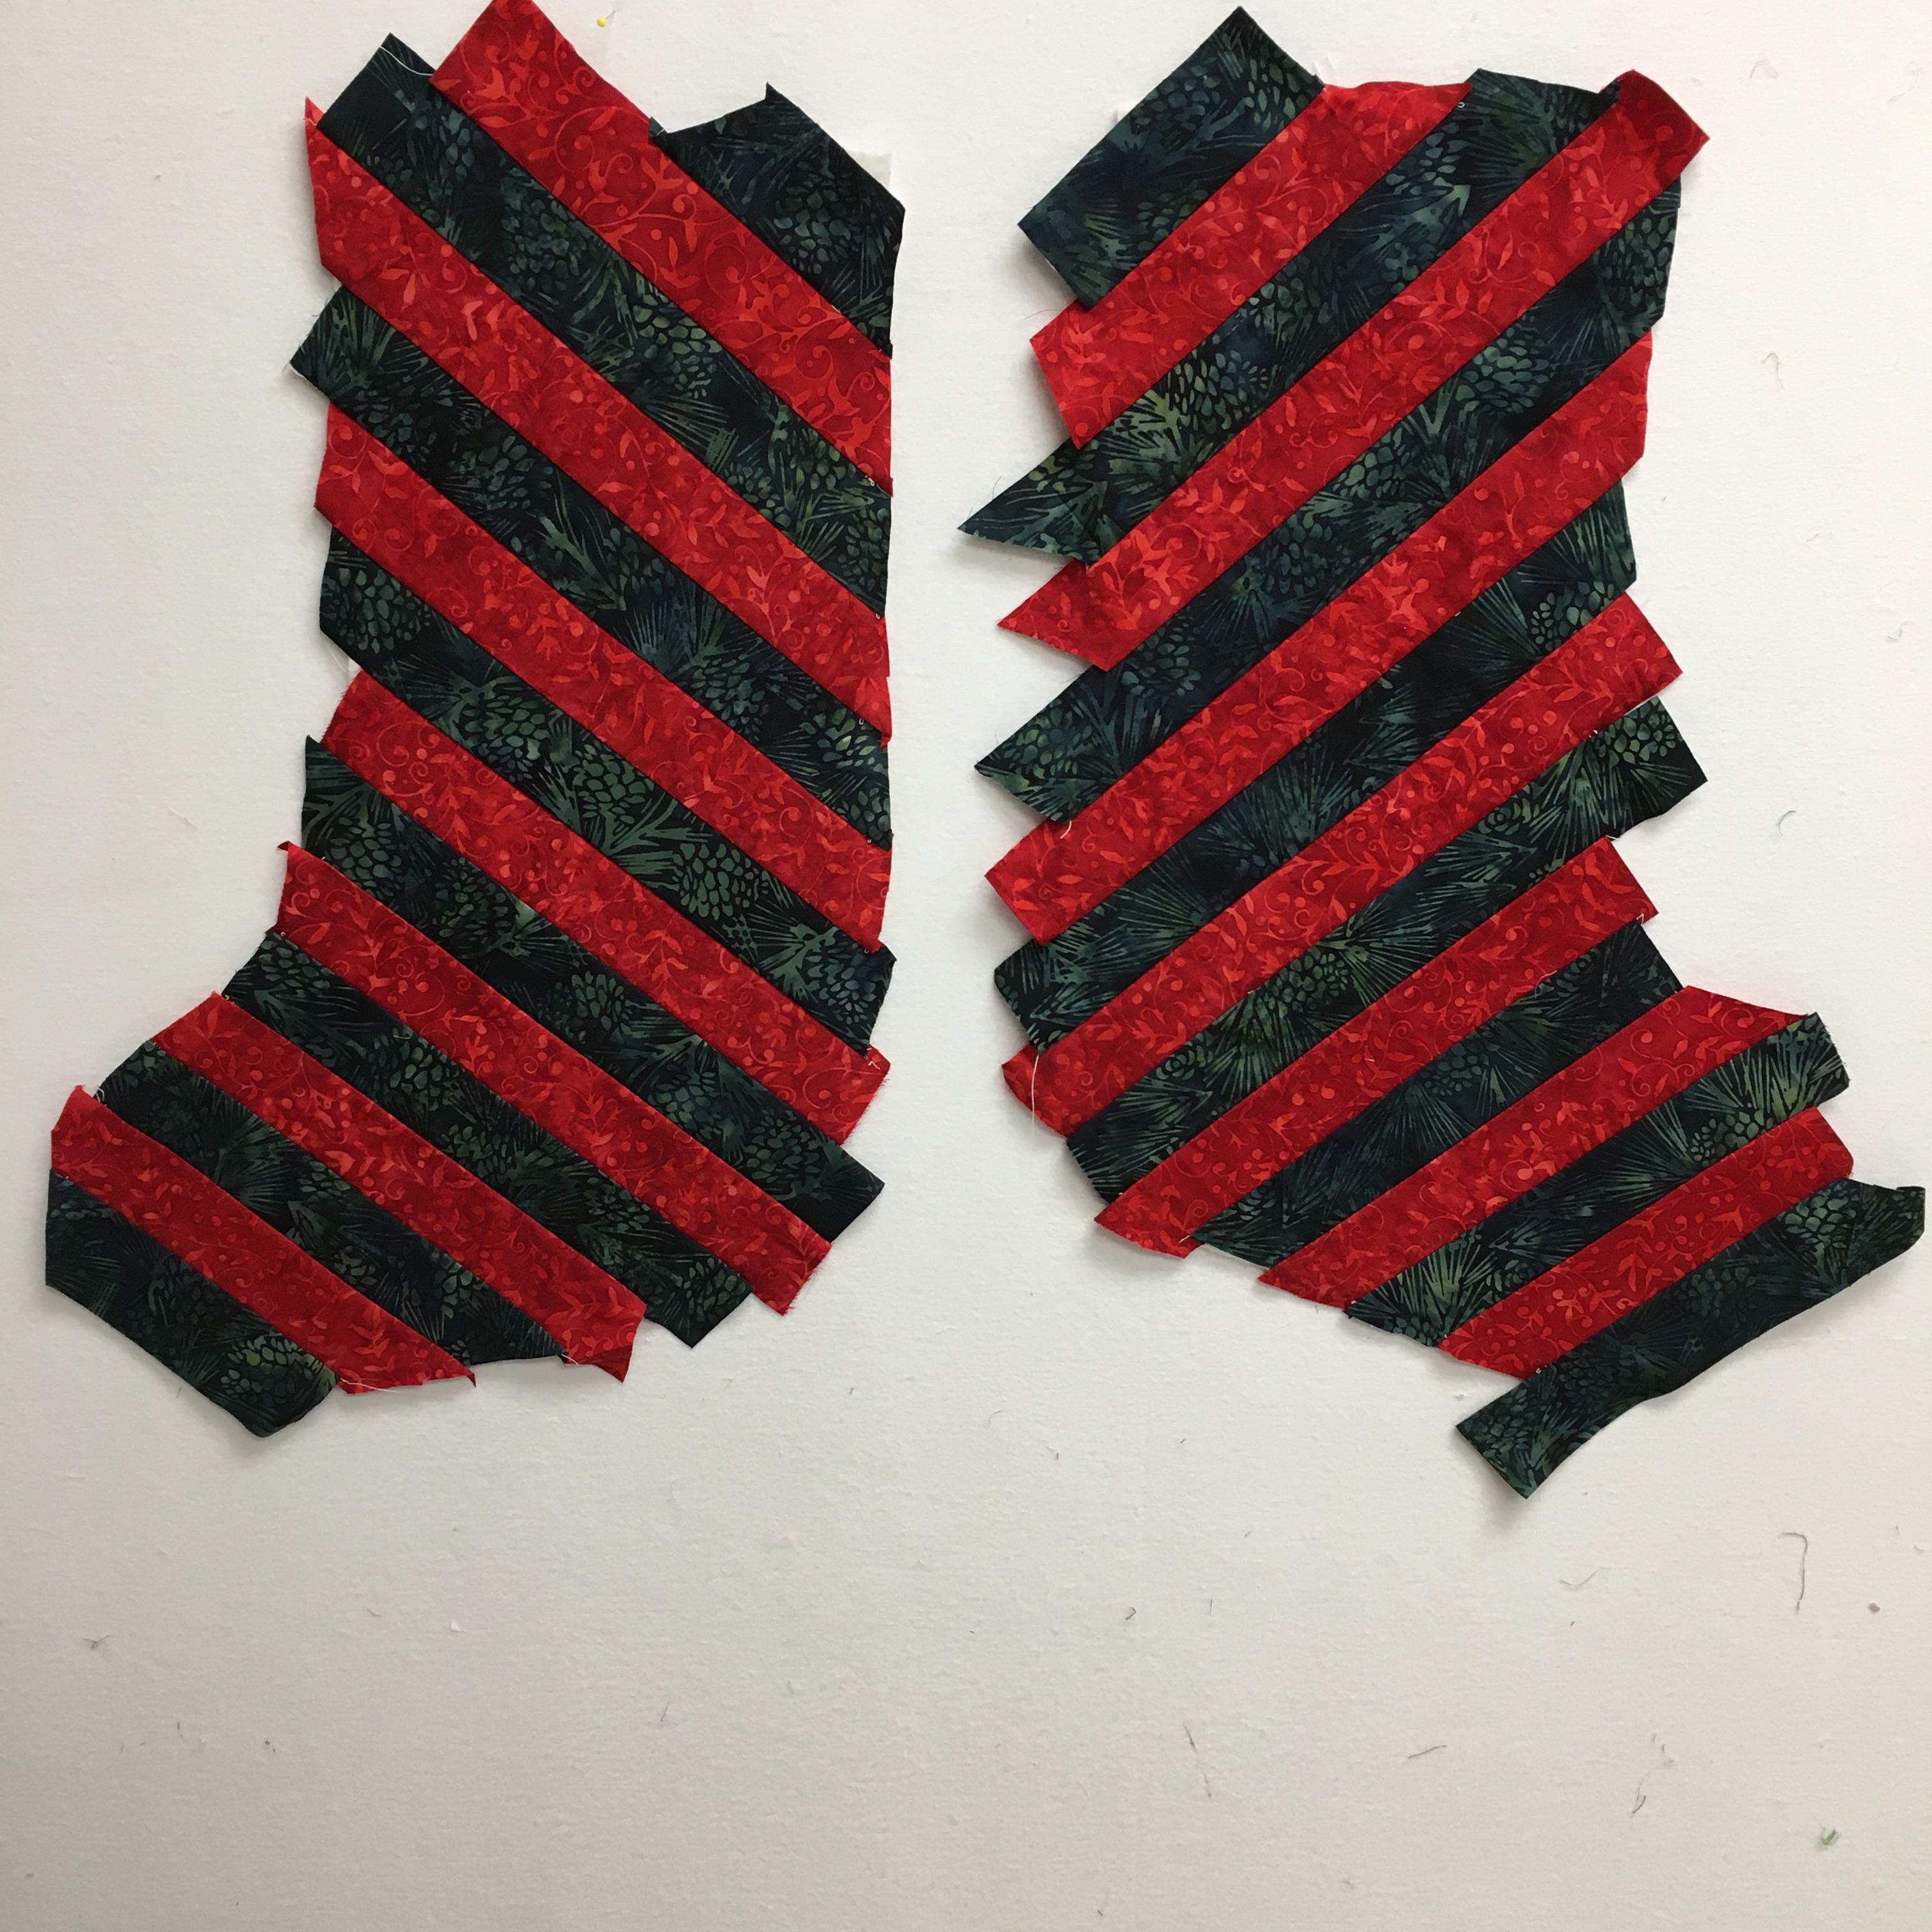
The first thing I did for this stocking challenge was to find a stocking pattern. I printed it out and I didn’t like I. My husband adjusted it, making the toes larger and I liked it way better!
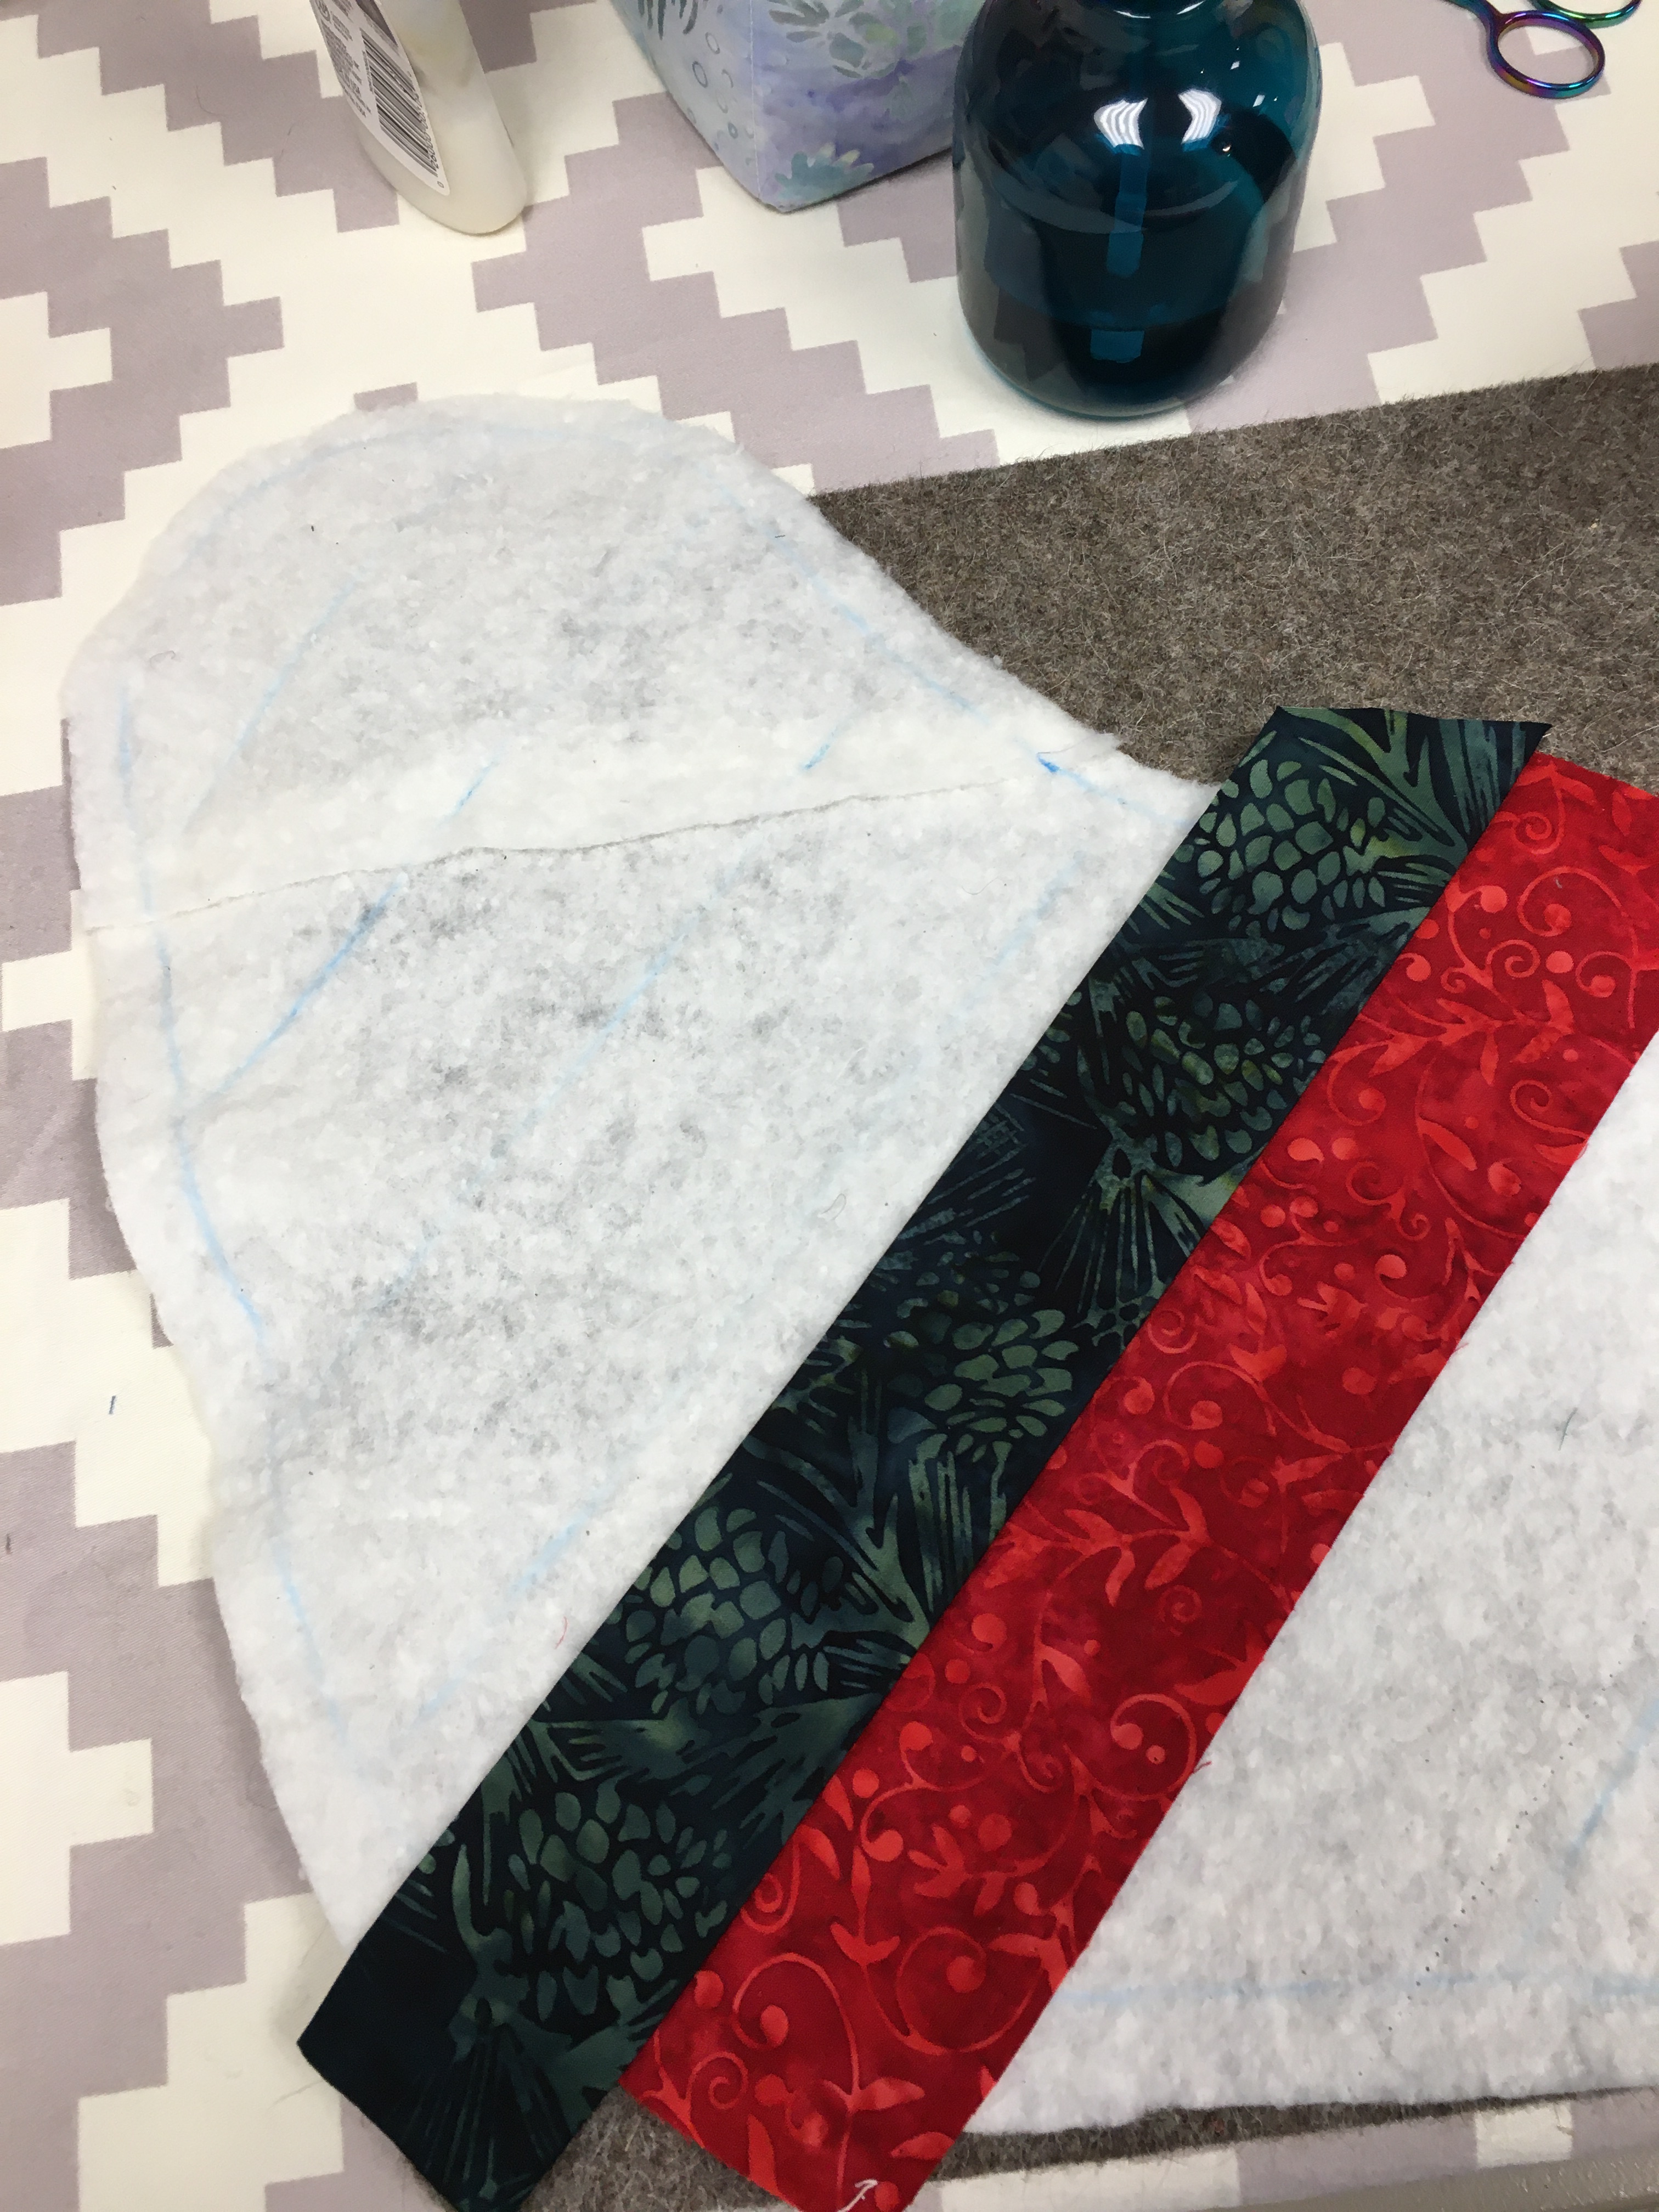
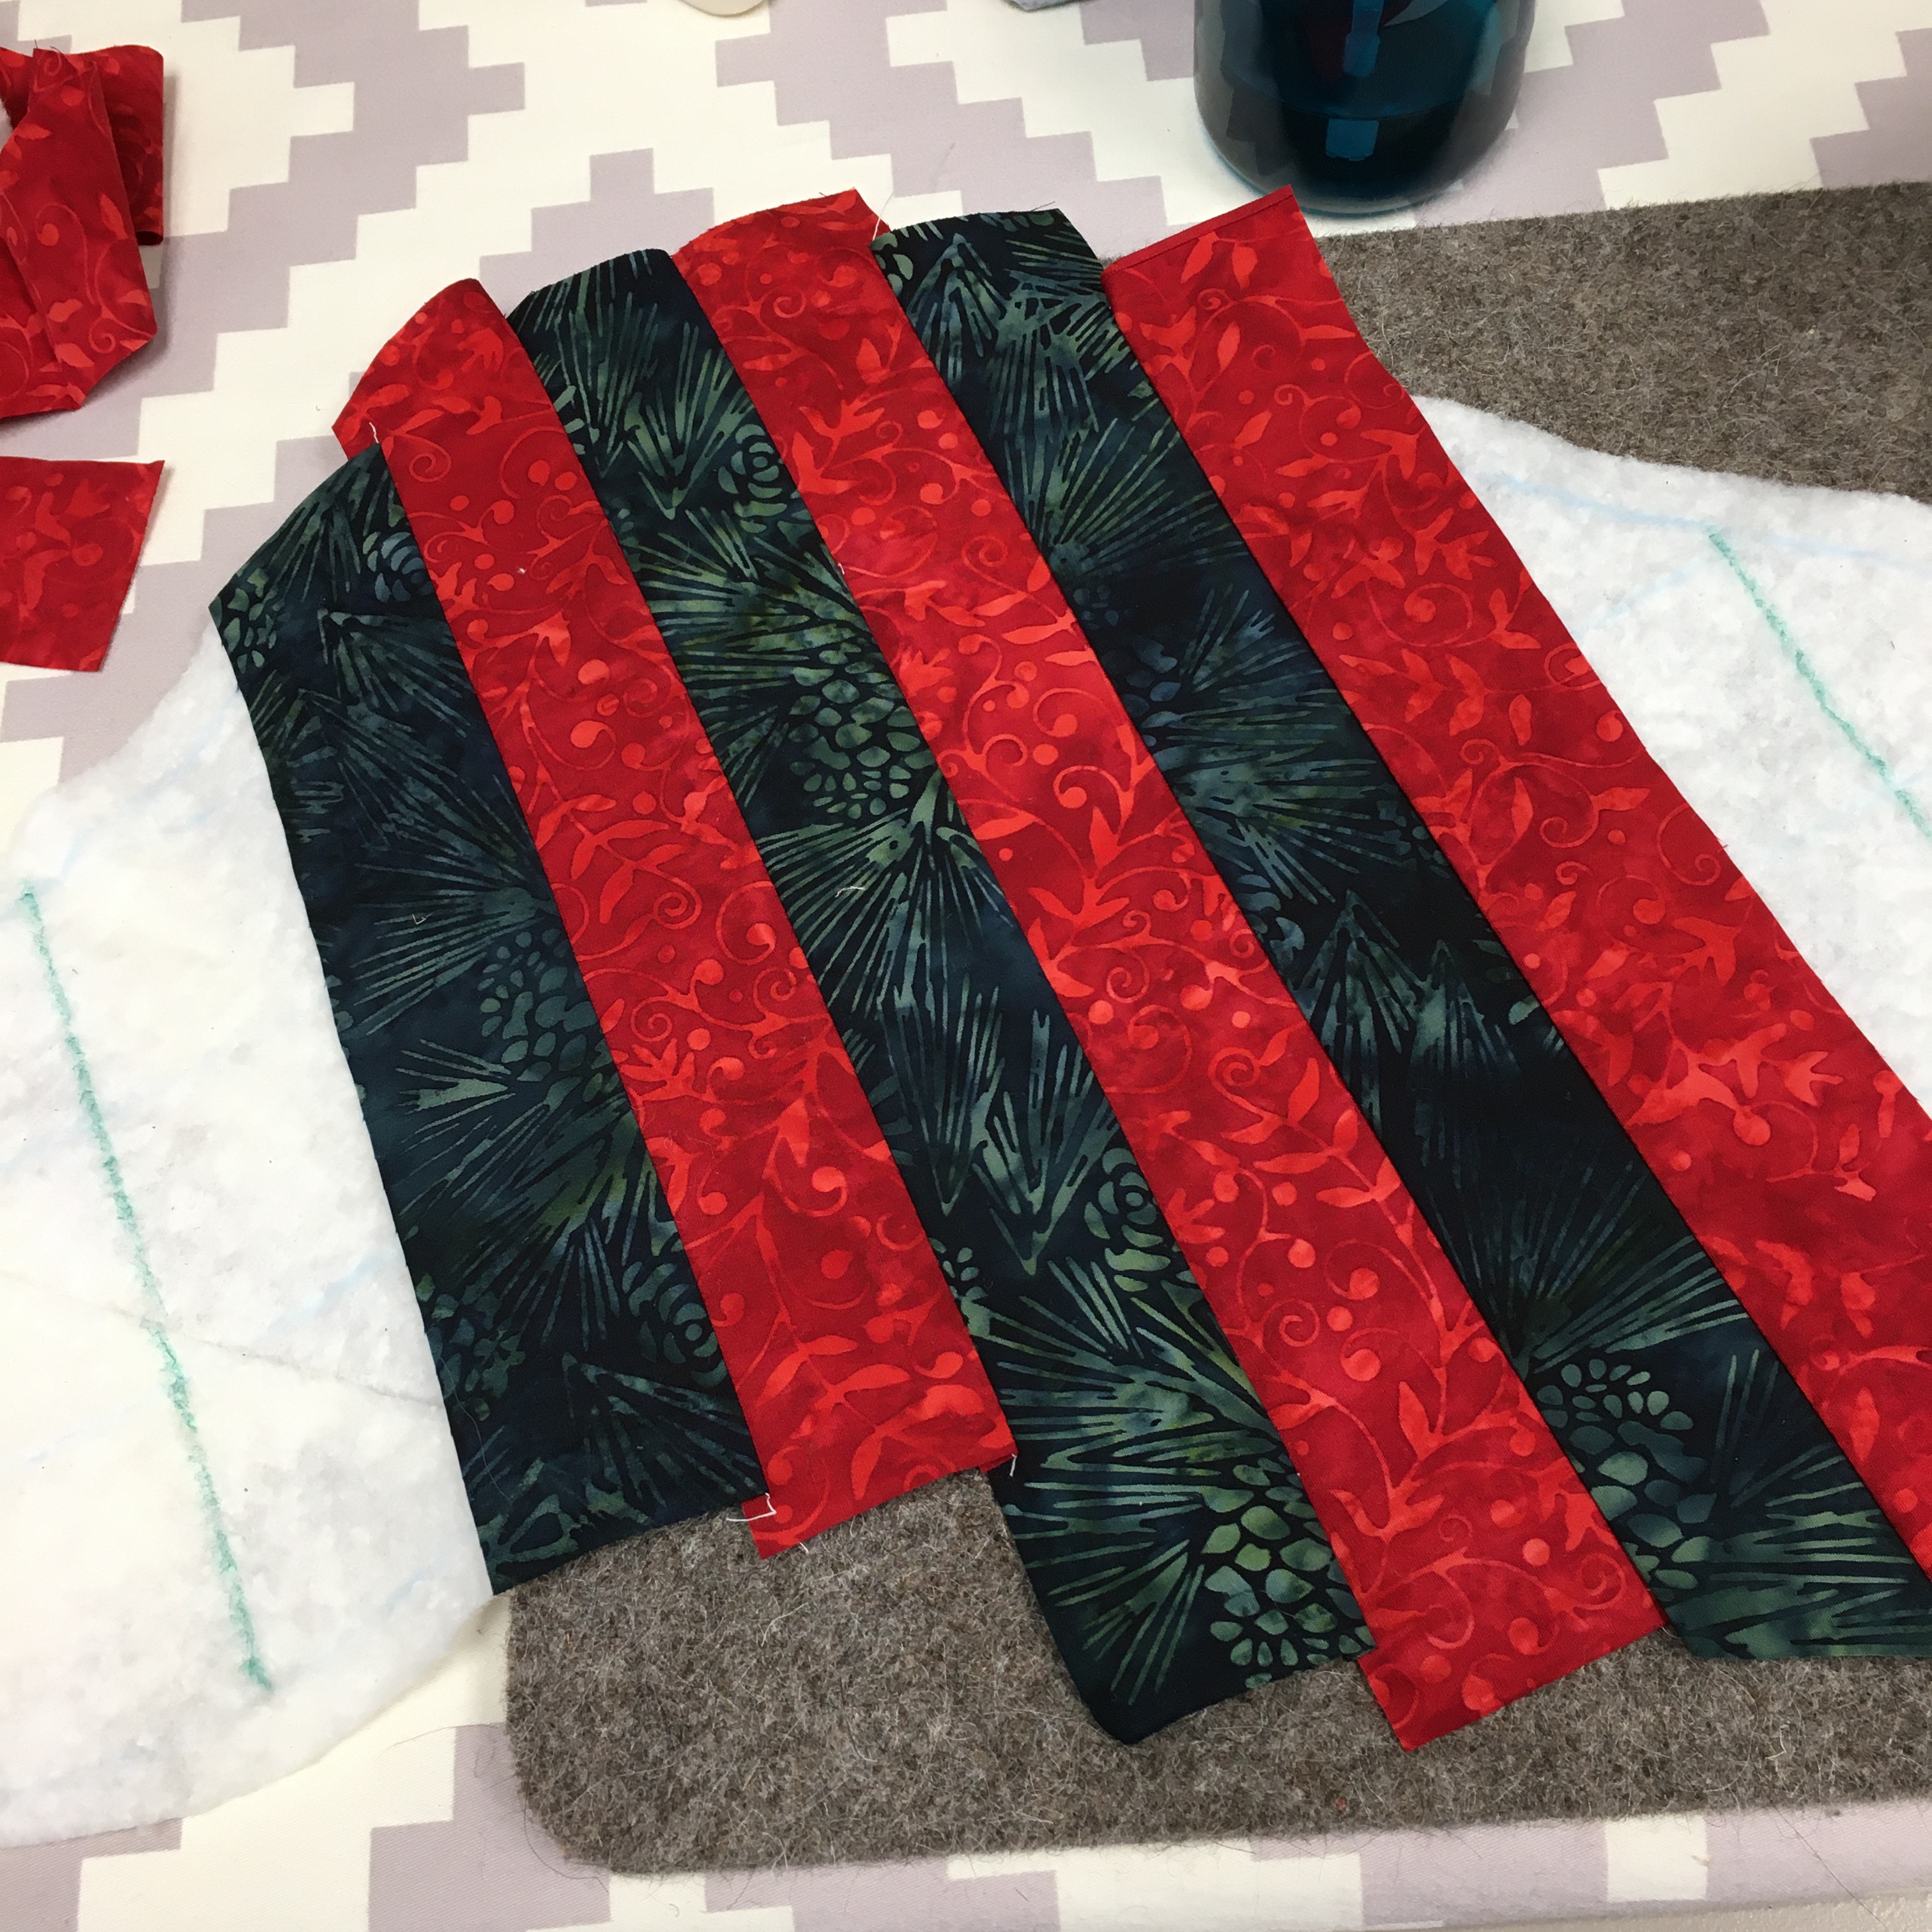
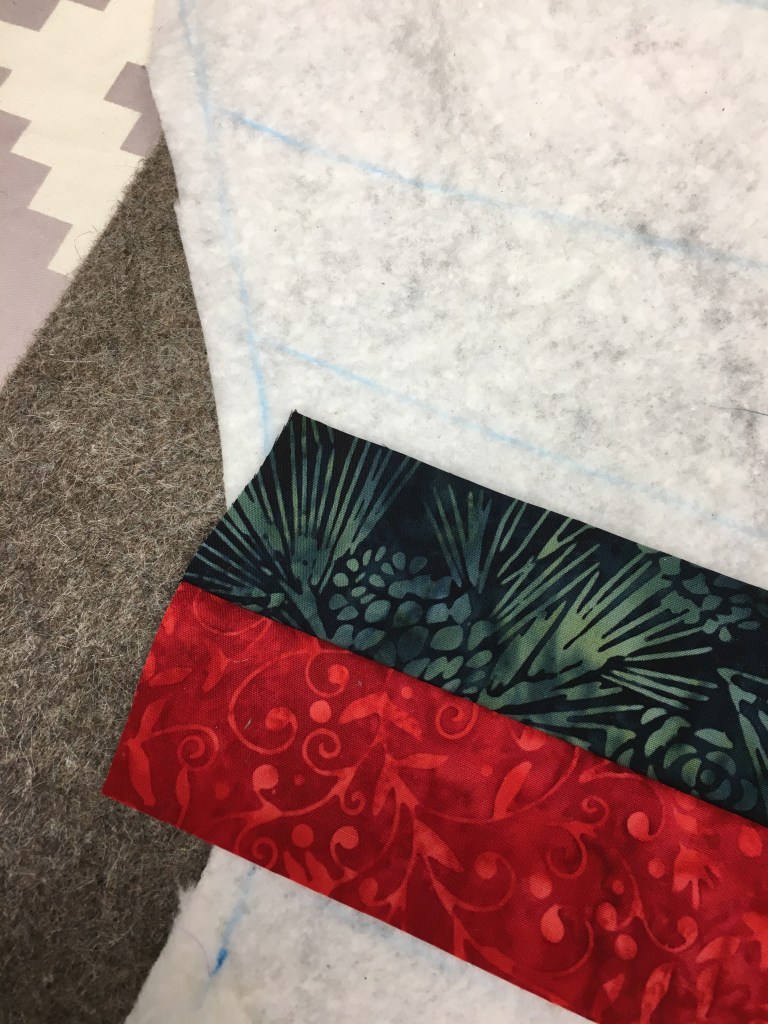
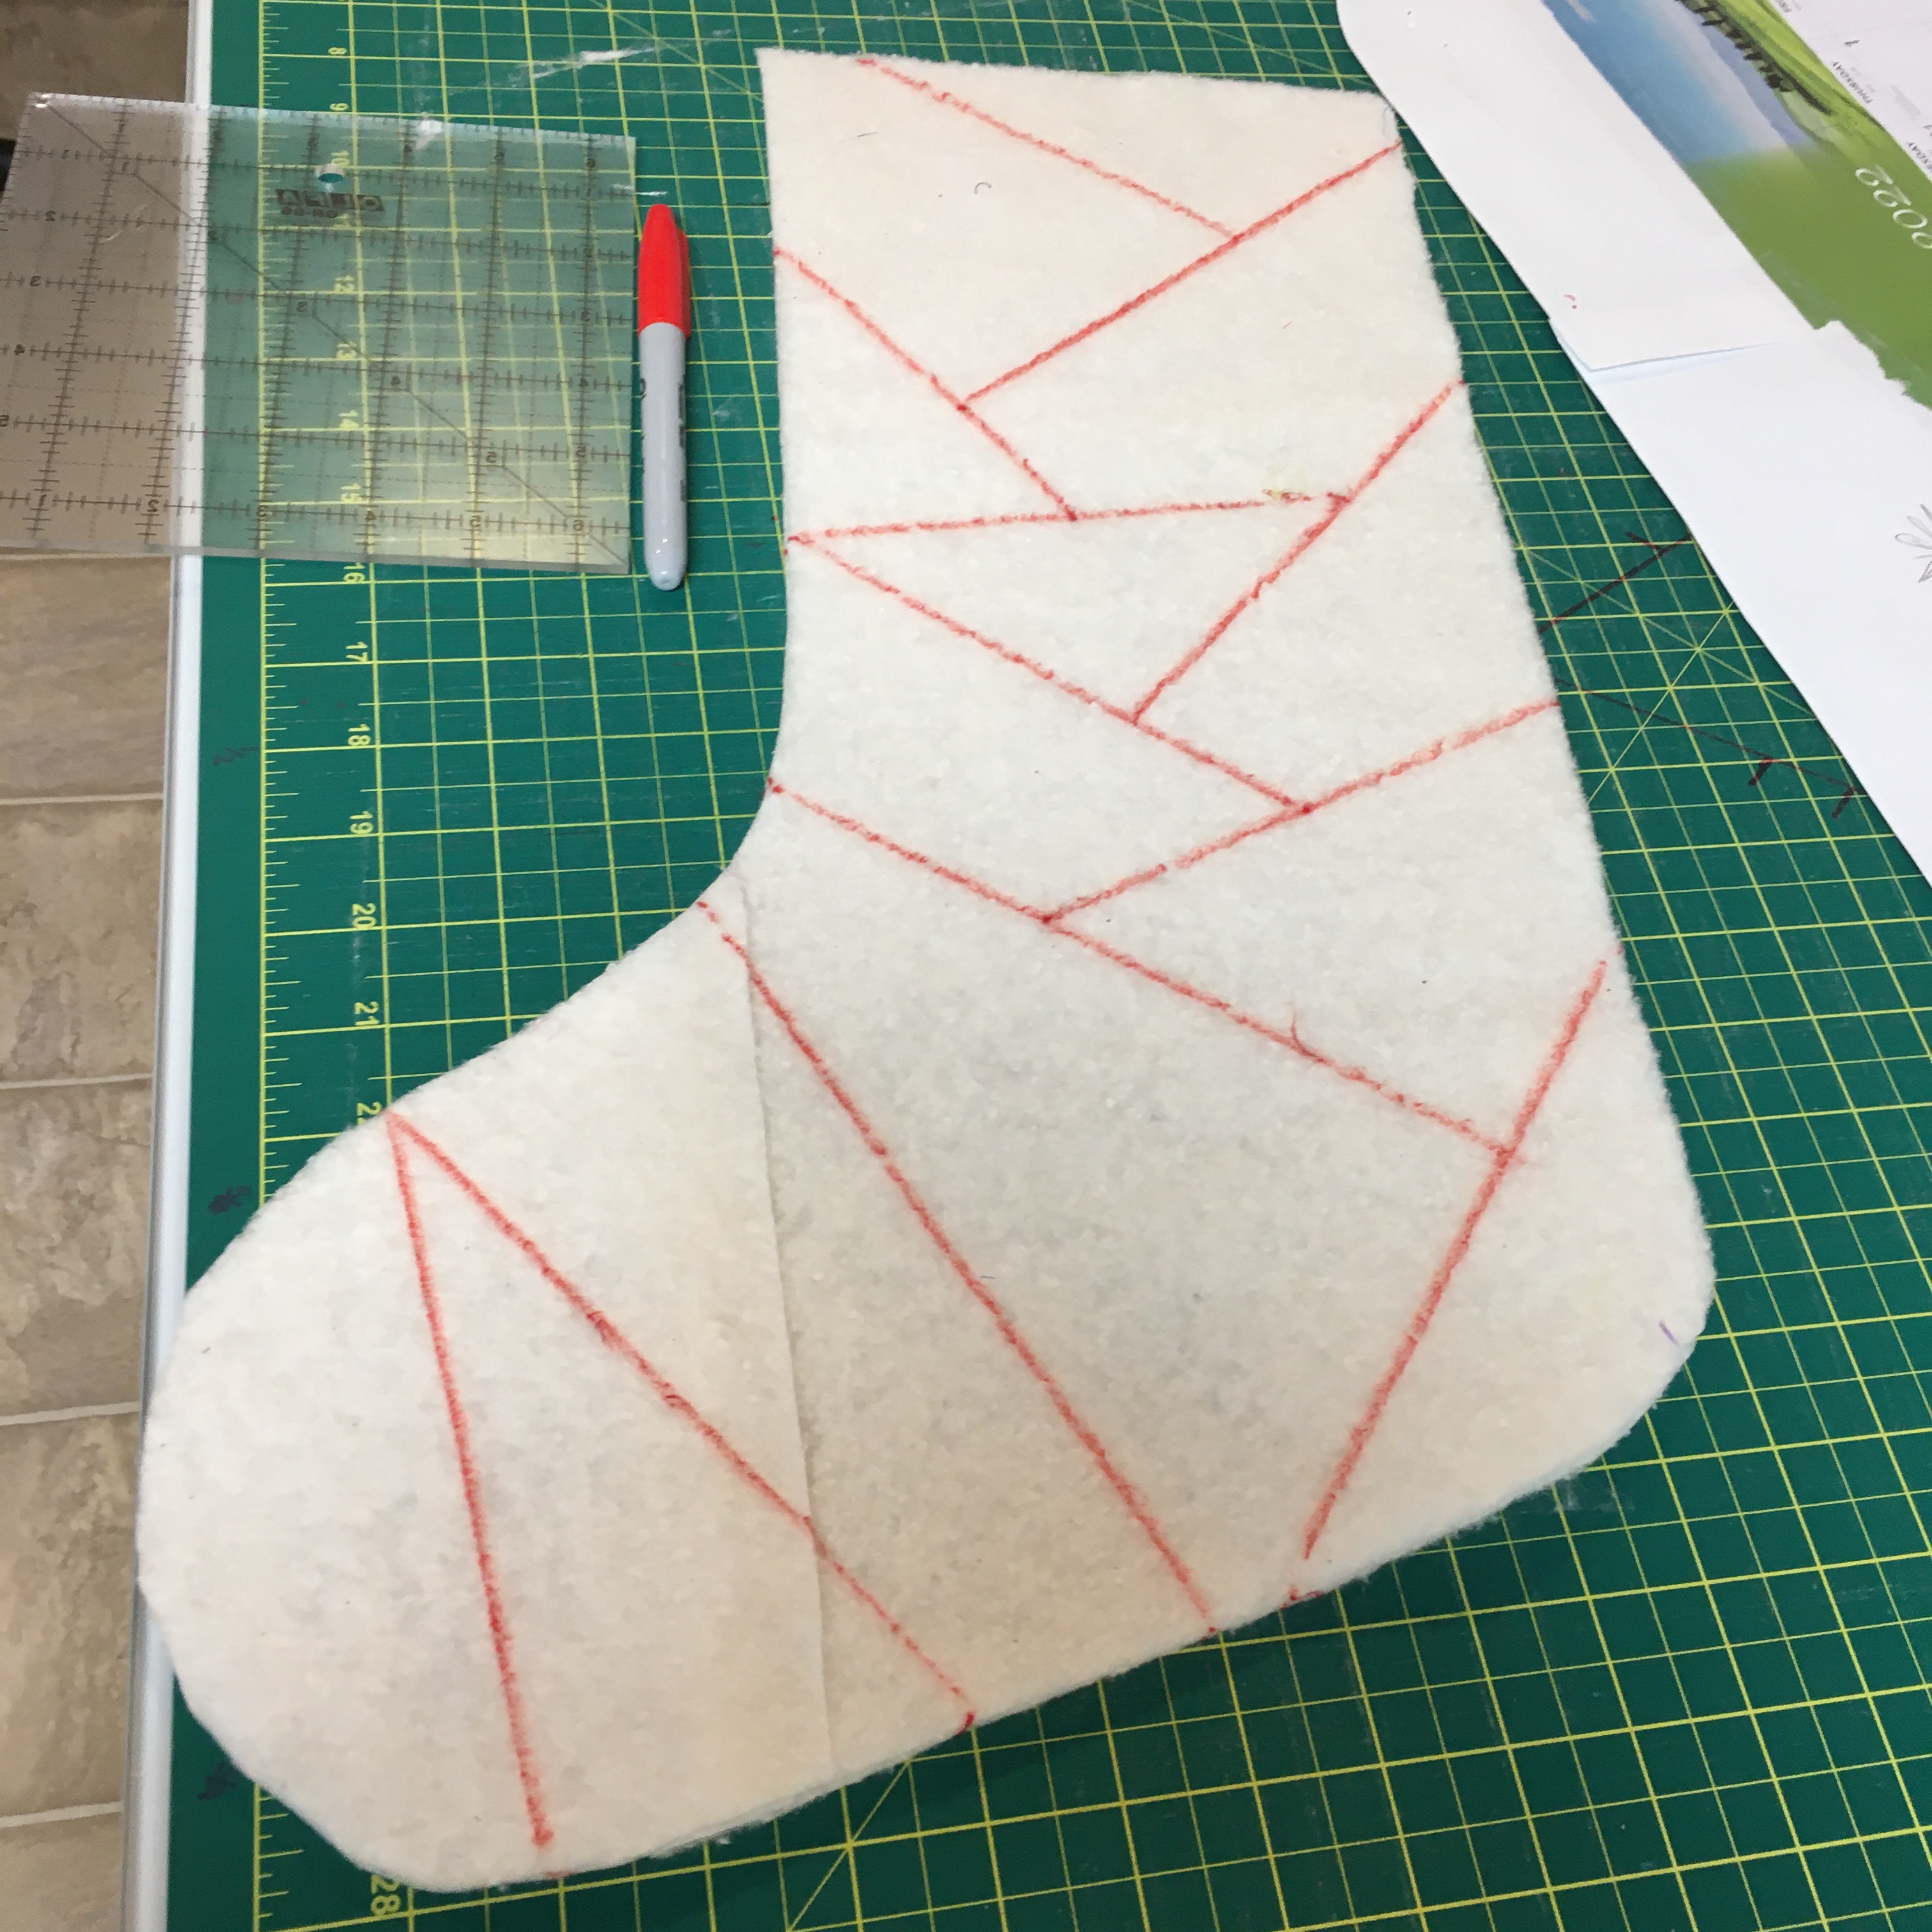
For my first stocking, I cut out 2 pieces of Hobbs Batting 80/20 and drew lines on it to guide me as I did the striped quilt as you go. I used 2″ strips of each fabric. Prairie Spirit Alpacas/Wool pressing mat made everything lie perfectly flat!
I needed to be careful to ensure that I covered the batting with the fabrics … Jack the ripper came out to play here …
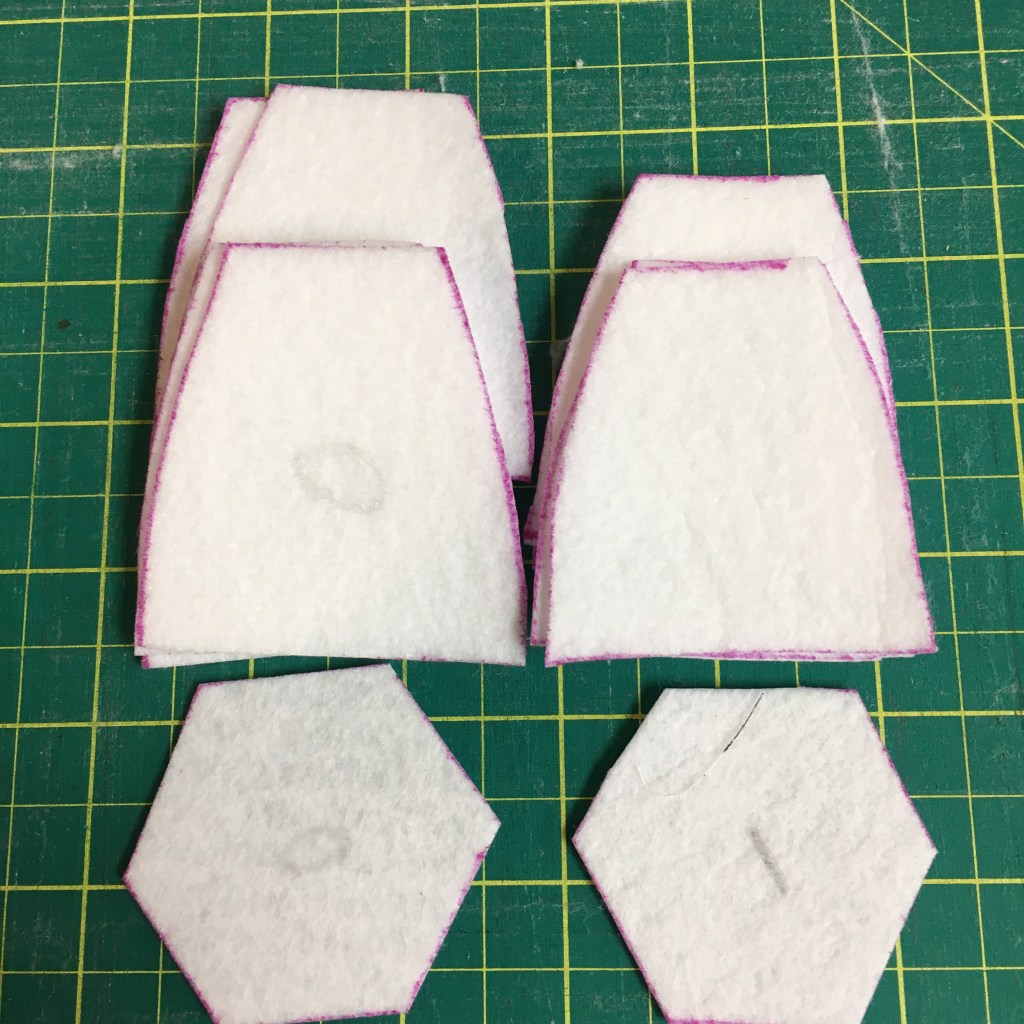
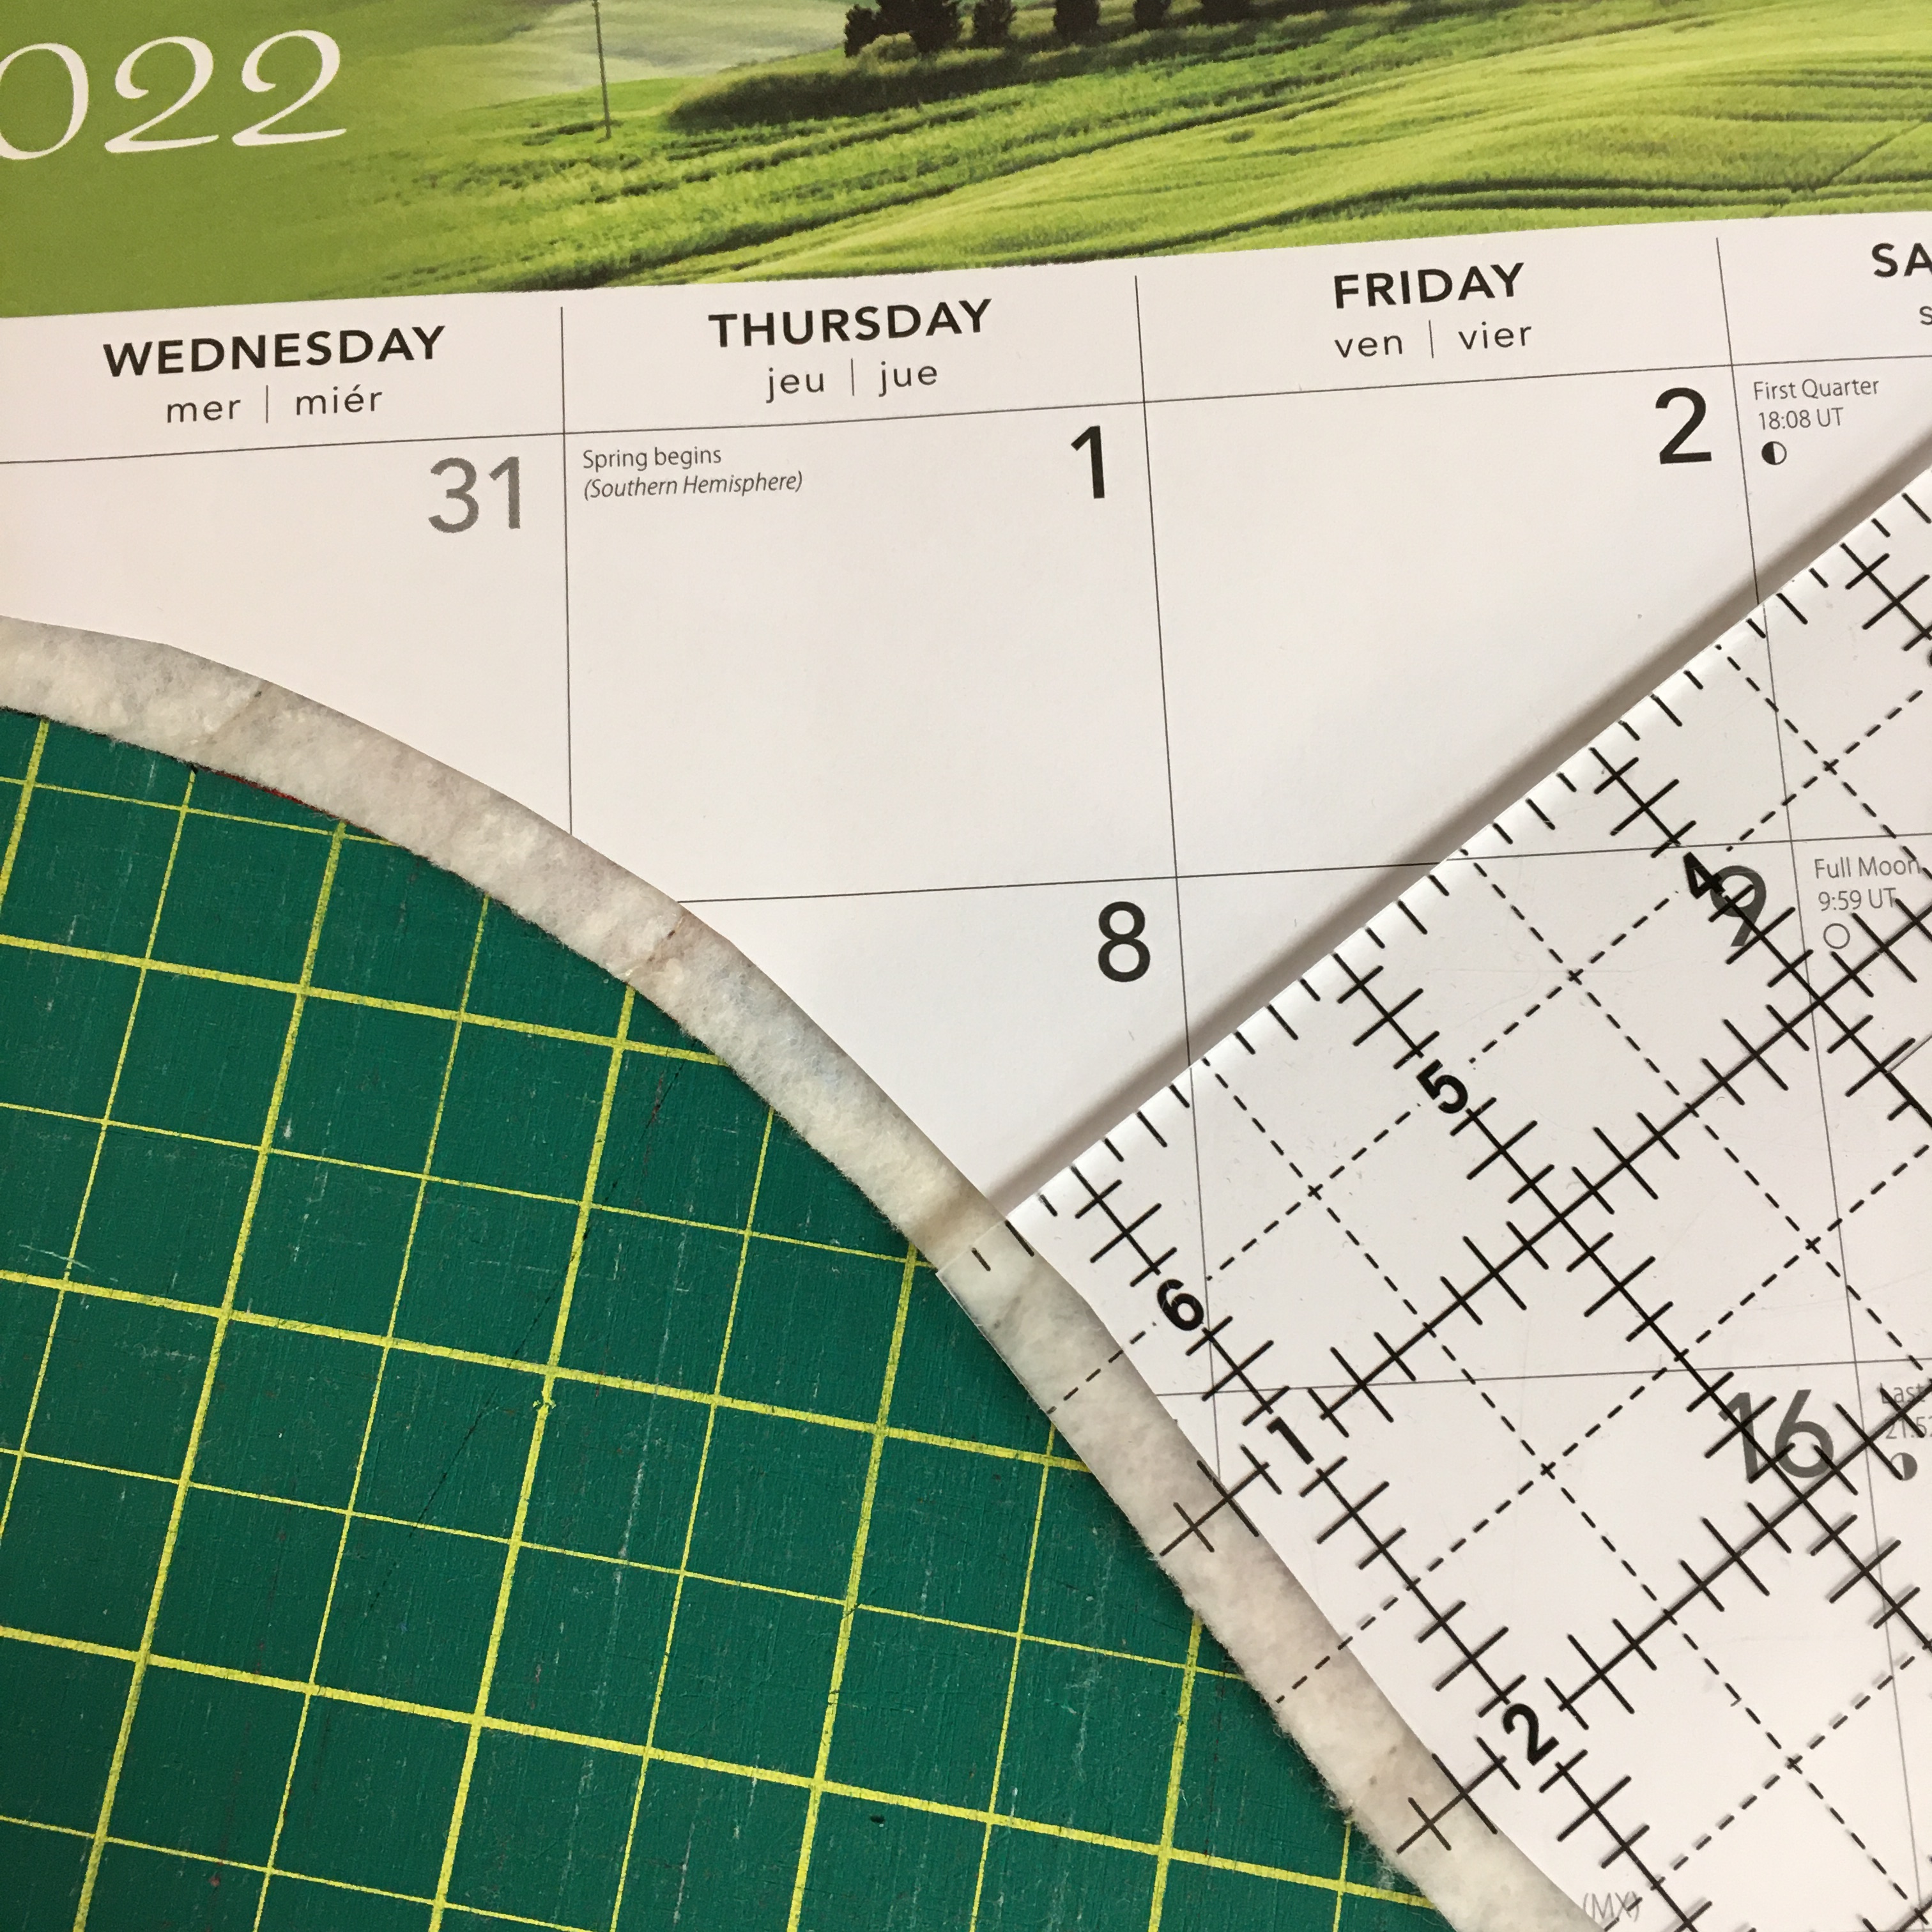
The stockings needed to be trimmed. I used the 1/4” mark on my ruler and worked around my template. (Yes, I used the page from a large calendar for my pattern!)
The 2nd stocking was a crazy patch that I attempted to do as a quilt as you go – but I had drawn too many intersecting lines to make it work … so it became an improvised crazy patch stocking.
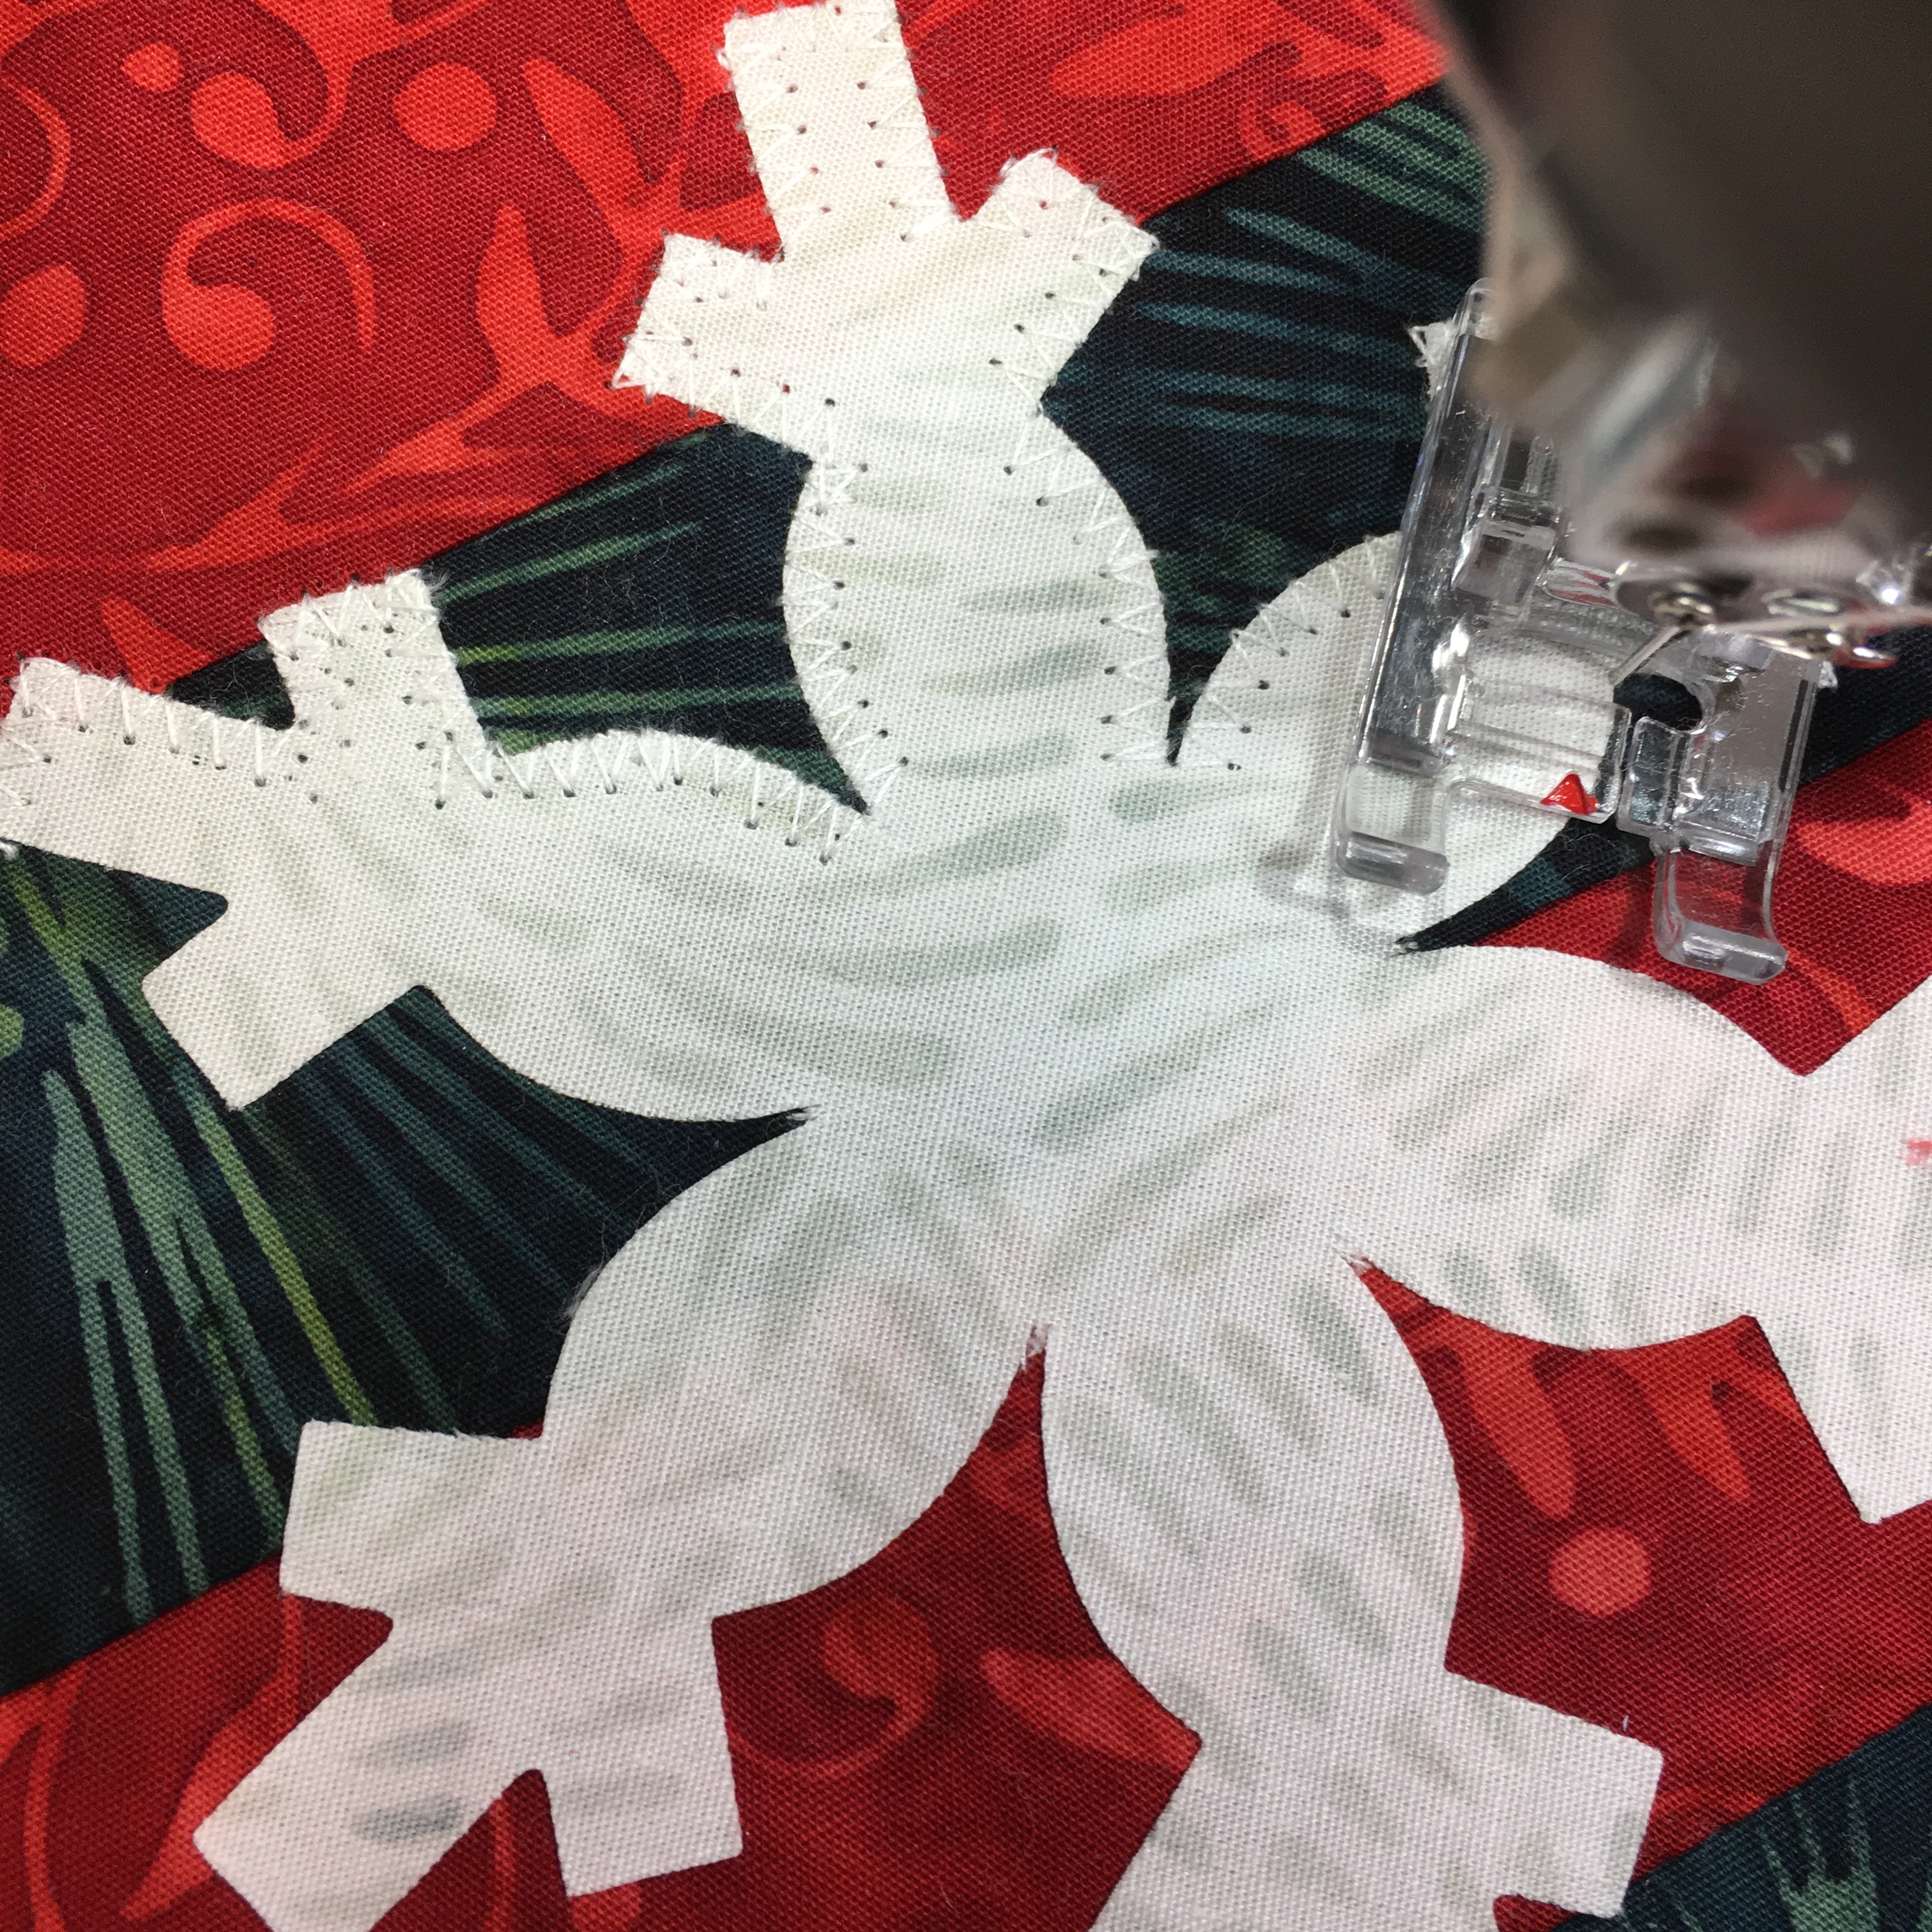
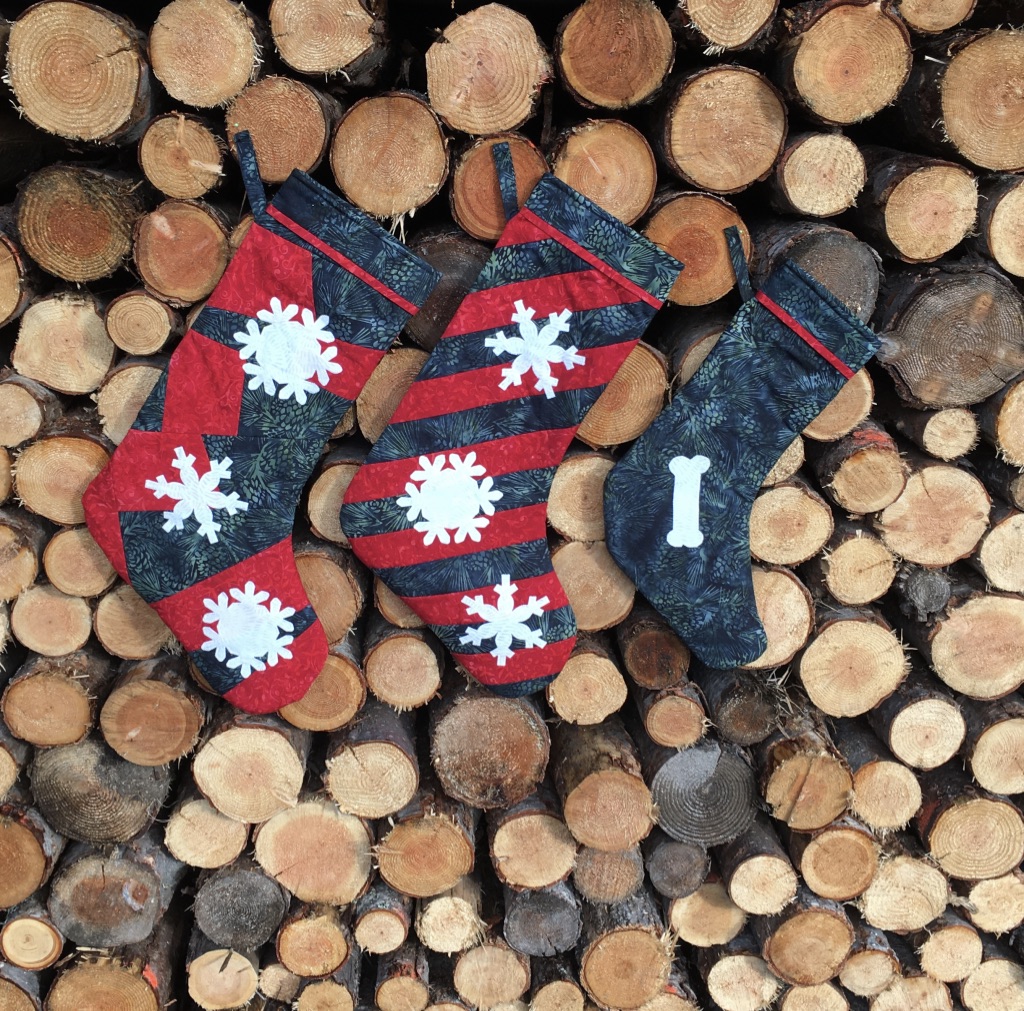
I used “Pinecone – Dark Teal” and the red is #121913380 from Season Splendor (Fall/Winter 2019 collection) for the stockings and “Coconut” for the snowflakes. The snowflakes were cut with Accuquilt dies that I borrowed from our guild’s die collection.
Appliqueing the snowflake and marking the stocking for the crazy quilting.
Aurifil Thread # 2021 (Natural White) was used for the applique process. #2692 (Black) was used for quilting, assembly and the hanging tabs.
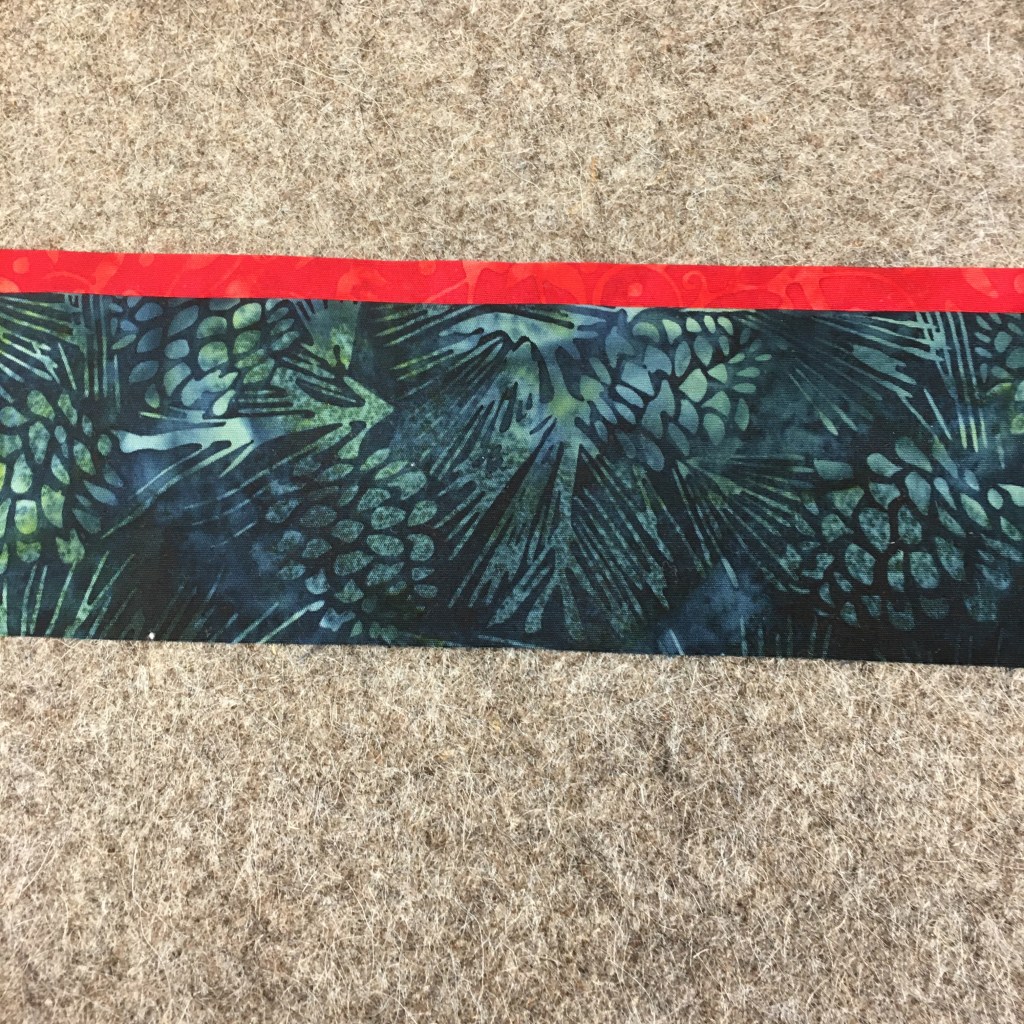
I wanted a little flange on the cuff – so the red was cut at 1 1/4” and the green at 3.” This made it possible to fold it 3/4” of the green to the inside so that the lining didn’t show. I used Island Batik solid white fabric for the lining.
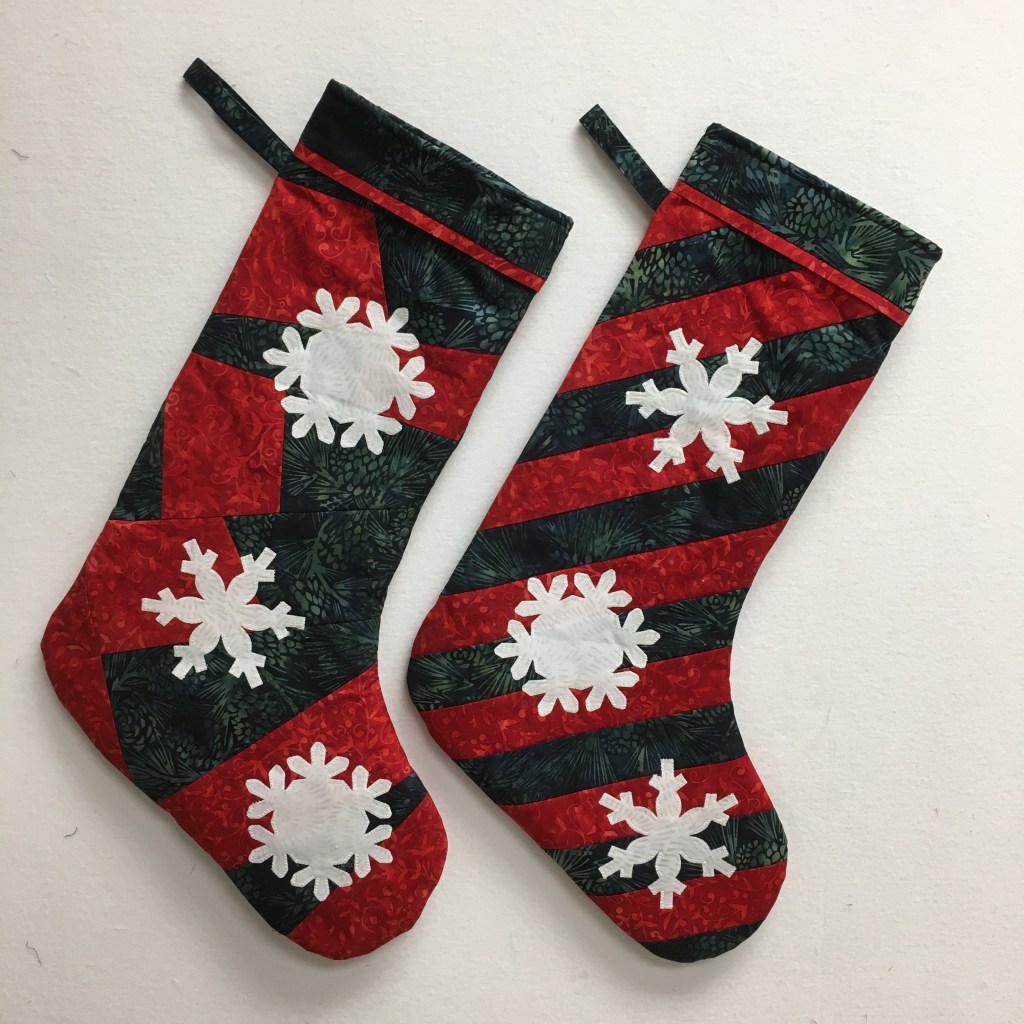
Here’s the first 2 stockings hanging on my design wall.
I think the stockings look a little more Christmasy pinned to the wood pile! The third stocking is for our grand-dog, Daphne! The larger stockings are 21″ long and Daphne’s is 17″ long.
This is a super simple mystery quilt! It is my own design. I designed it for the Boundary Bay Quilt Guild, but I’m going to be sharing it with YOU as well!
There will be 8 clues. This quilt will finish at 43″ x 53″ … unless you decide to make it bigger or smaller.
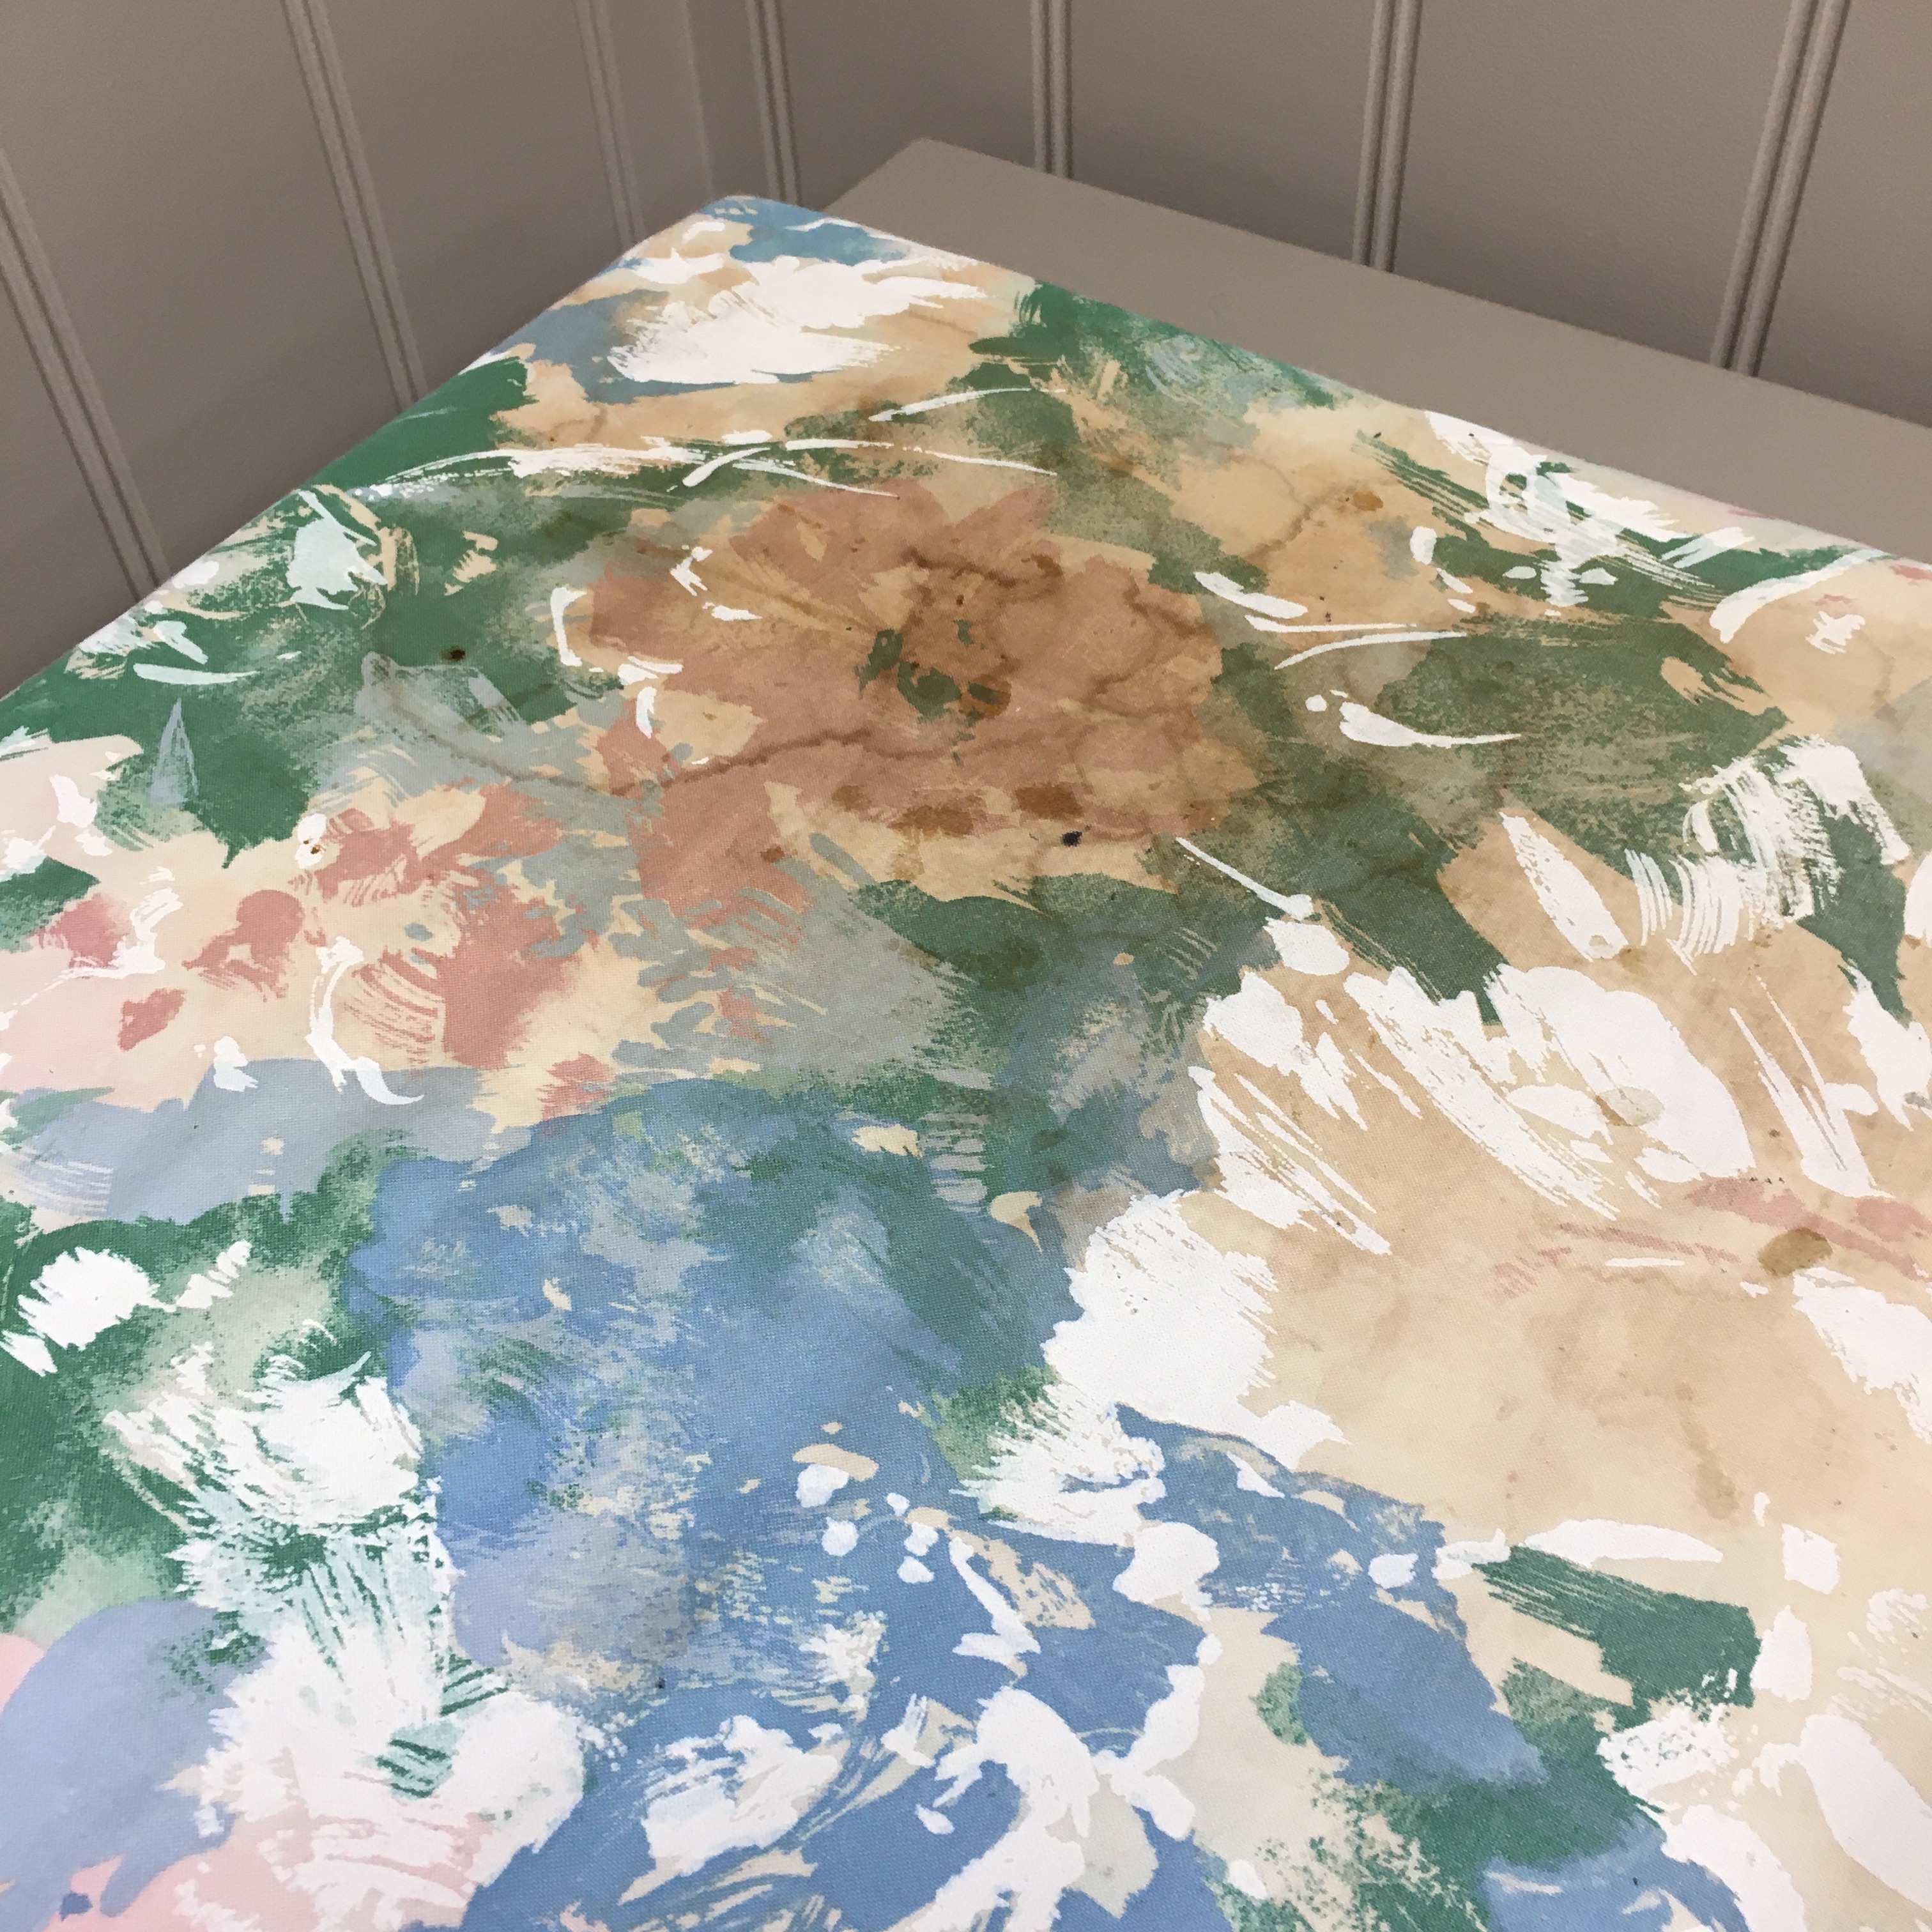
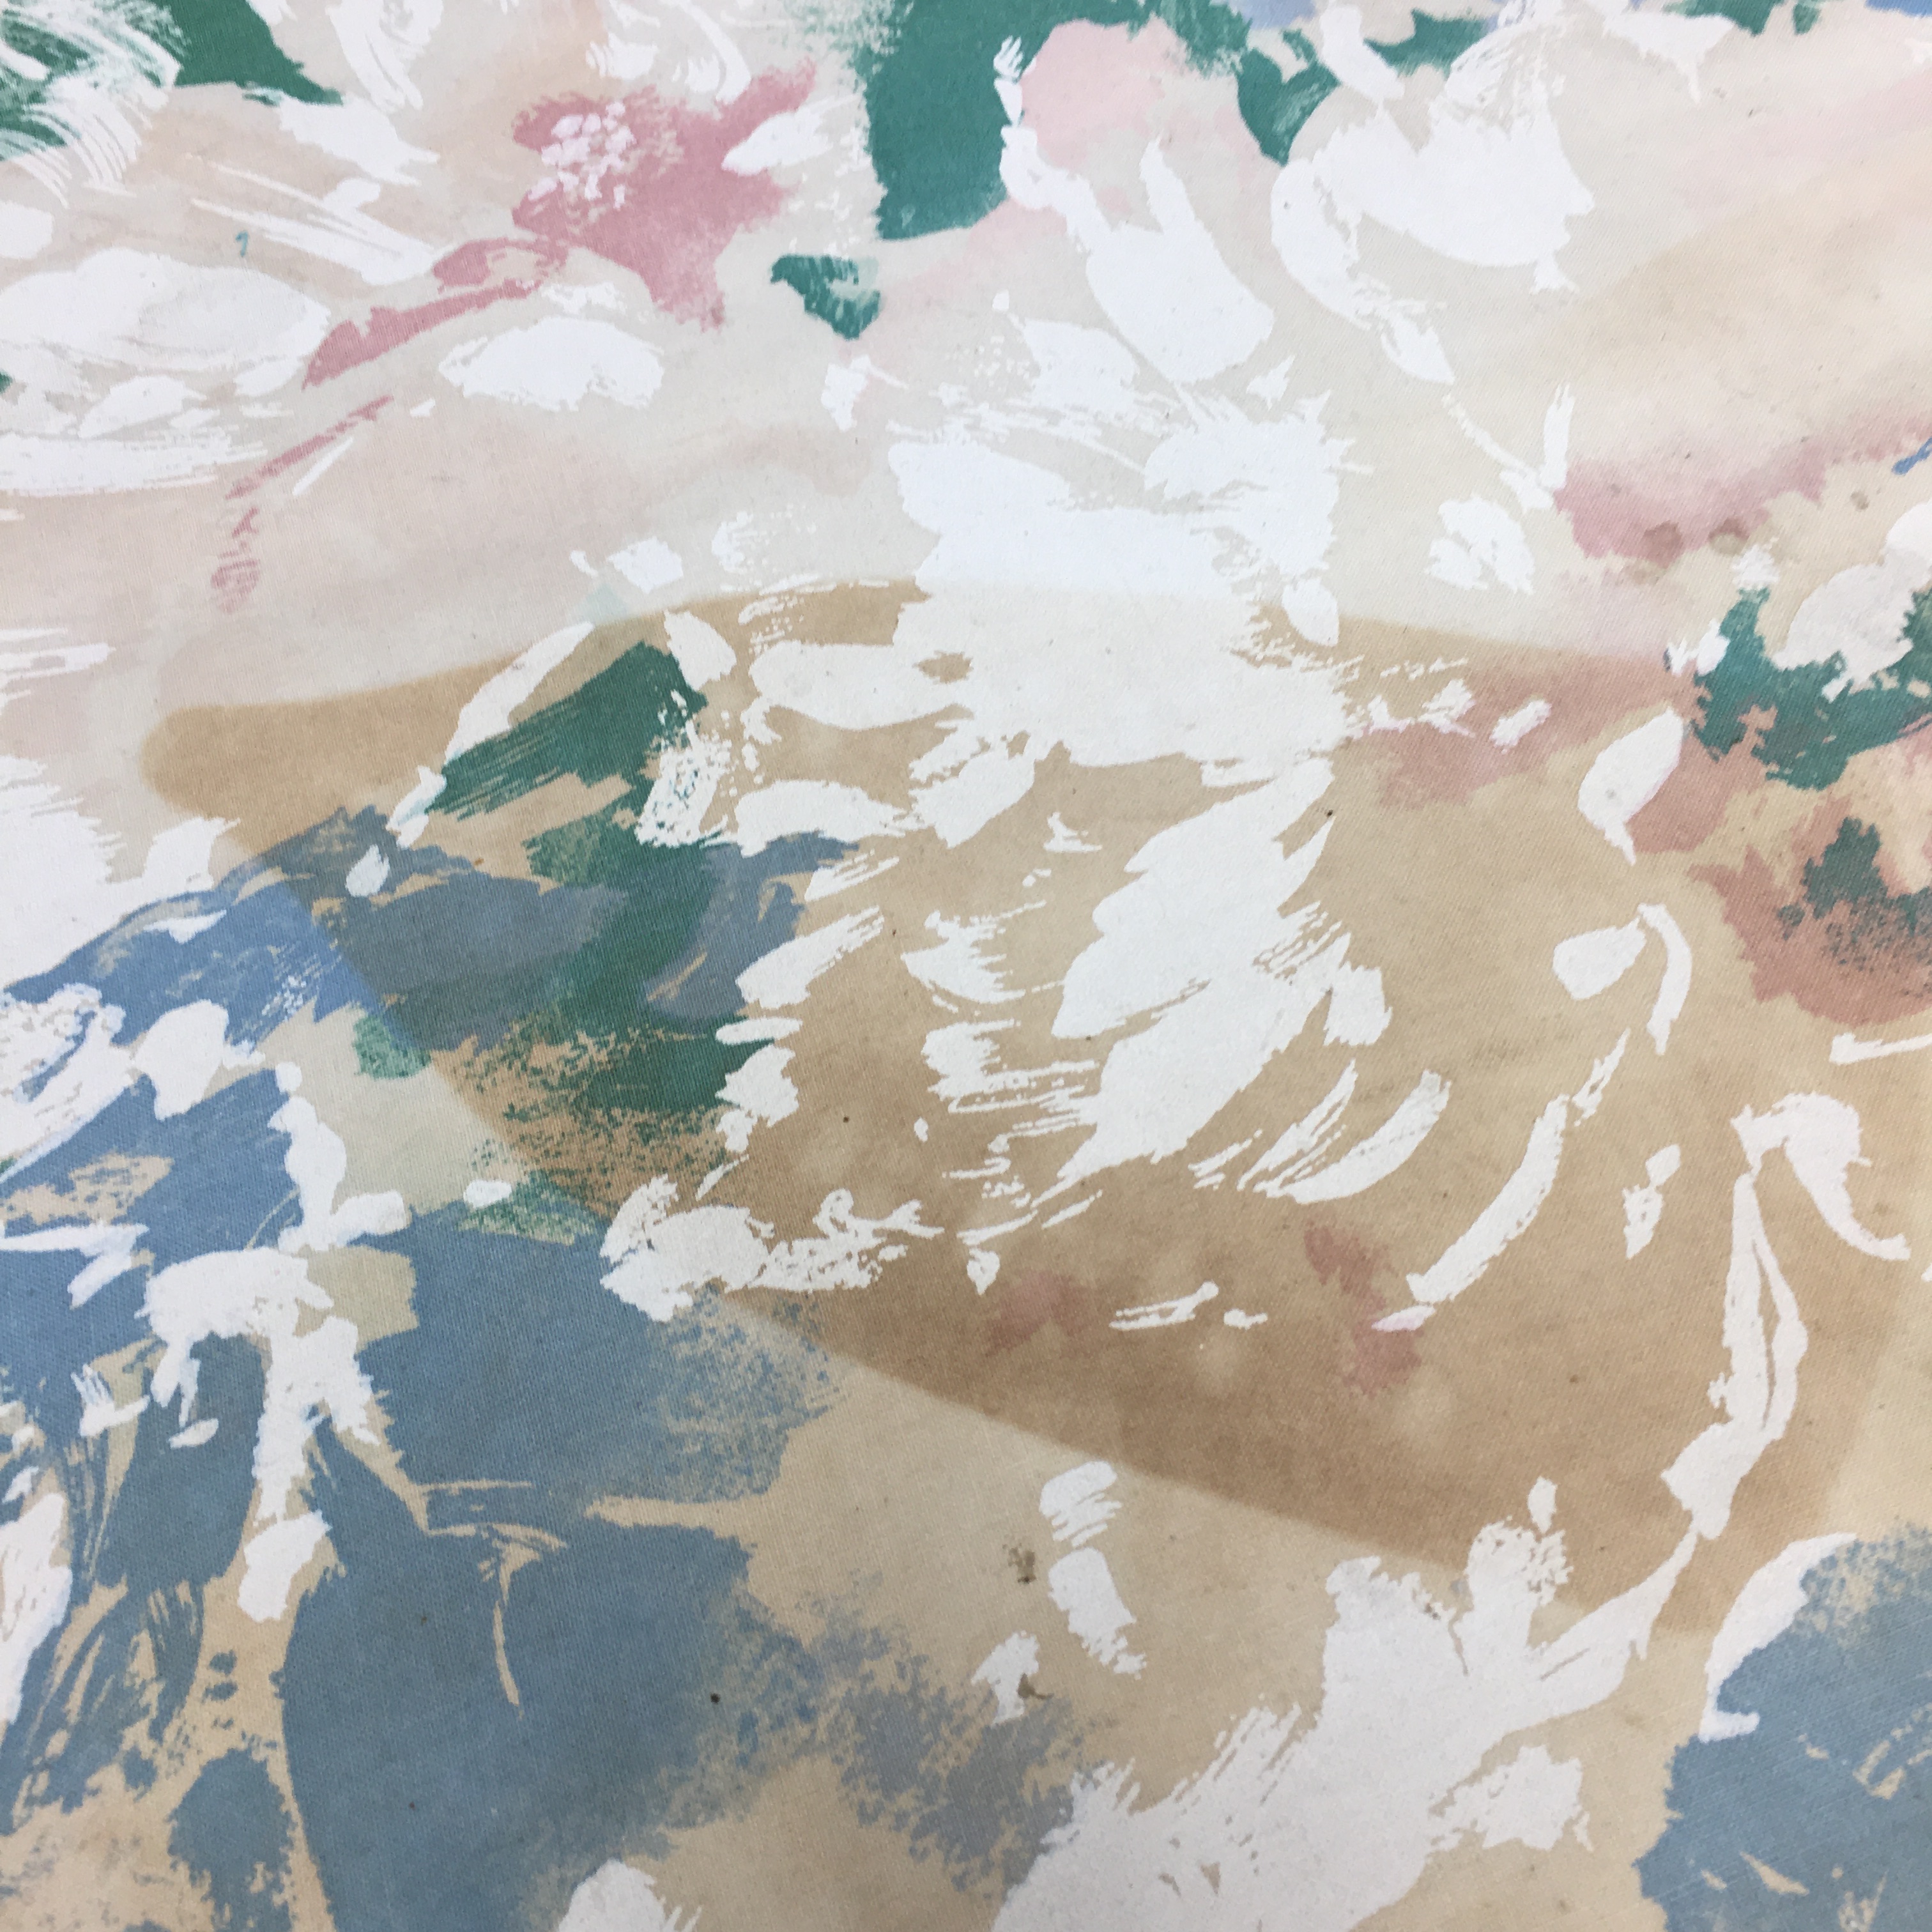
My ironing board cover was a disaster! So many dark marks … I was going to change it before I took it to the retreat a few weeks ago … I’m glad I didn’t, because it gained an iron imprint!
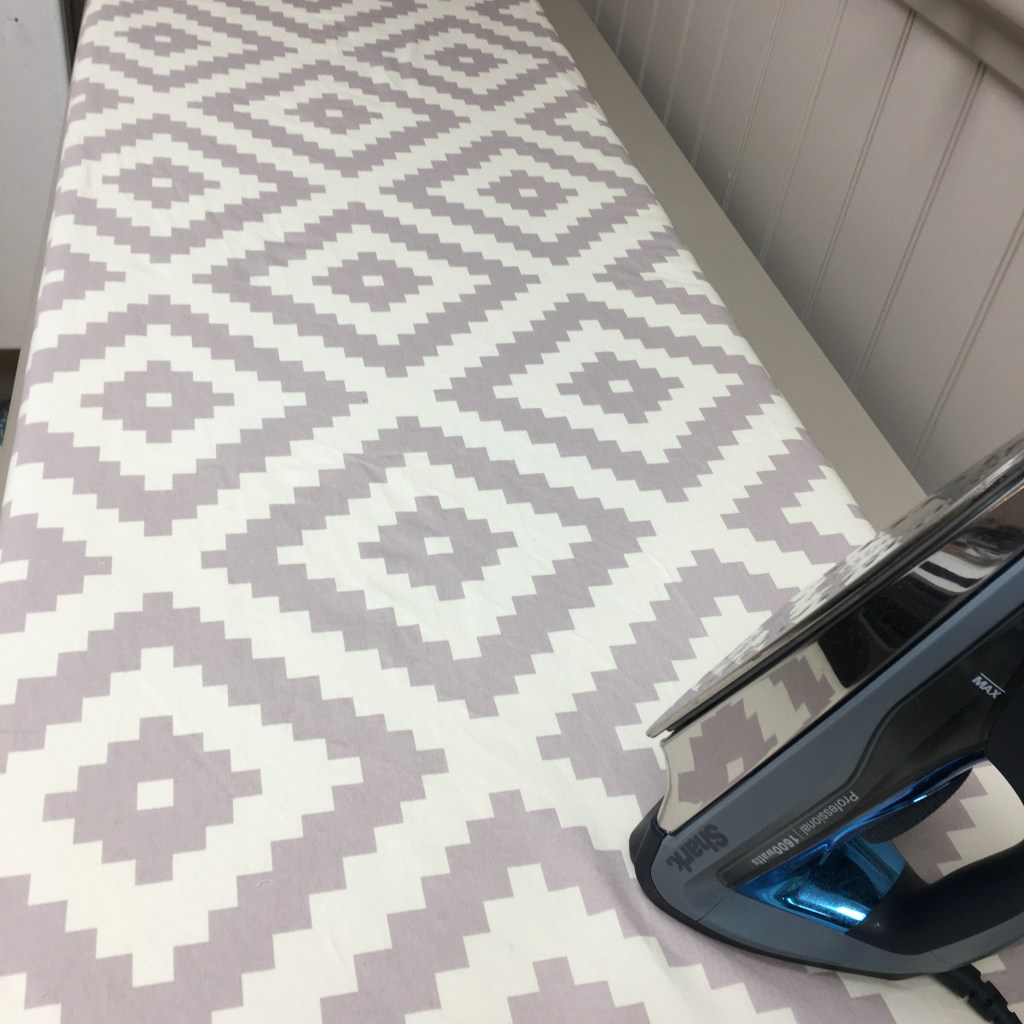
So, I took 2 layers of Hobbs 80/20 batting and some fabric from my stash and made a new cover! It’s so nice and clean, I almost hate to use it!
This is a super simple mystery quilt! It is my own design. I designed it for the Boundary Bay Quilt Guild, but I’m going to be sharing it with YOU as well!
There will be 8 clues. This quilt will finish at 43″ x 53″ … unless you decide to make it bigger or smaller.
It’s hard for me to choose my favourite finish of the month. There is the byAnnie “A Place for Everything” bag and the Heart quilt made for the Breast Cancer Awareness Blog Hop. Both are made with Island Batik fabrics! For more info on these projects see HERE and HERE. Check out Meadow Mist Designs for more “Favourite Finishes”.
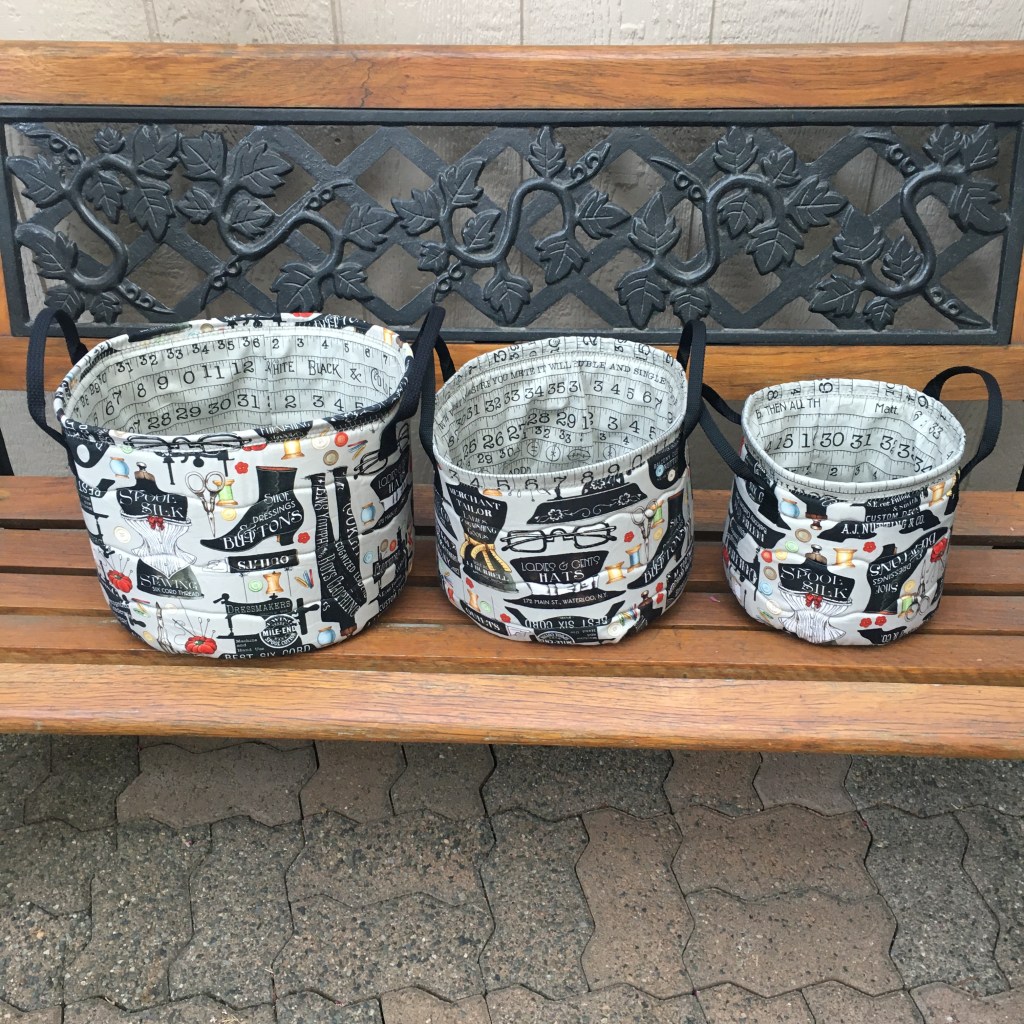
DrEAMI
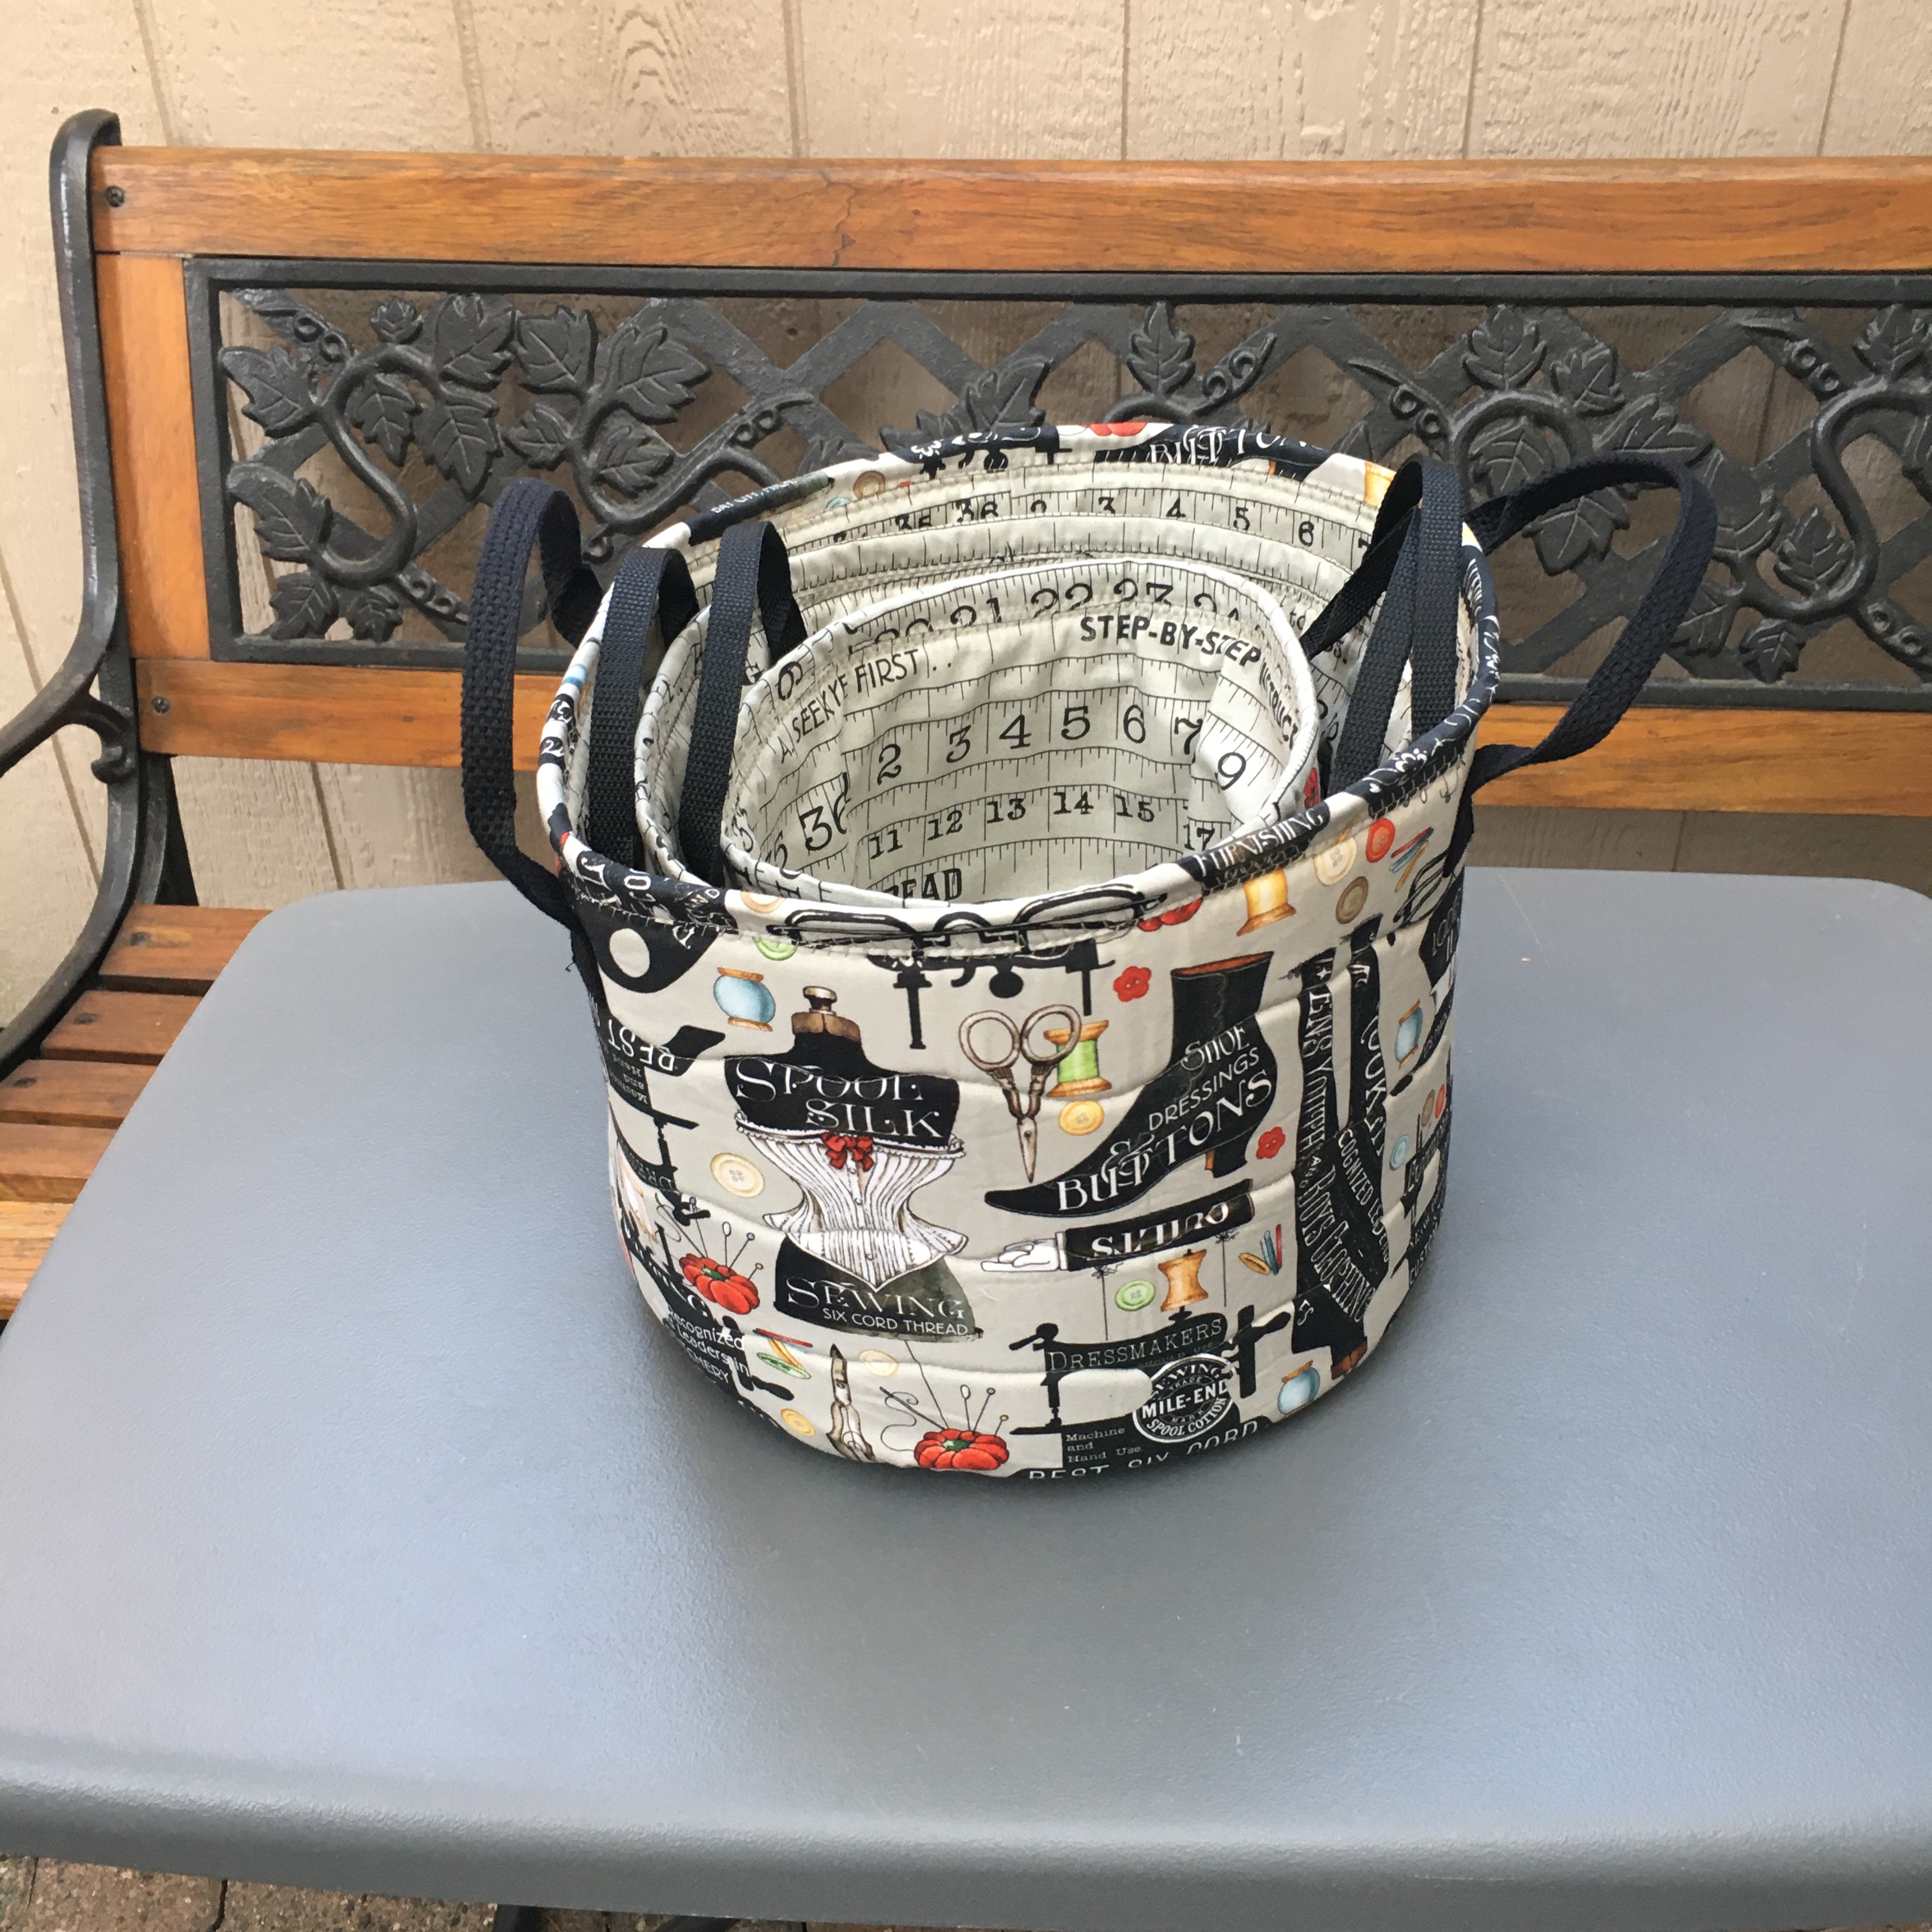
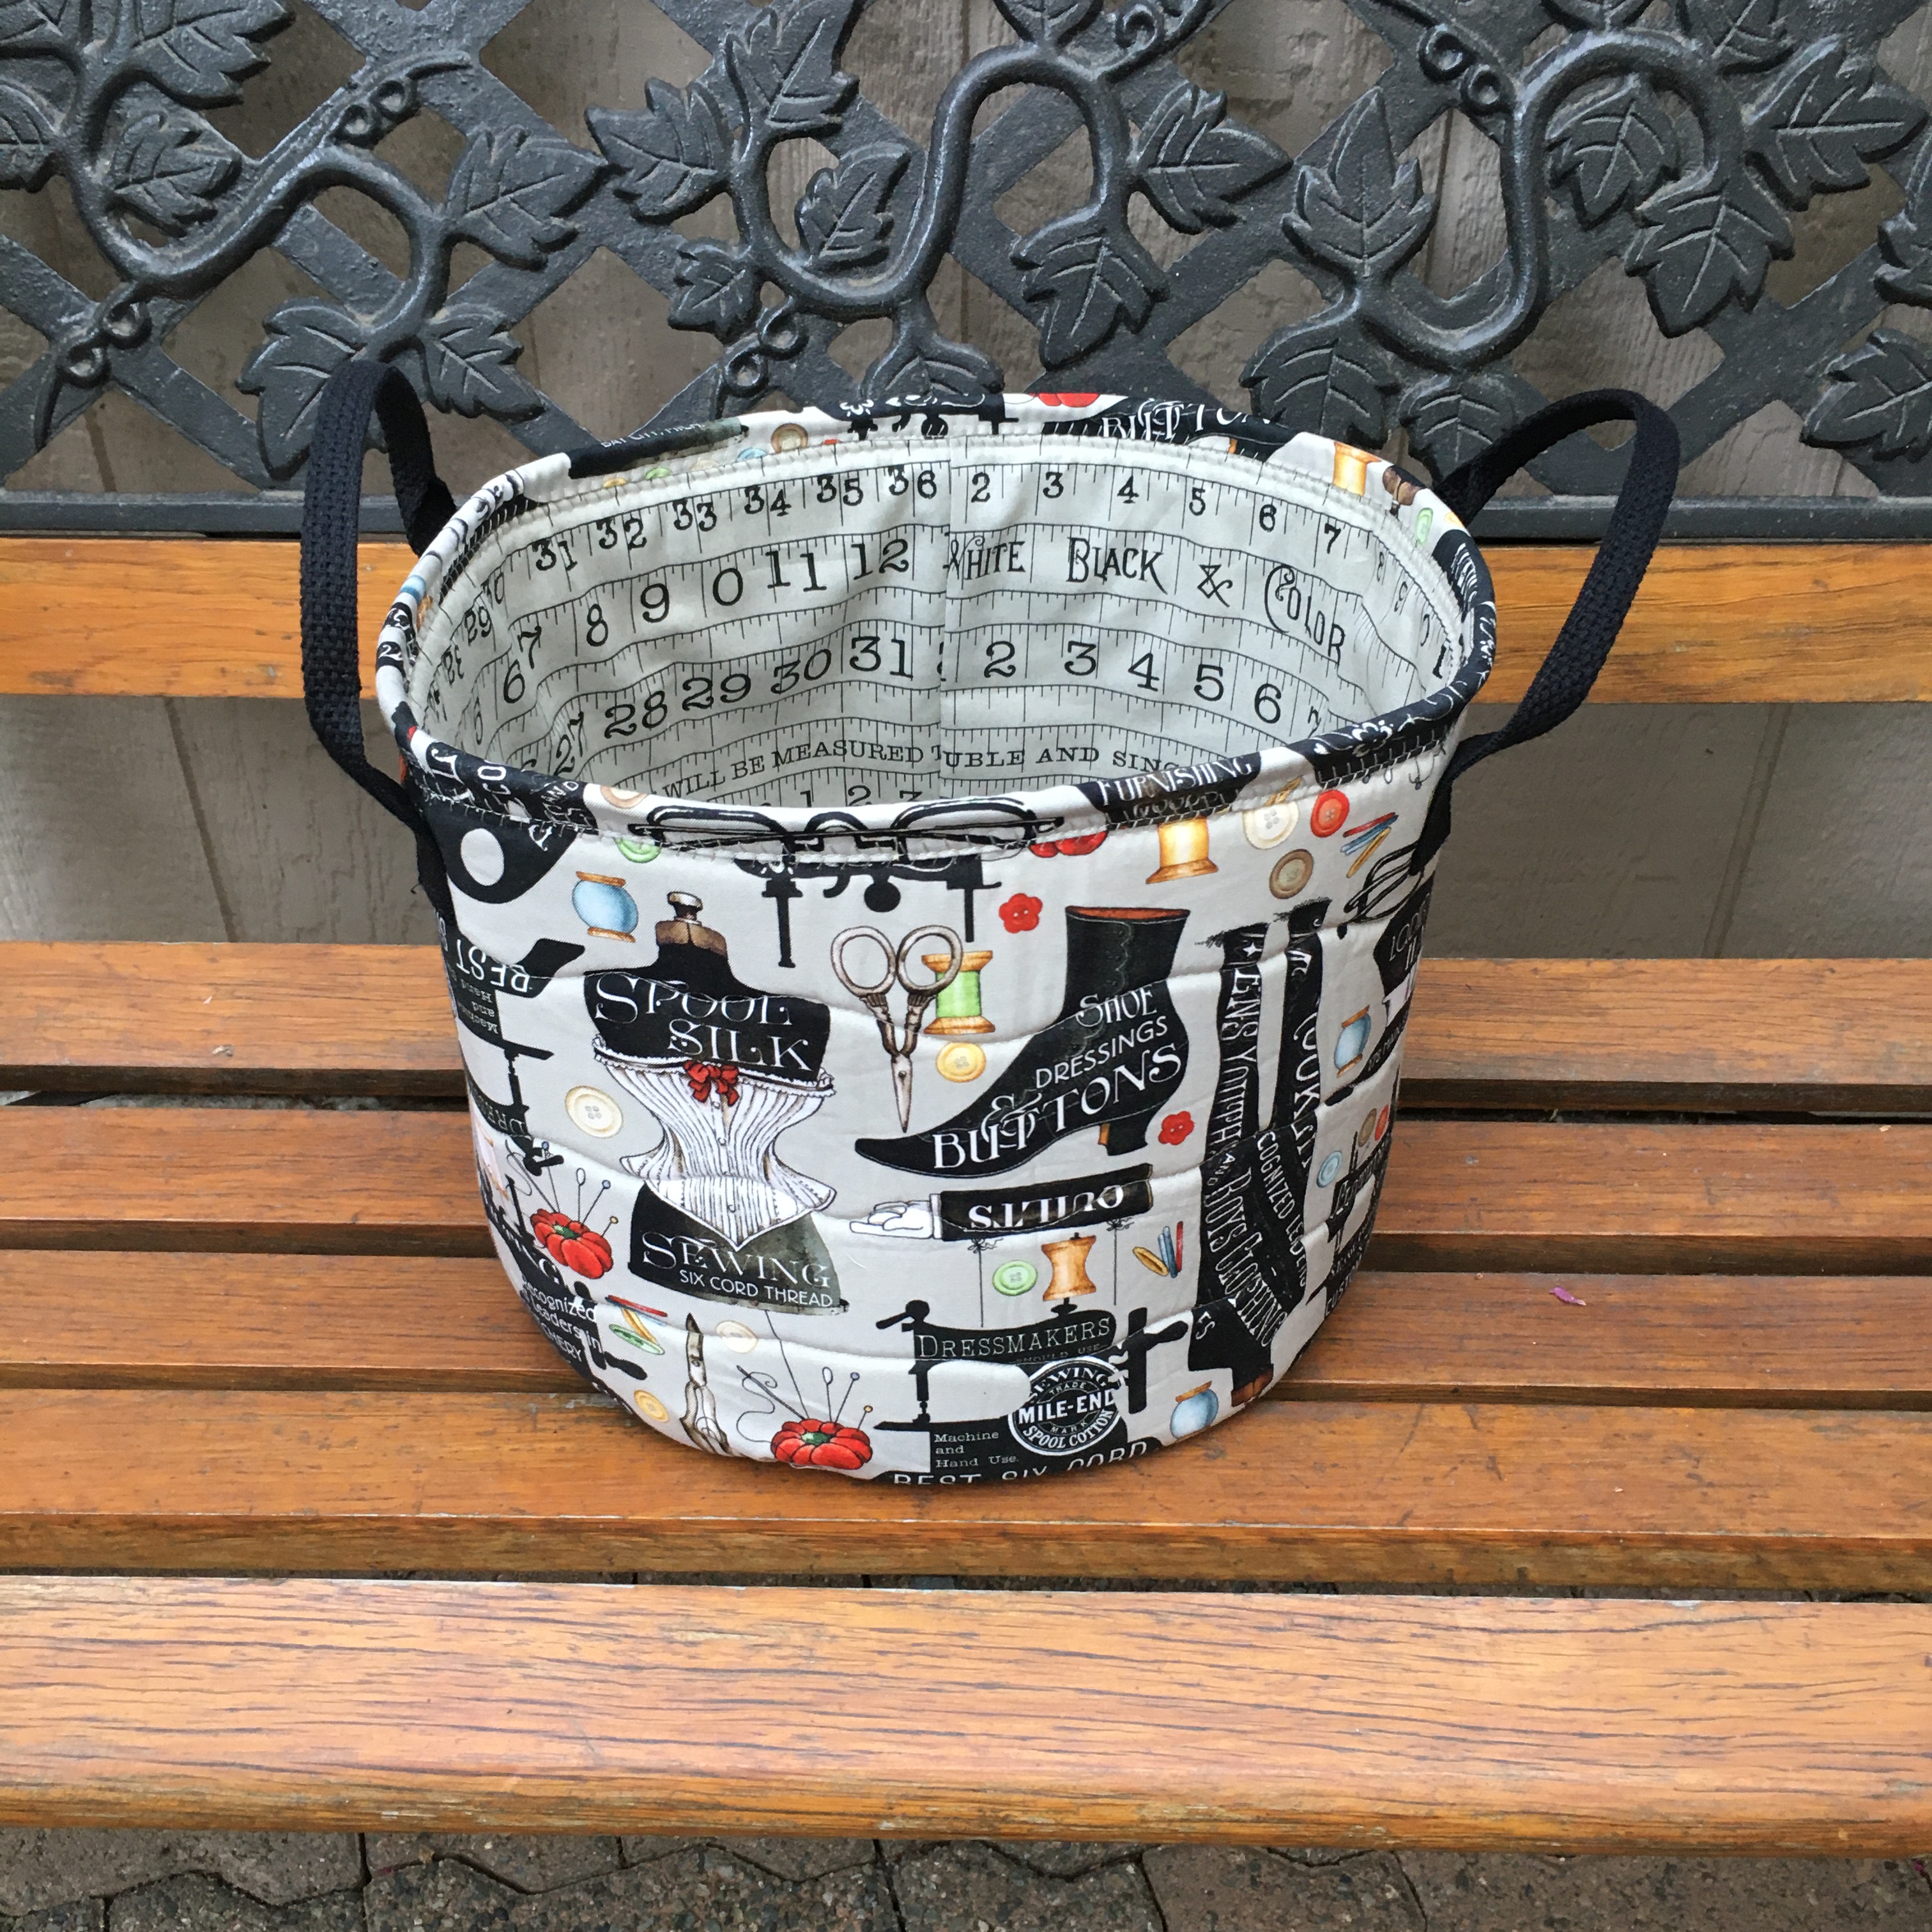
DrEAMI stands for Drop Everything And Make It. I dropped everything to make these baskets … I needed a gift for the retreat … but I made 3 baskets … They were fun to make and I used up fabric that I had bought to make them!
Fabric Draw
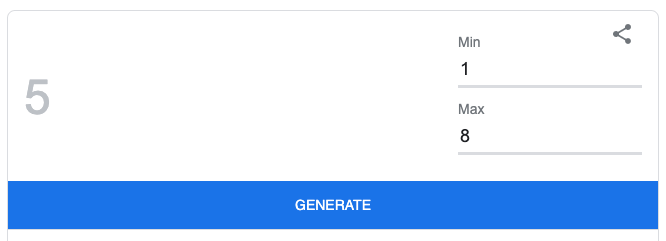
OK … WAY back in September, when I posted my Island Batik project, (using Studio 180 rulers), I offered fabric to a Canadian reader … The fabric was set aside … as was the list … I had a lot going on at the time, emergency eye surgery plus other stuff (that’s my excuse & I’m sticking to it!)
Today, I remembered and the number generator chose #5. Sandra K. has been sent and email and the fabric will soon be on it’s way to her house! Congratulations, Sandra!
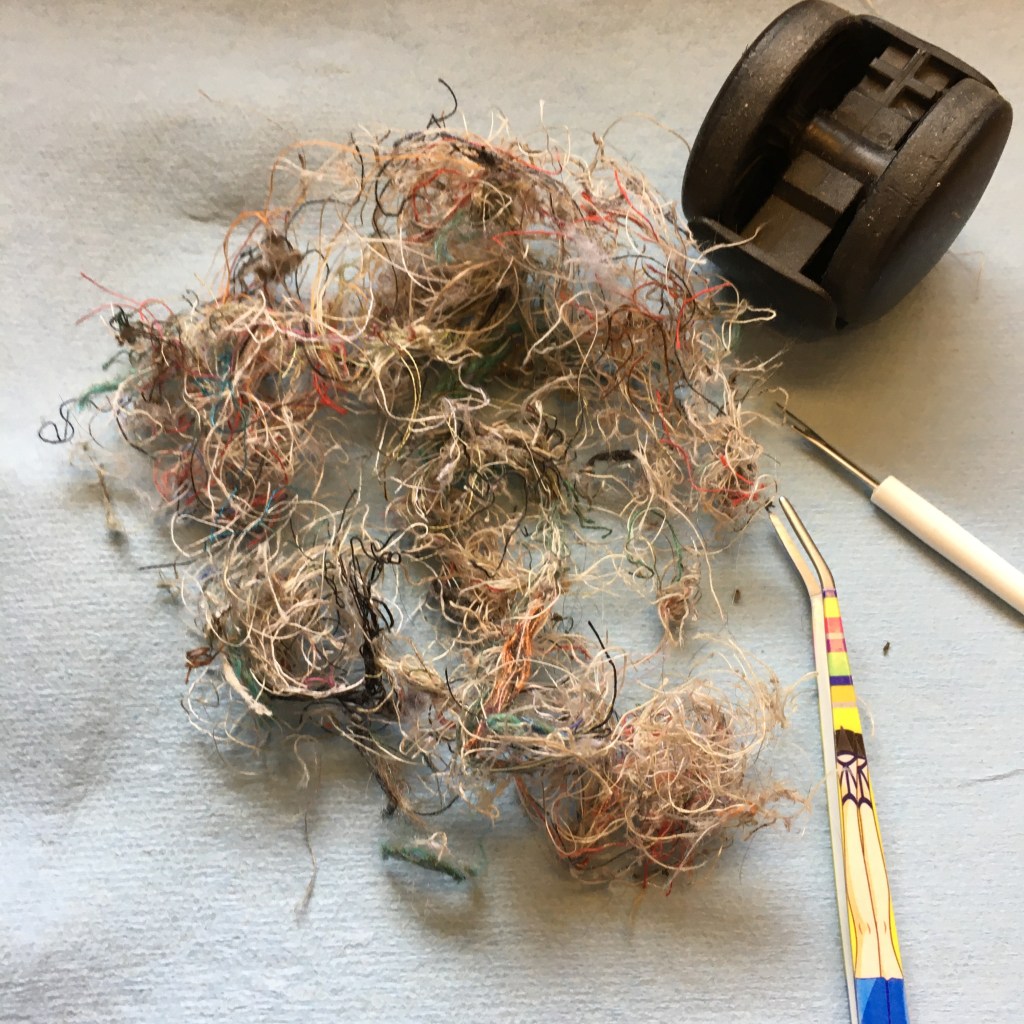
What? What wheels? Do sewing machines have wheels?
I know you’re asking!
If you’ve ever sewn with me or taken a class from me, or followed my blog for awhile, you KNOW that I will often tell you to clean the lint from your bobbin case! If there’s a problem, it’s one of the first things you should do. Get rid of the lint!
But wheels?
Yup, wheels!
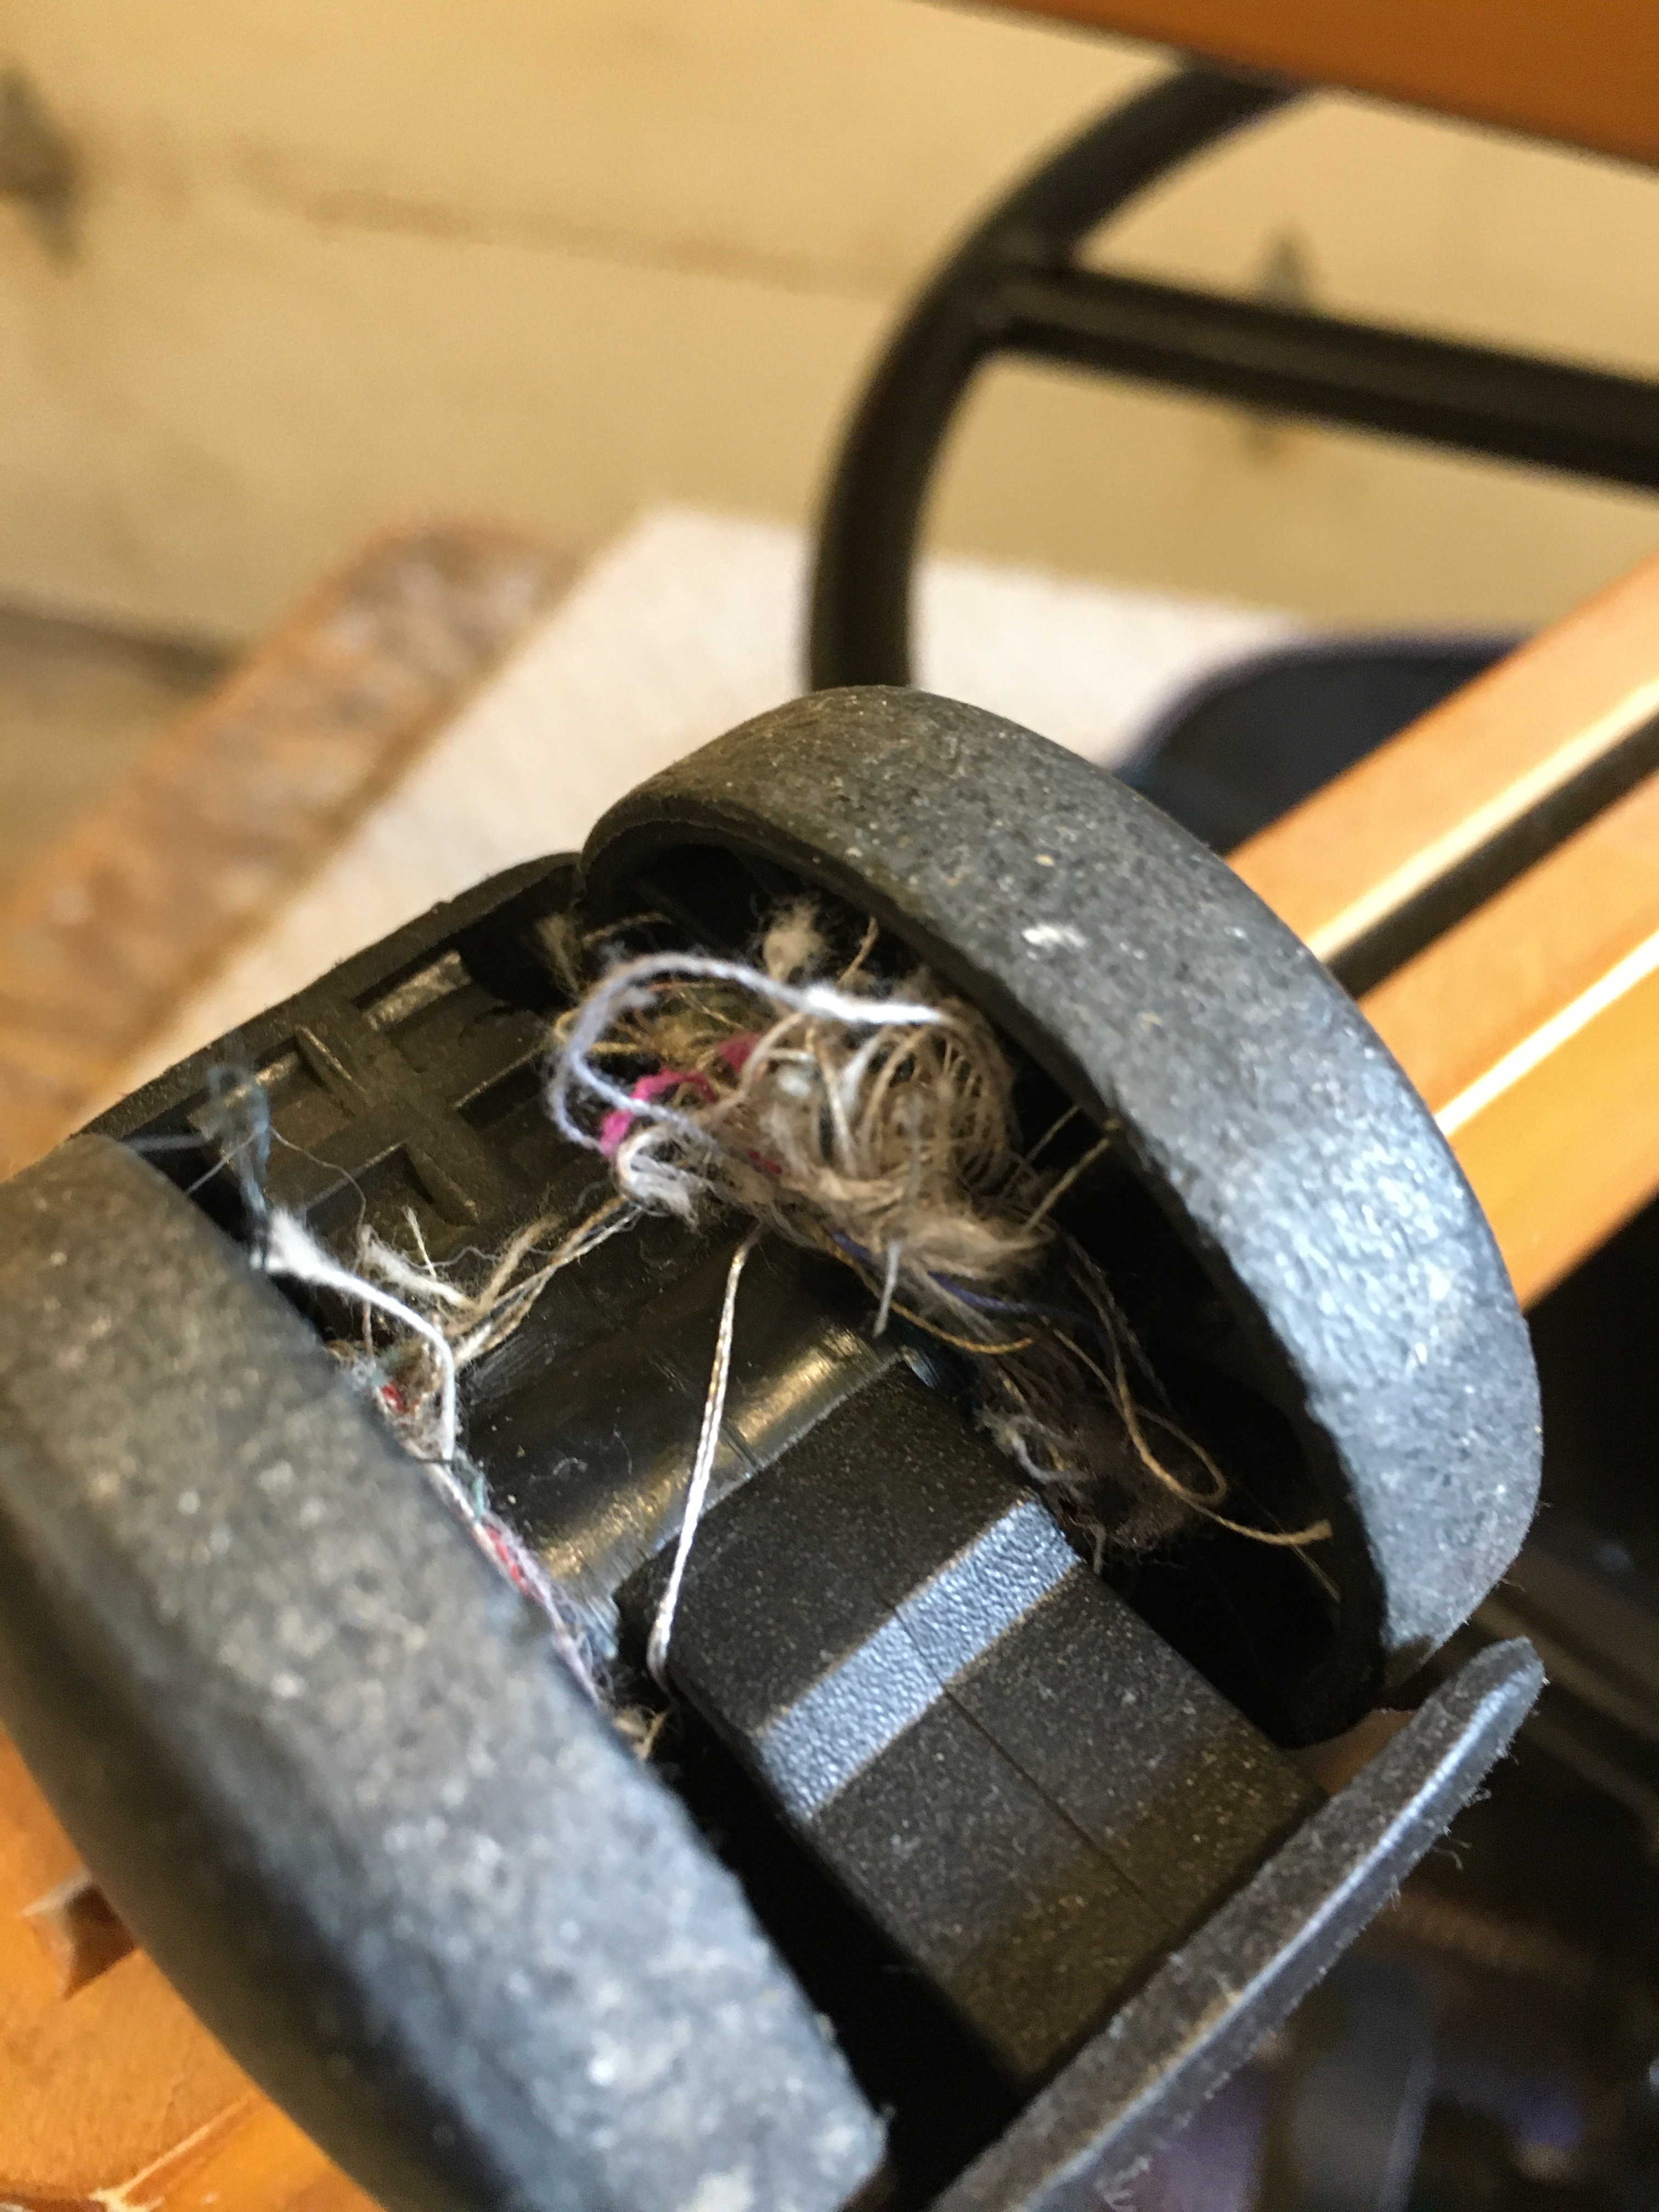
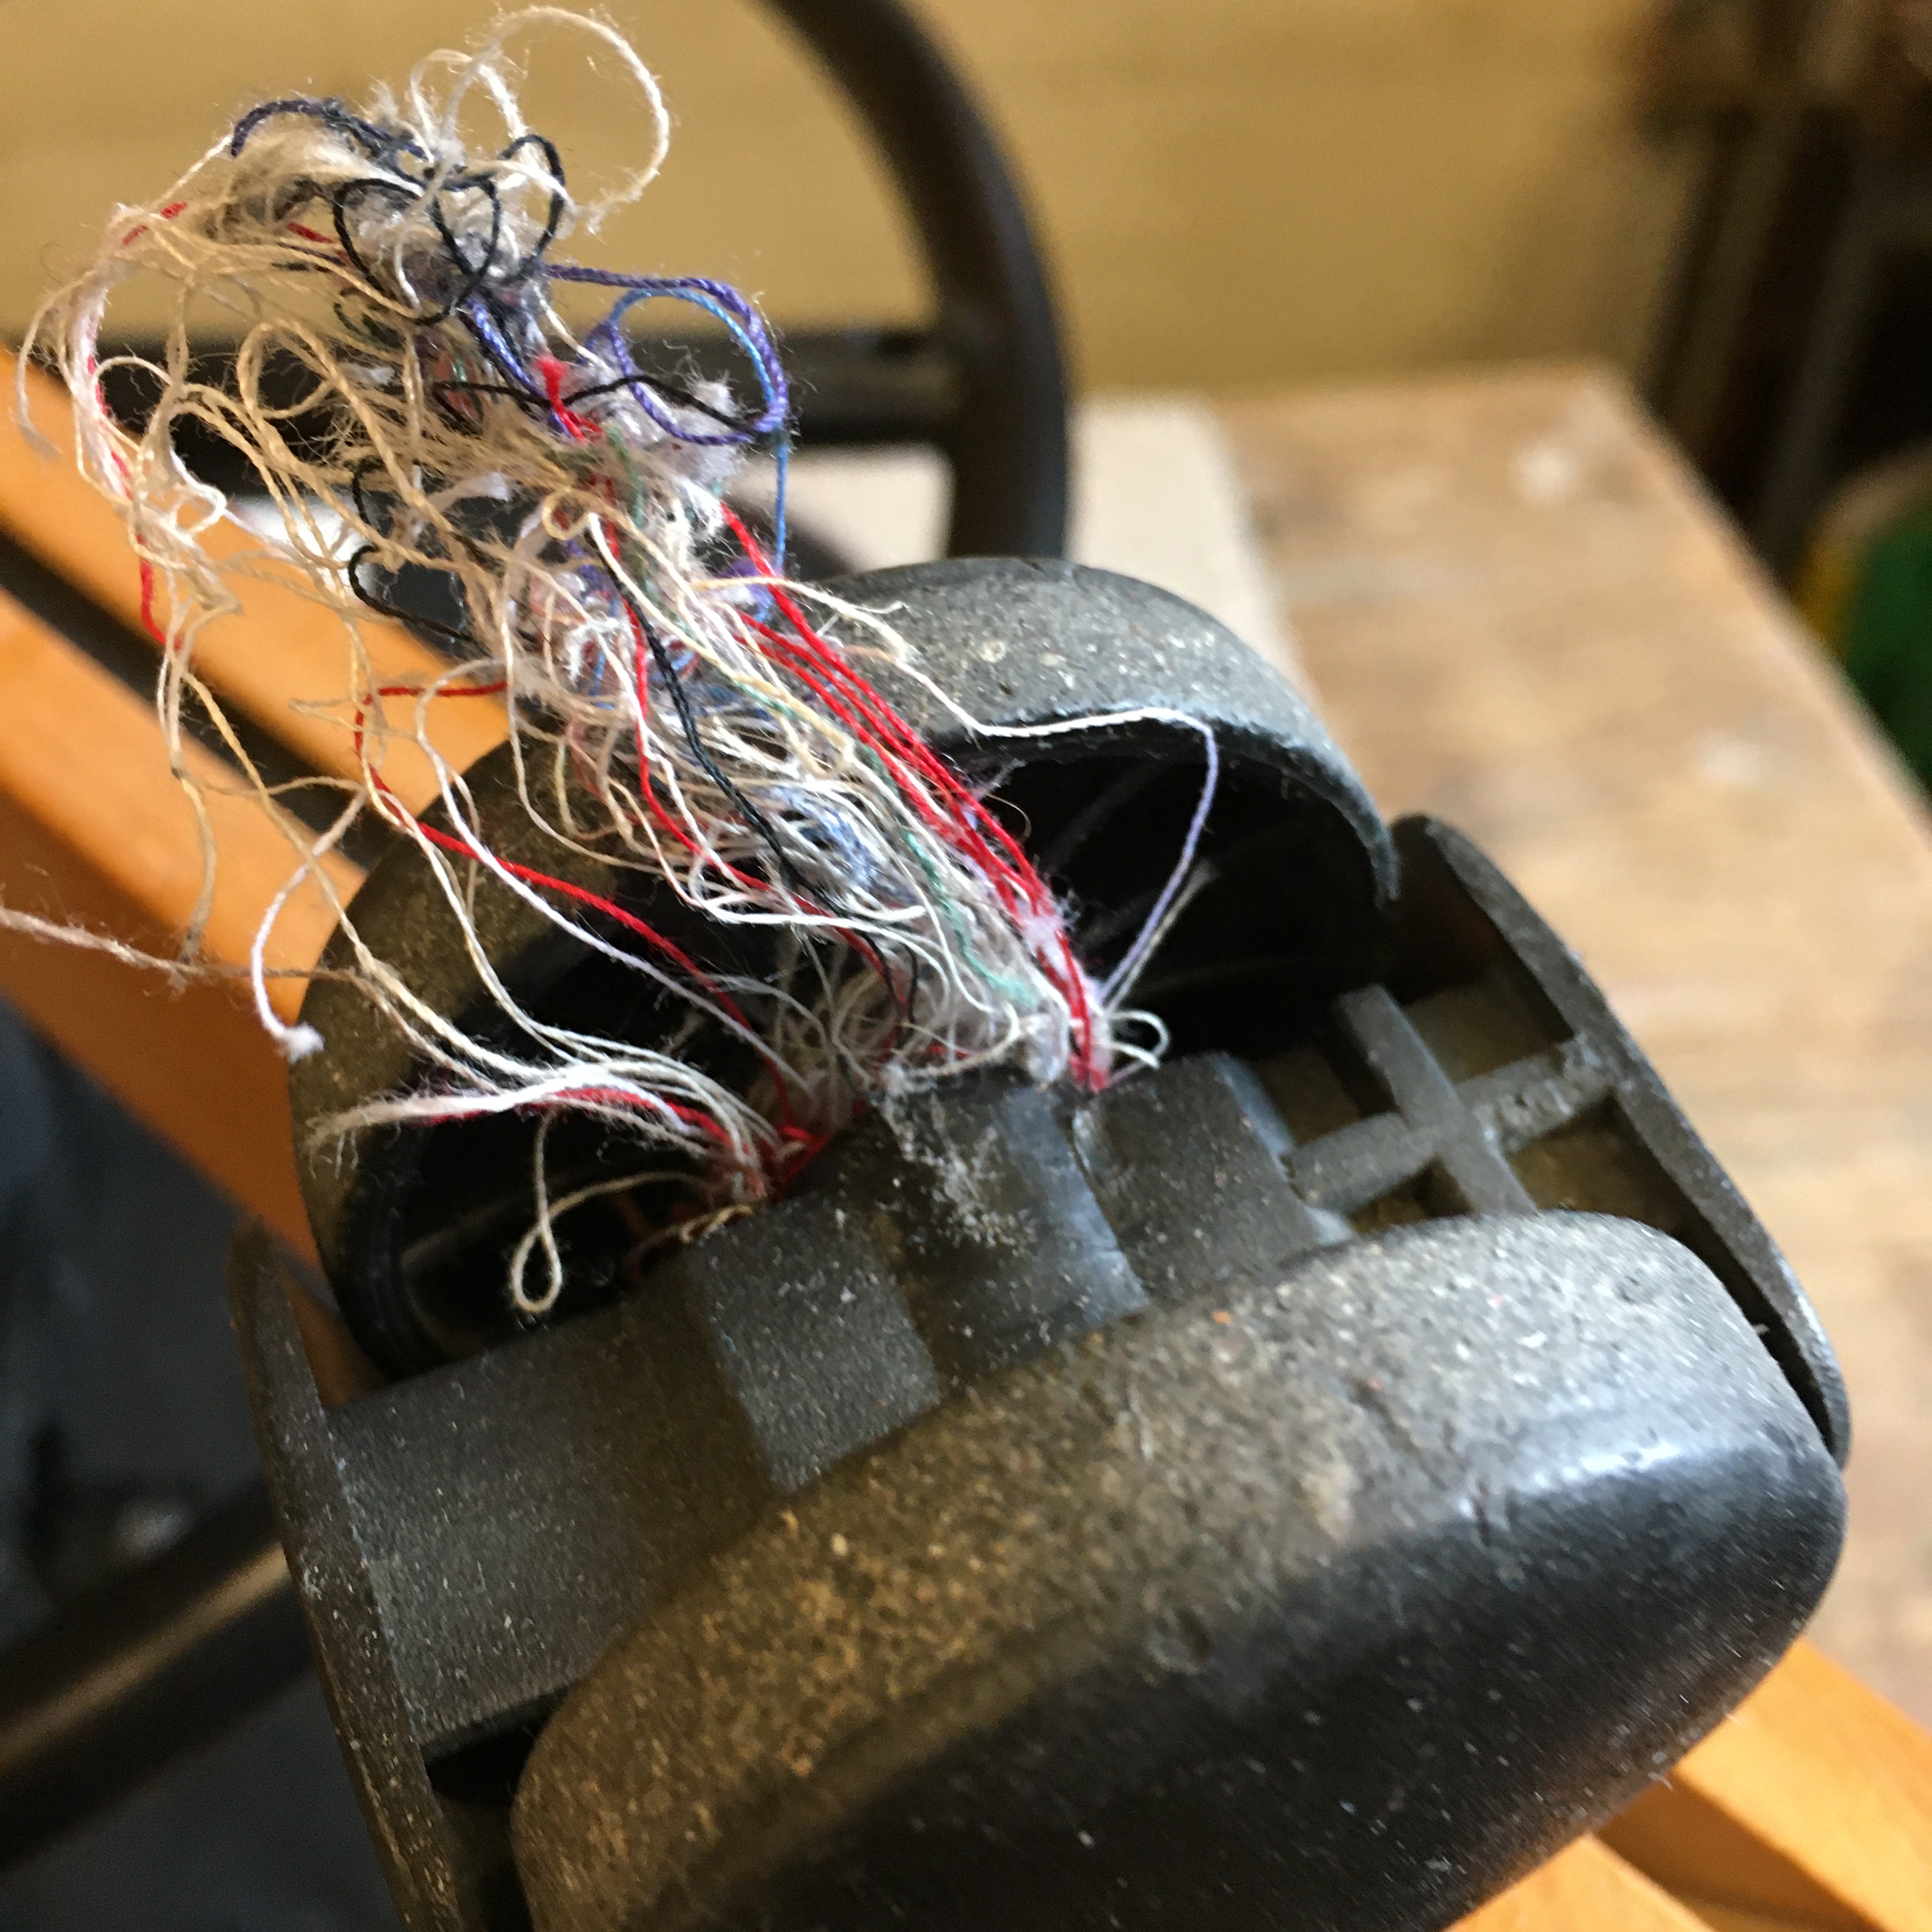
Years ago, I bought a rolling chair from a quilt store that was closing … the other day, my husband was sitting in the chair and realized that the wheels were not moving smoothly! I think I never noticed it because I’m too busy sewing or quilting.
He took the chair out to the garage and called me in to take a look at the wheels. Look at all the thread!
Well, I helped to pull some of the threads out … using a seam ripper and tweezers. Hubby ended up taking some of the wheels apart to get thread that was in the shaft (?) … I think that’s what he called it. He said if I talk about it on my blog to tell you that if it’s really bad – it might be worth just buying new wheels.
Here’s a picture of all the thread … and some wool that came out of the wheels. I know I’ve never had wool scraps in my sewing room, so some of it must have gotten twisted around before I even bought the chair.
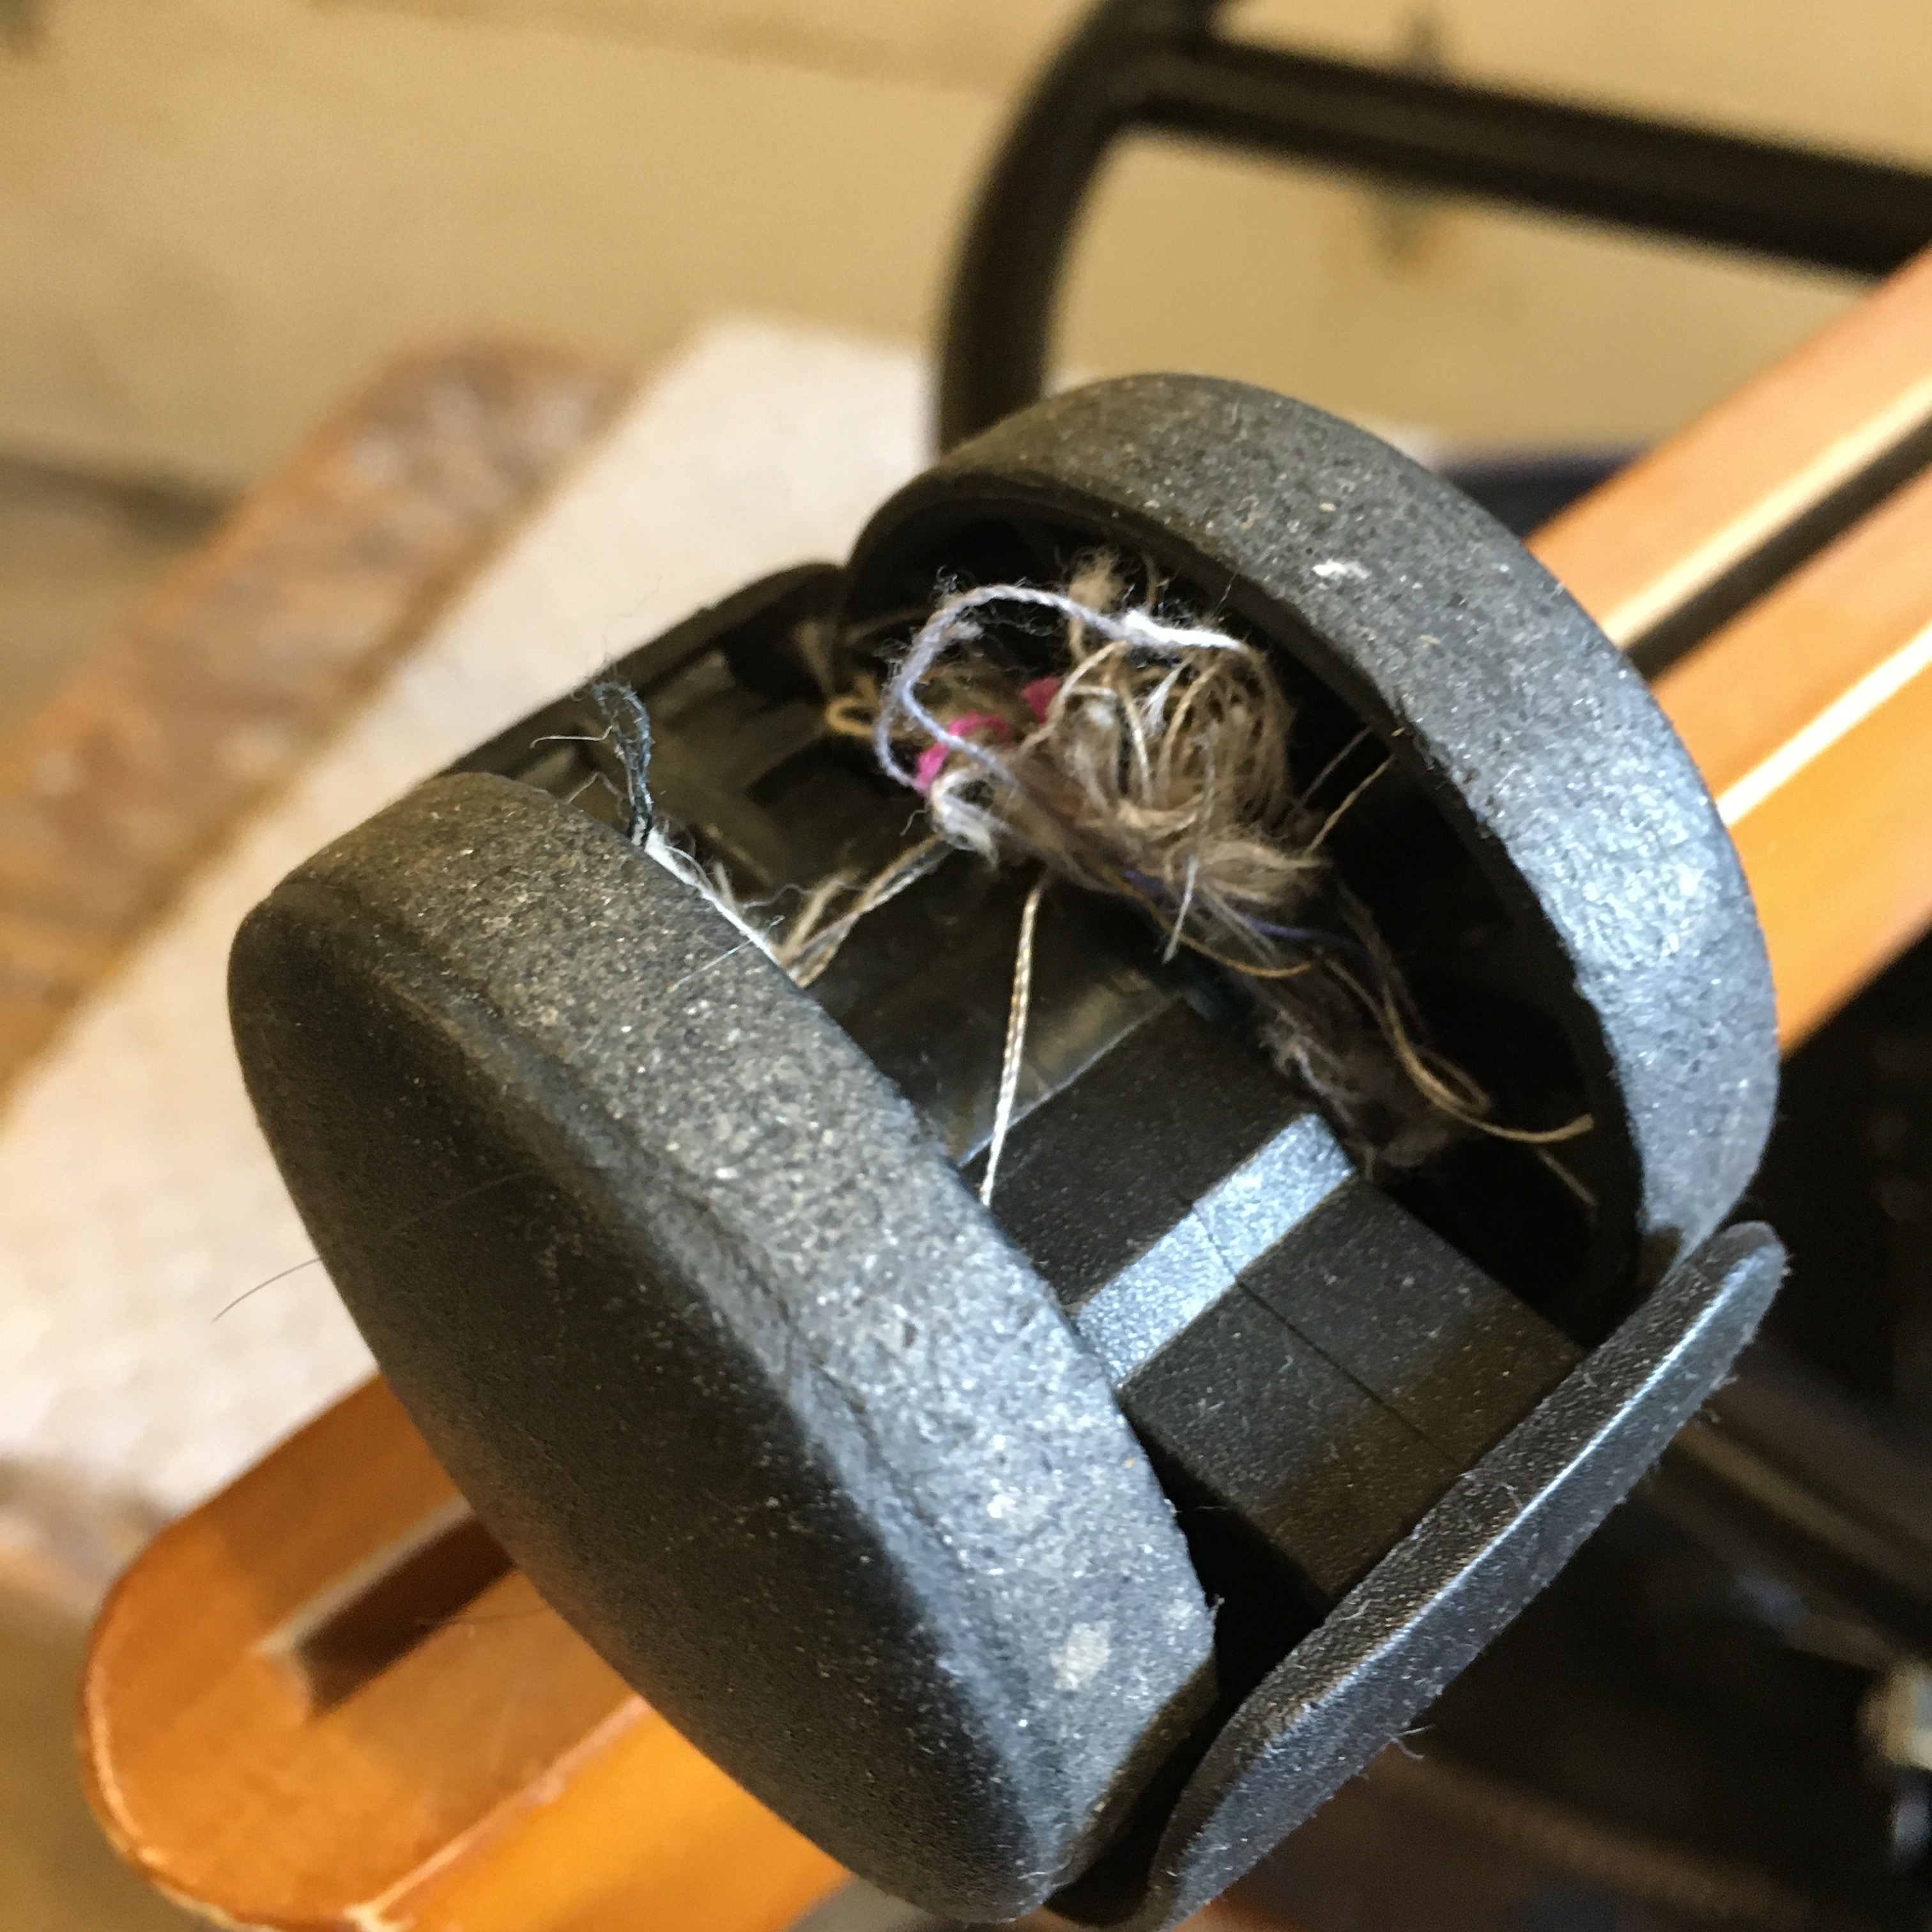
My wheels are now clean and oiled and my chair rolls very easily!
So, my Friday Finish (with the help of my husband!) is clean wheels!
This is a super simple mystery quilt! It is my own design. I designed it for the Boundary Bay Quilt Guild, but I’m going to be sharing it with YOU as well!
There will be 8 clues. This quilt will finish at 43″ x 53″ … unless you decide to make it bigger or smaller.
I finished a project that I started in January … playing with Inktense pencils. I did the quilting while at the retreat last week. Once I was home, I found the perfect dark green fabric for the binding. This project was a free-motion quilt-along by Helen Godden. The design is free and there are youtube tutorials to guide the quilting. You can access the free design HERE. (Christmas 2019)
My quilting is nowhere near perfect, but I find doing these little projects certainly helps my quilting and I learn lots as I do the projects.
I used Black Aurifil thread and red, green and yellow Glide thread. Hobbs 80/20 batting is in the center.
The Mystery has started!
This is a super simple mystery quilt! It is my own design. I designed it for the Boundary Bay Quilt Guild, but I’m going to be sharing it with YOU as well!
This quilt will finish at 43″ x 53″
There will be 8 clues. They will all come out on Tuesdays, starting October 18.
Oct 18: Clue #1: Fabric Requirements and Cutting HERE
Oct 25: Clue #2
Nov 1: Clue #3
Nov 8: Clue #4
Nov 15: Clue #5
Nov 22: Clue #6
Nov 29: Clue #7
Dec 6: Clue #8
Dec 13: Mystery Quilt Parade
New Classes
I will be teaching several classes at Essem in November. You can register for them HERE.
Stitching Time
Kate, from Life in Pieces, is hosting “Stitching Stuff” and the goal is to sew for at least 15 minutes a day. I use Kate’s guideline, but my personal goal is to sew for 30 minutes a day. On those “blah” days, it does motivate me to sit at my machine and 30 minutes often turns into several hours. Thank you Kate for the motivation!
Lots of stitching in the past week!
January – September: 234 / 272
Oct : 24 / 24
Total: 252 / 297
Percentage = 84%
Stash Report
Donna at Quilt Paint Create hosts a weekly linky party where you can display your stash numbers. This has really kept my stash from growing (somewhat!) Before I buy anything, I am always mindful of the fact that I need to report it on my blog … That sometimes stops me in my tracks!
But, I was at a retreat last week … and The Steam Trunk Craftworks had a pop-up shop … I absolutely NEEDED fabric … so 2 yards just happened to come home with me! Along with some snowflake buttons and tassels. Well, I only needed the white with the blue dots … but the other fabric is so pretty, I couldn’t resist!
However, the project I finished this week (see the top picture) used 1 yard of fabric.
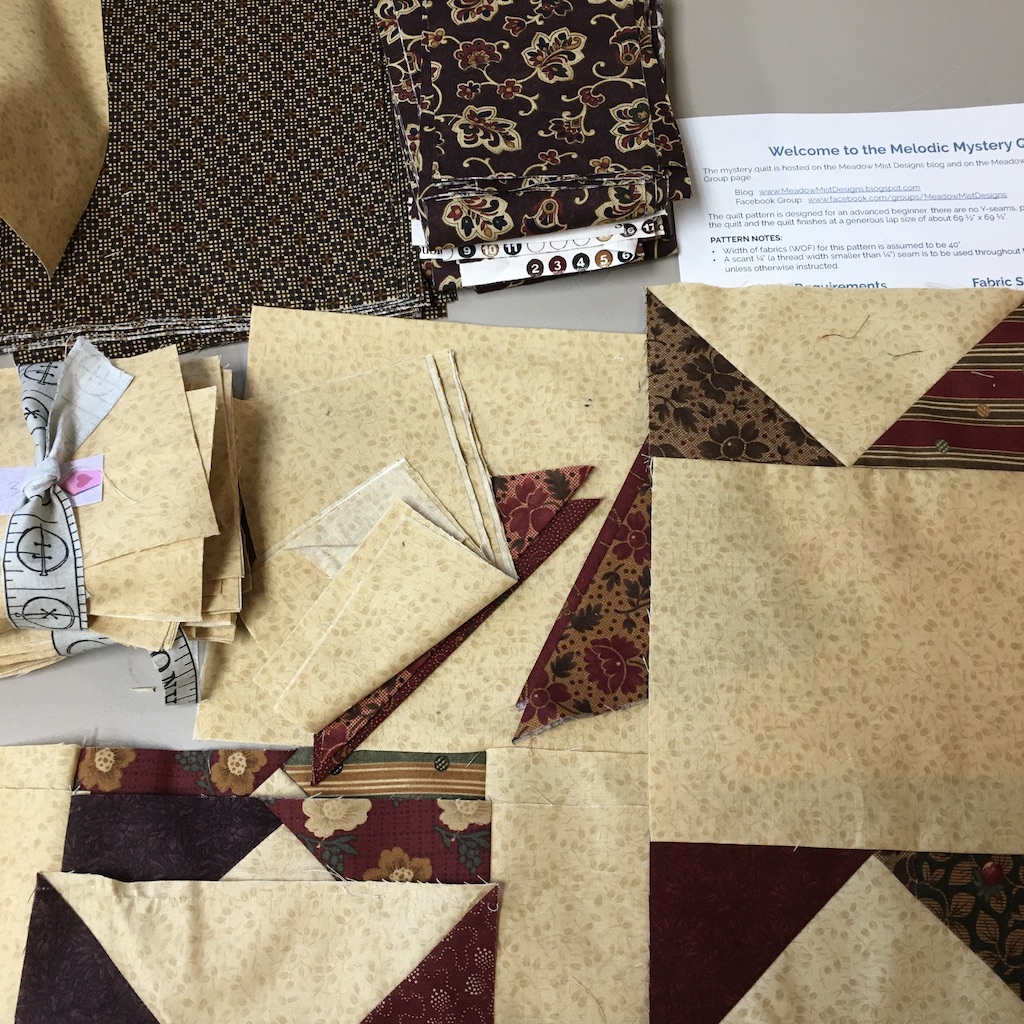
Melodic Mystery Quilt: I was working on this at the retreat … I was very tired and made a ton of mistakes … I need to fix those and finish the September clue! It’s not too late for you to start … the clues are at Meadow Mist Designs.
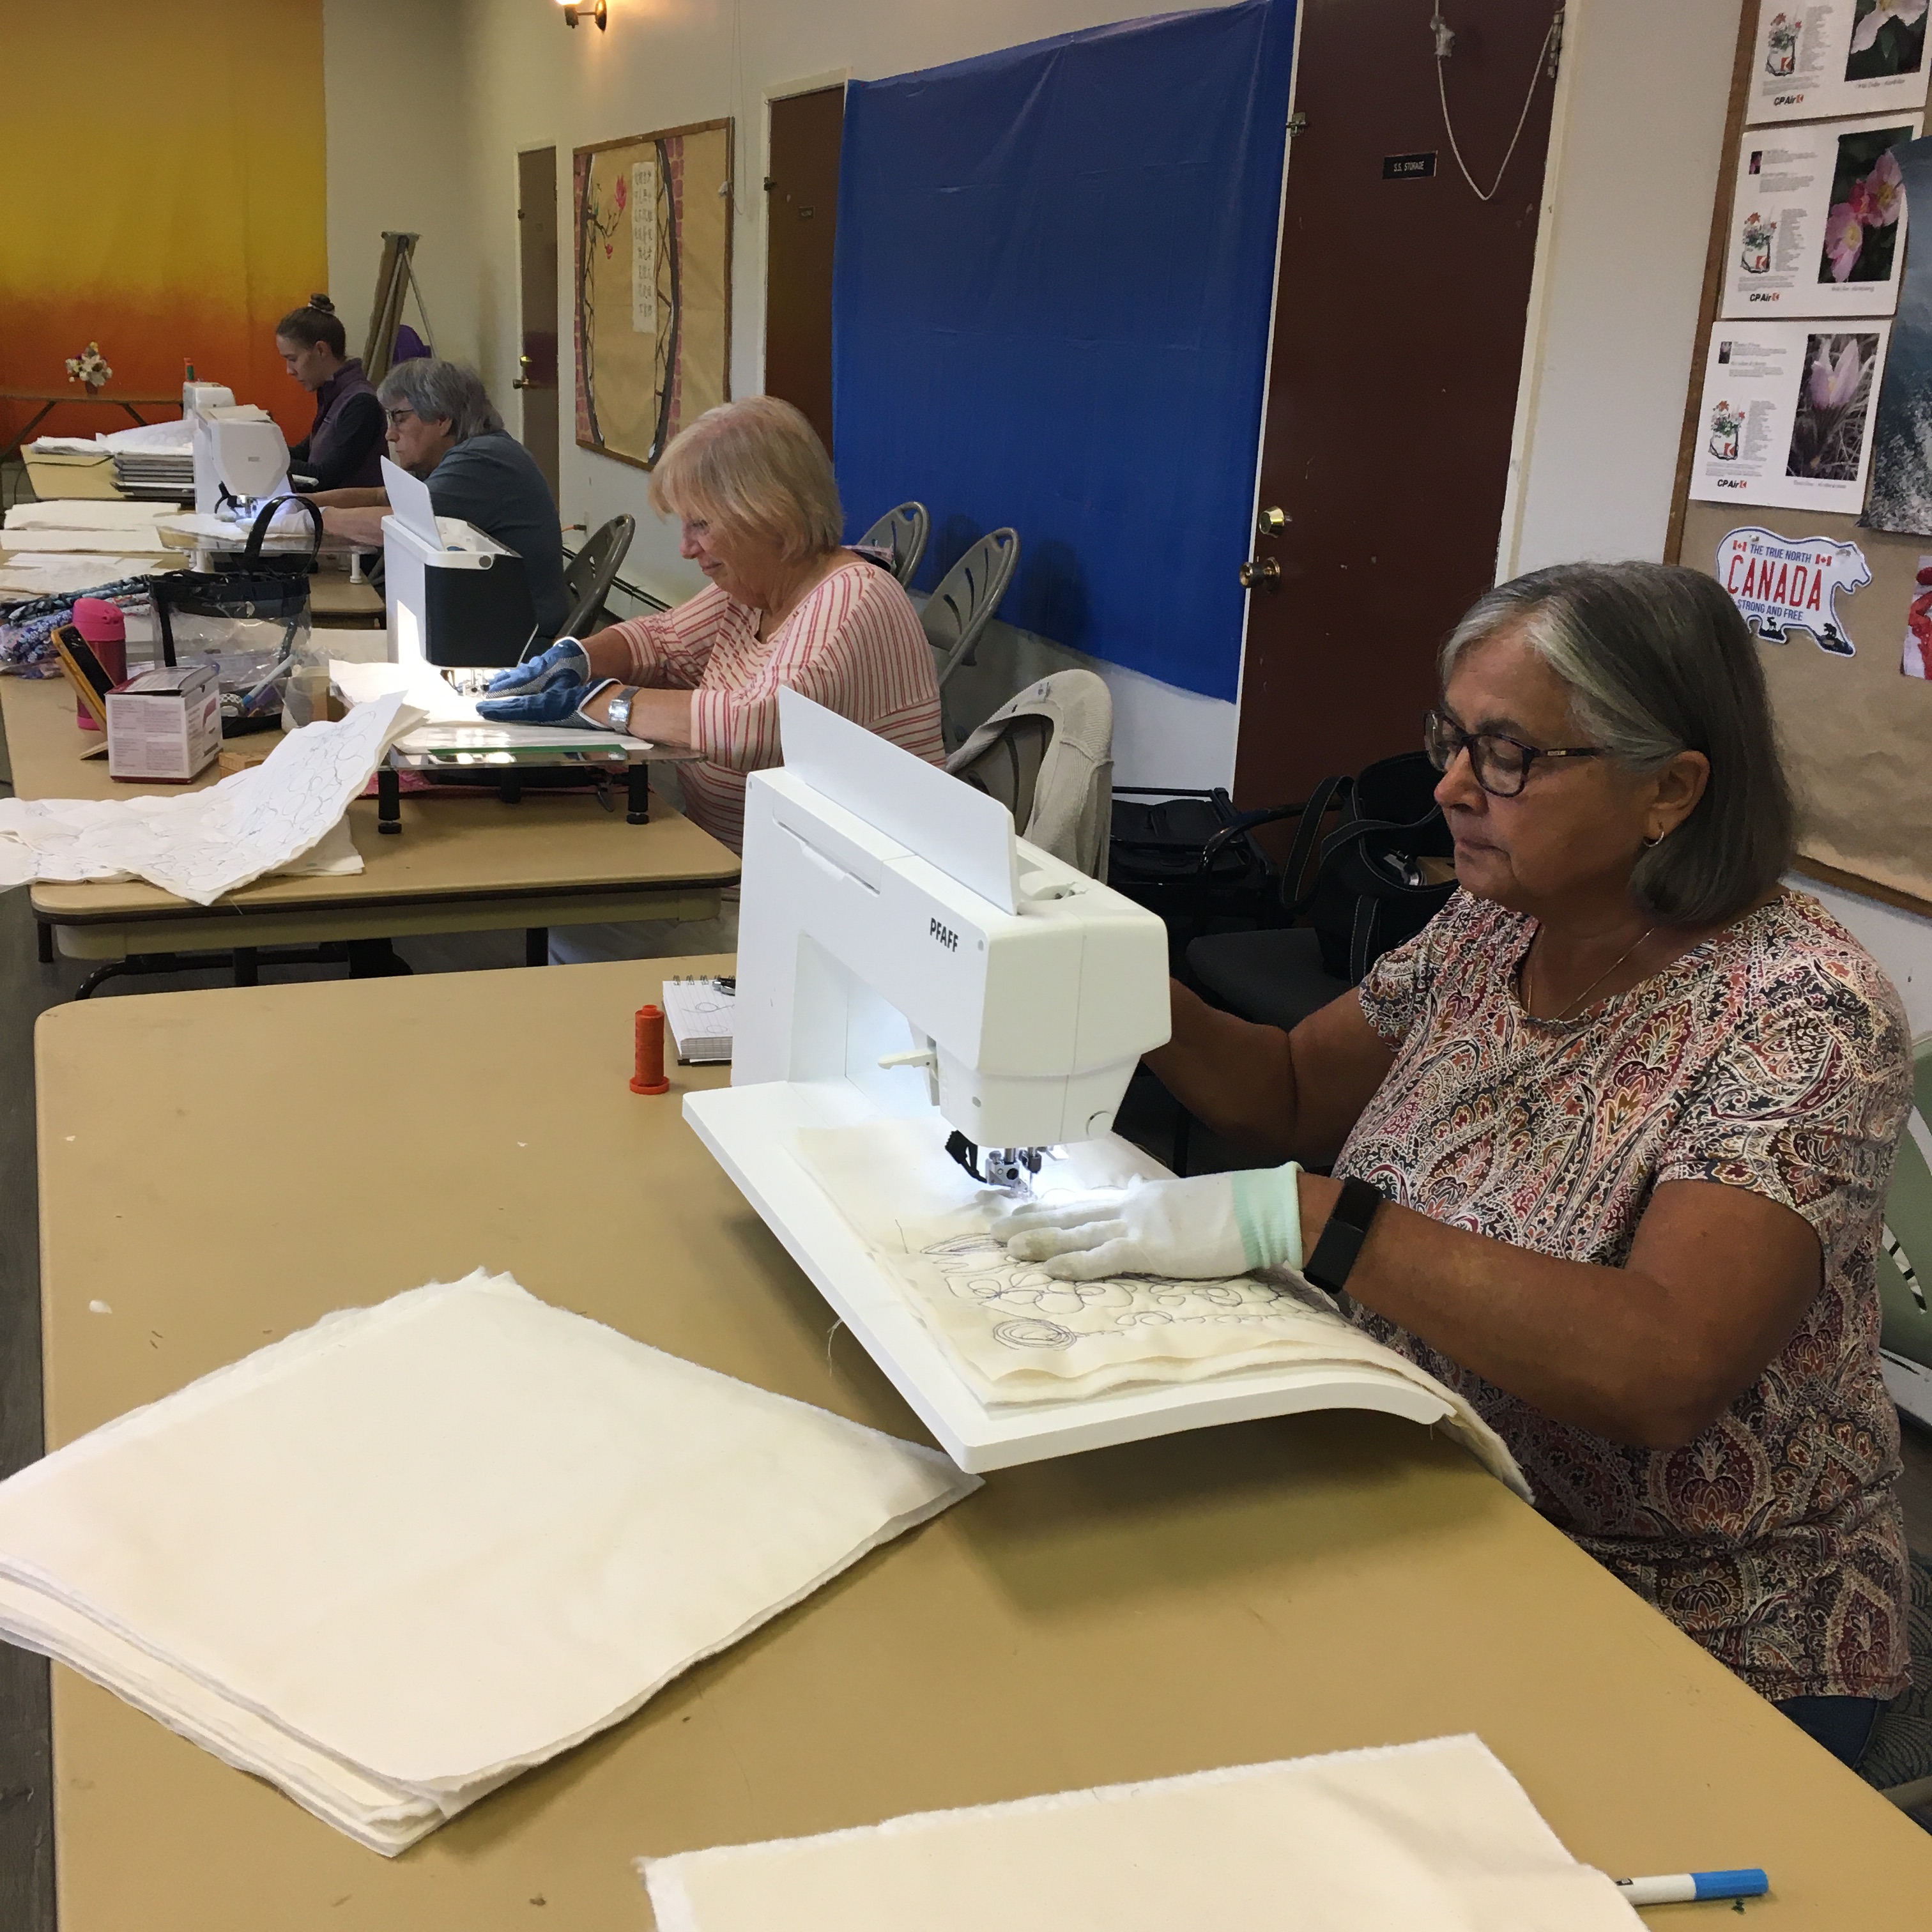
I was at a 4 day retreat earlier this week … and if you’ve ever been to a retreat, you know that they are a LOT of fun. A friend (Cheryl) and I have been organizing this retreat for several years (not including when Covid was at its height). The venue has been Edenvale, near Abbotsford … it’s a wonderful place with great accommodations, excellent food, a well lit sewing area and a beautiful forest nature hiking area. Unfortunately, this was our last retreat as they are switching to having long-term residents.
I know I didn’t get pictures of everyone’s projects. There was so much going on! Here’s a snapshot of some of the projects:
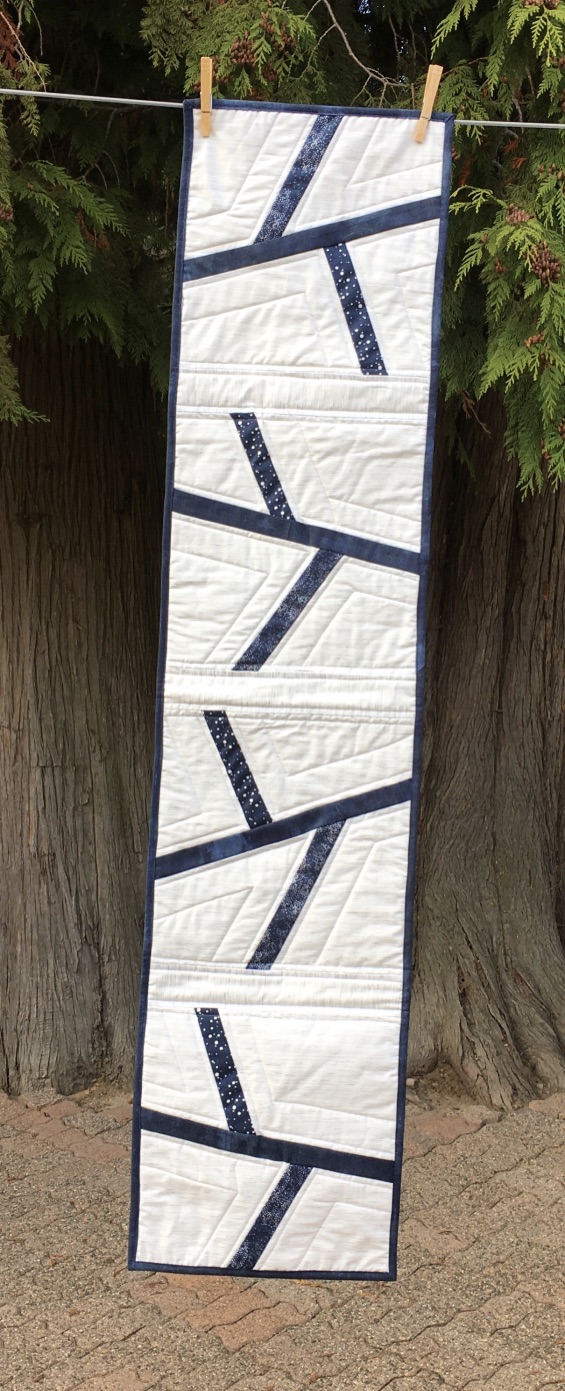
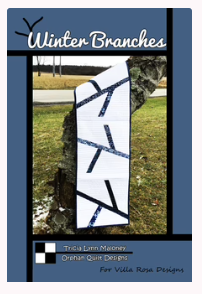
I worked a little on several projects, but I managed to finish one … this Winter Branches table runner. I will be teaching this at Essem on November 30. You can register for the class HERE. Simina will have a few kits with this exact fabric. Let her know if you want a kit!
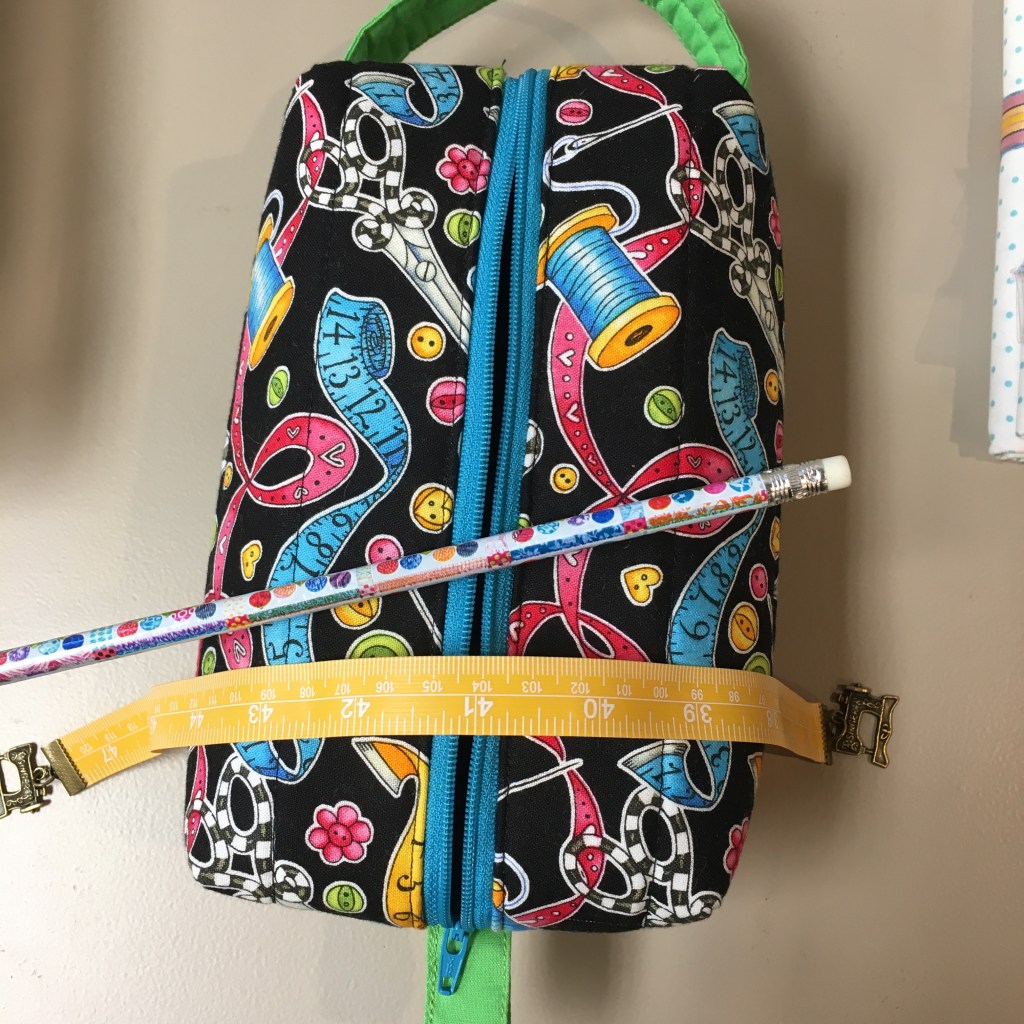
We played a game for the secret gift exchange and I ended up receiving this very cute little boxed zipper pouch! A long with a tape measure book mark with sewing machine ends, some sewing bandaids (not shown), a pencil that says “If only sewing machines had erasers,” and 3 yummy Aero chocolate bars. Thank you, Juli!
I’ve already shown you what I made for the secret gift exchange, but I didn’t say what it was for:
This is a super simple mystery quilt! It is my own design. I designed it for the Boundary Bay Quilt Guild, but I’m going to be sharing it with YOU as well!
There will be 8 clues. This quilt will finish at 43″ x 53″ … unless you decide to make it bigger or smaller.
On Saturday, the guild had Carola from Carola’s Quilt Shop come and teach a free motion class. Amy & I were asked to help. Carola didn’t need our help … but, we pretended to assist!
I had a good chuckle when I saw Nora’s “speed control” for her machine! Isn’t it a great idea?
It was a great class and everyone learned a LOT!
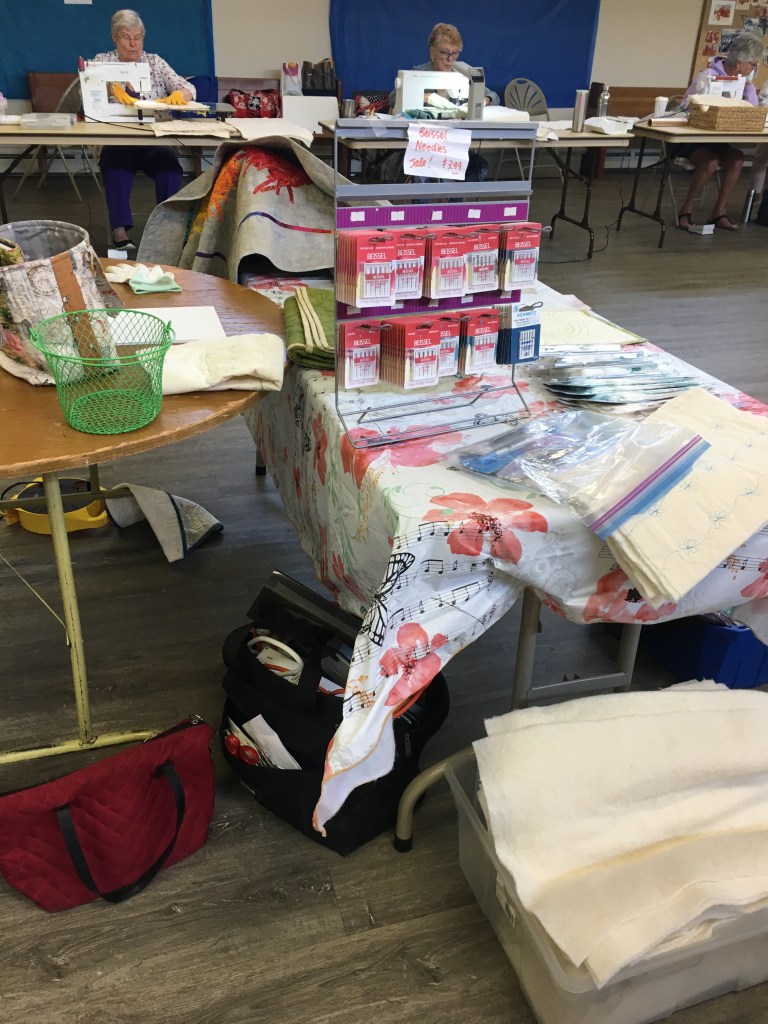
There was a small “pop-up” store … with fabric and notions. But, I was almost good, and only bought a “Silly Moon” ruler! Although, some of the beautiful wide back fabrics were to die for!
New Fabric Sewn!
The Fabric I showed you last week was sewn into buckets! The pattern is “Storage Solutions Bucket Bags” by Among Brenda’s Quilts.
Upcoming Mystery!
This is a super simple mystery quilt! It is my own design. I designed it for the Boundary Bay Quilt Guild, but I’m going to be sharing it with YOU as well!
This starts on Tuesday, October 18!
This quilt will finish at 43″ x 53″
There will be 8 clues. They will all come out on Tuesdays, starting October 18.
Oct 18: Clue #1: Fabric Requirements and Cutting
Oct 25: Clue #2
Nov 1: Clue #3
Nov 8: Clue #4
Nov 15: Clue #5
Nov 22: Clue #6
Nov 29: Clue #7
Dec 6: Clue #8
Dec 13: Mystery Quilt Parade
New Classes
I will be teaching several classes at Essem in November. You can register for them HERE.
Stitching Time
Kate, from Life in Pieces, is hosting “Stitching Stuff” and the goal is to sew for at least 15 minutes a day. I use Kate’s guideline, but my personal goal is to sew for 30 minutes a day. On those “blah” days, it does motivate me to sit at my machine and 30 minutes often turns into several hours. Thank you Kate for the motivation!
With company here, very little stitching happened!
January – September: 234 / 272
Oct : 16 / 16
Total: 245 / 290
Percentage = 84%
Stash Report
Donna at Quilt Paint Create hosts a weekly linky party where you can display your stash numbers. This has really kept my stash from growing (somewhat!) Before I buy anything, I am always mindful of the fact that I need to report it on my blog … That sometimes stops me in my tracks!
I used the 2 yards I reported last week to make the buckets and there was 4 yards used for the backing of my Pinktober quilt (HERE).
Yesterday, I posted my quilt for the PINKtober blog hop. You can see details of it HERE.
However, I did have a few left-overs, and I’m currently determined to use the leftovers from a quilt right away. That way, they are not waiting around until I can find time to deal with them!
Sew … I had partial quarter square triangles and quarter square triangles. Not enough to do much with them, but I resorted to my “go to” for small pieces!
Sew, I put them together and made these cute bags! I had enough of the white patterned fabric to line the small bag … the large bag used Island Batik solid white fabric. There is scraps of Hobbs 80/20 in between the lining and the outside. They were quilted and sewn with Aurifil thread.
TGIFF Linky Party
Here’s the link to the Linky Party … show us your TGIFF!
This is a super simple mystery quilt! It is my own design. I designed it for the Boundary Bay Quilt Guild, but I’m going to be sharing it with YOU as well!
This quilt will finish at 43″ x 53″
There will be 8 clues. They will all come out on Tuesdays, starting October 18.
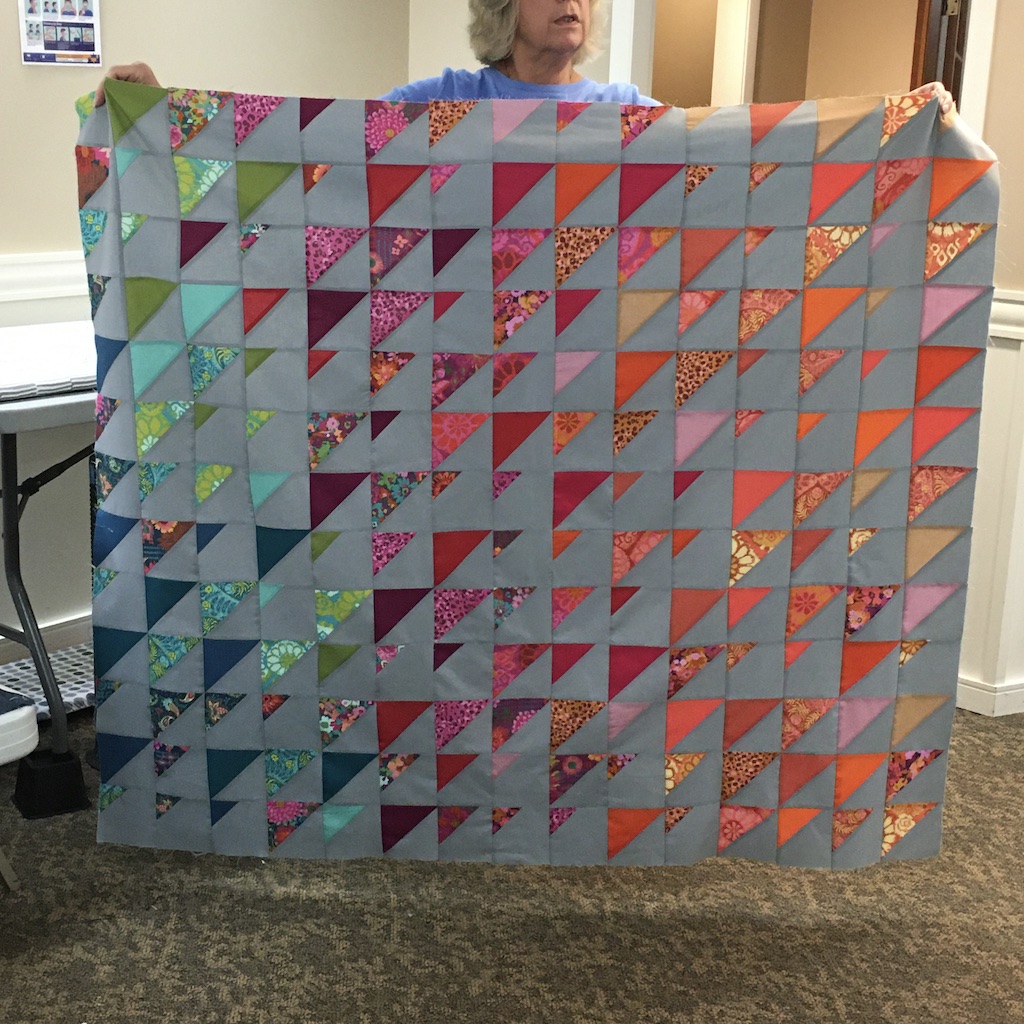
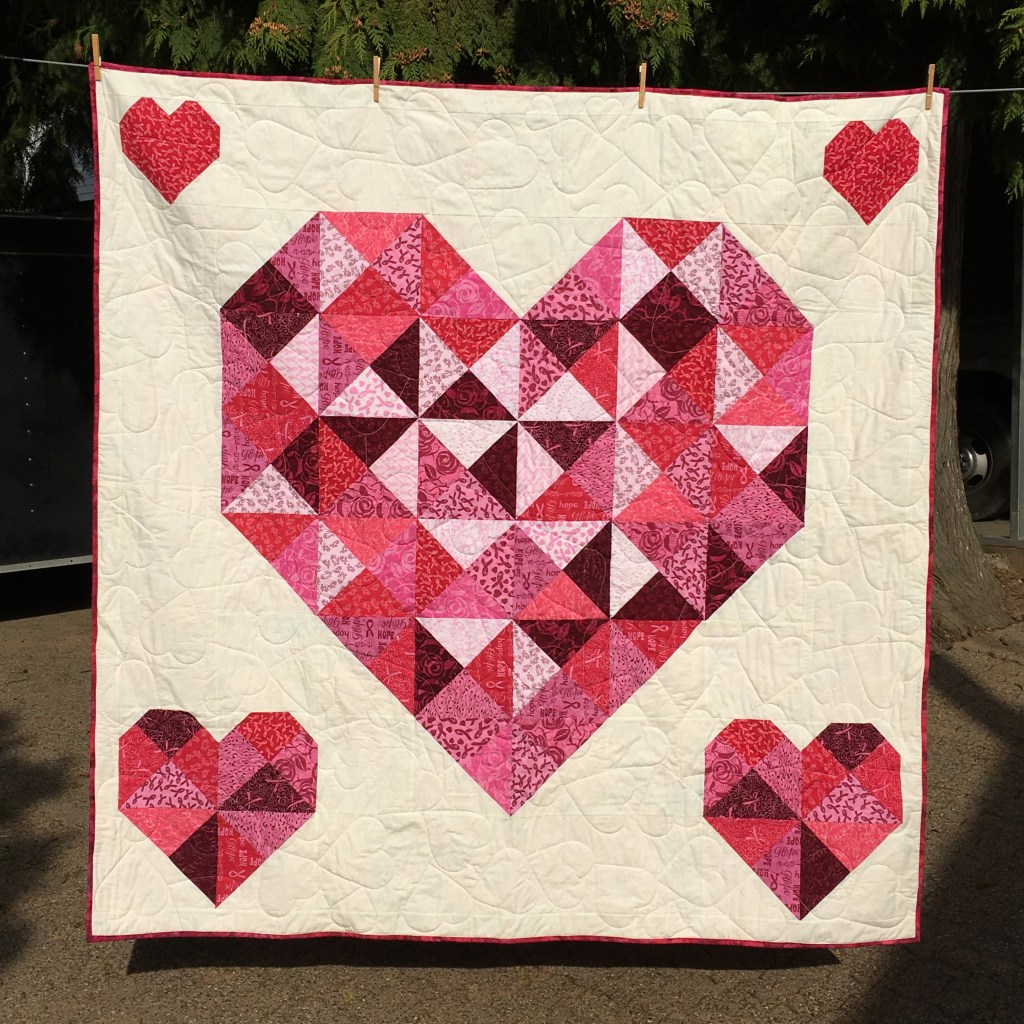
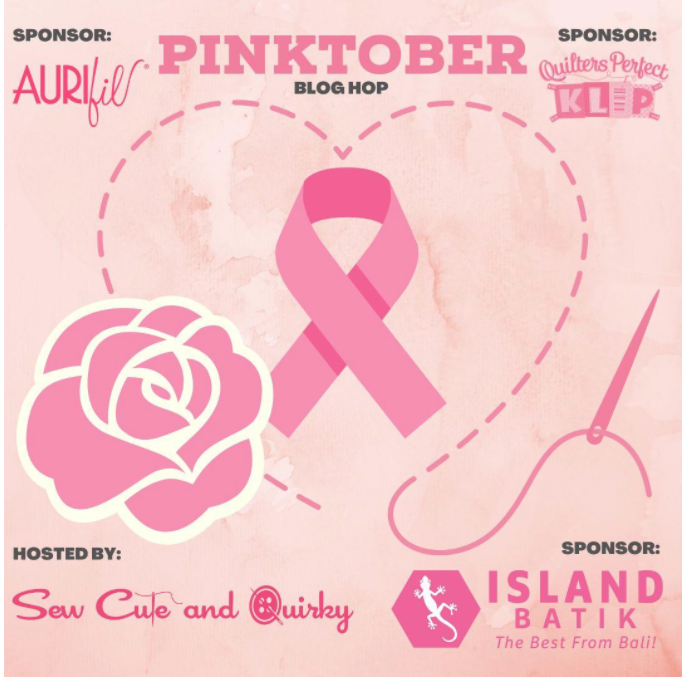
October is Breast Cancer Awareness month! Brianna from Sew Cute and Quirky has organized Pinktober Blog Hop to honour breast cancer patients.
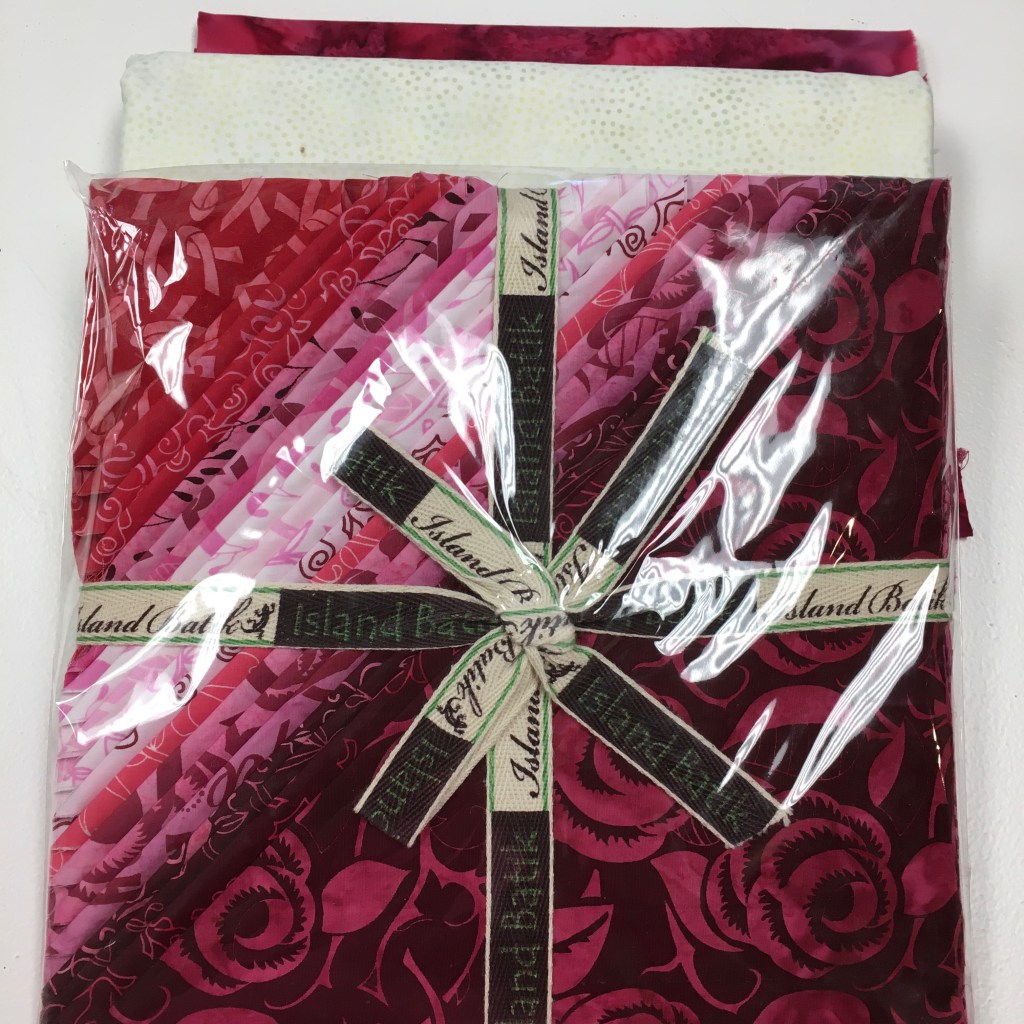
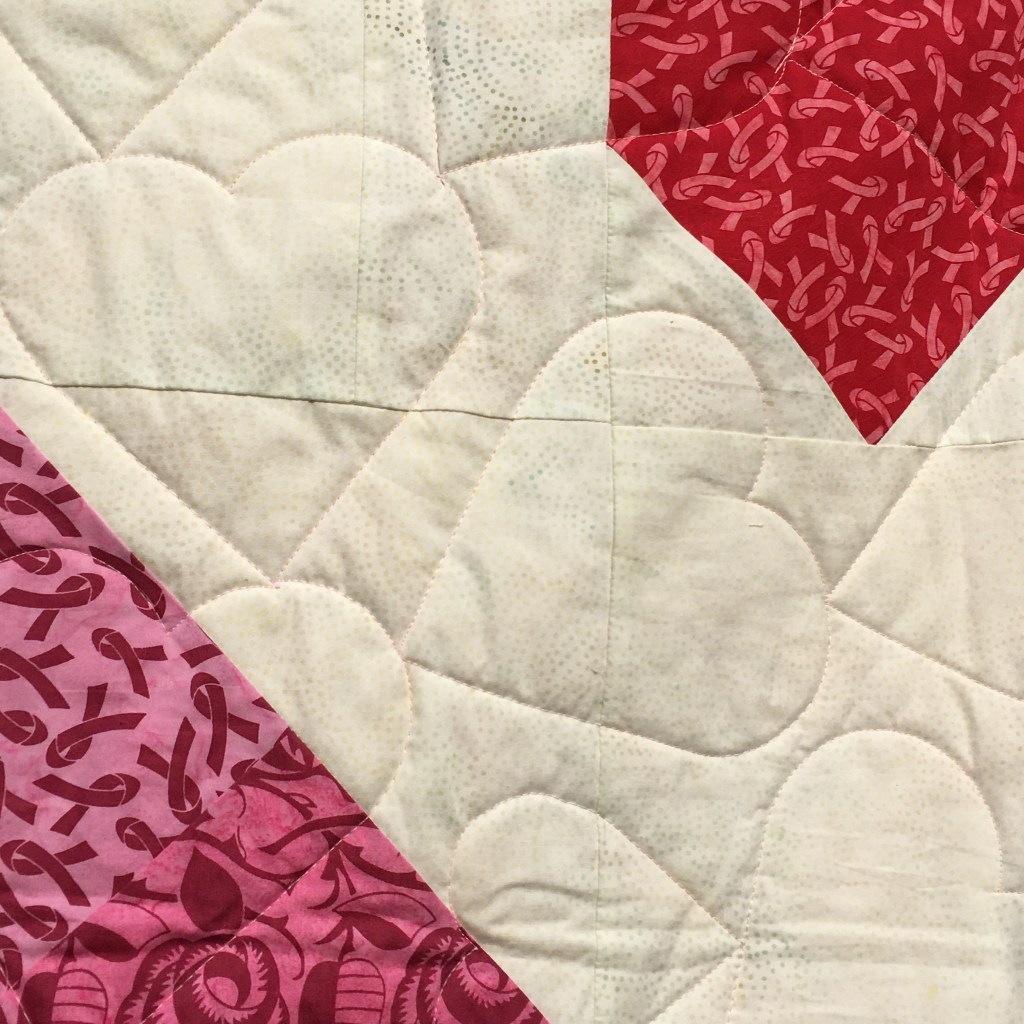
The main sponsor for the blog hop is Island Batik and I received the Positively Pink fabric stack (40 – 10″ squares), along with background fabric (Eggwhite) and binding fabric (Magenta). Isn’t it pretty?
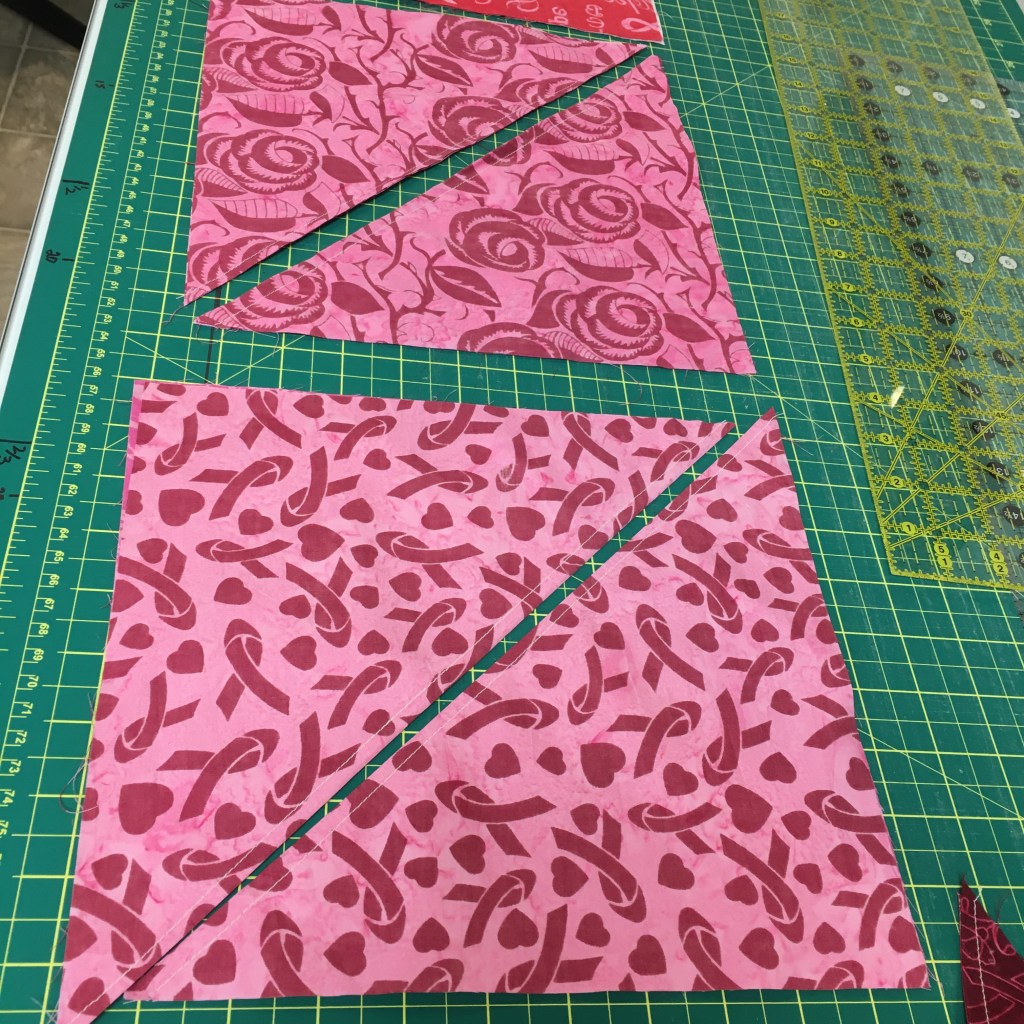
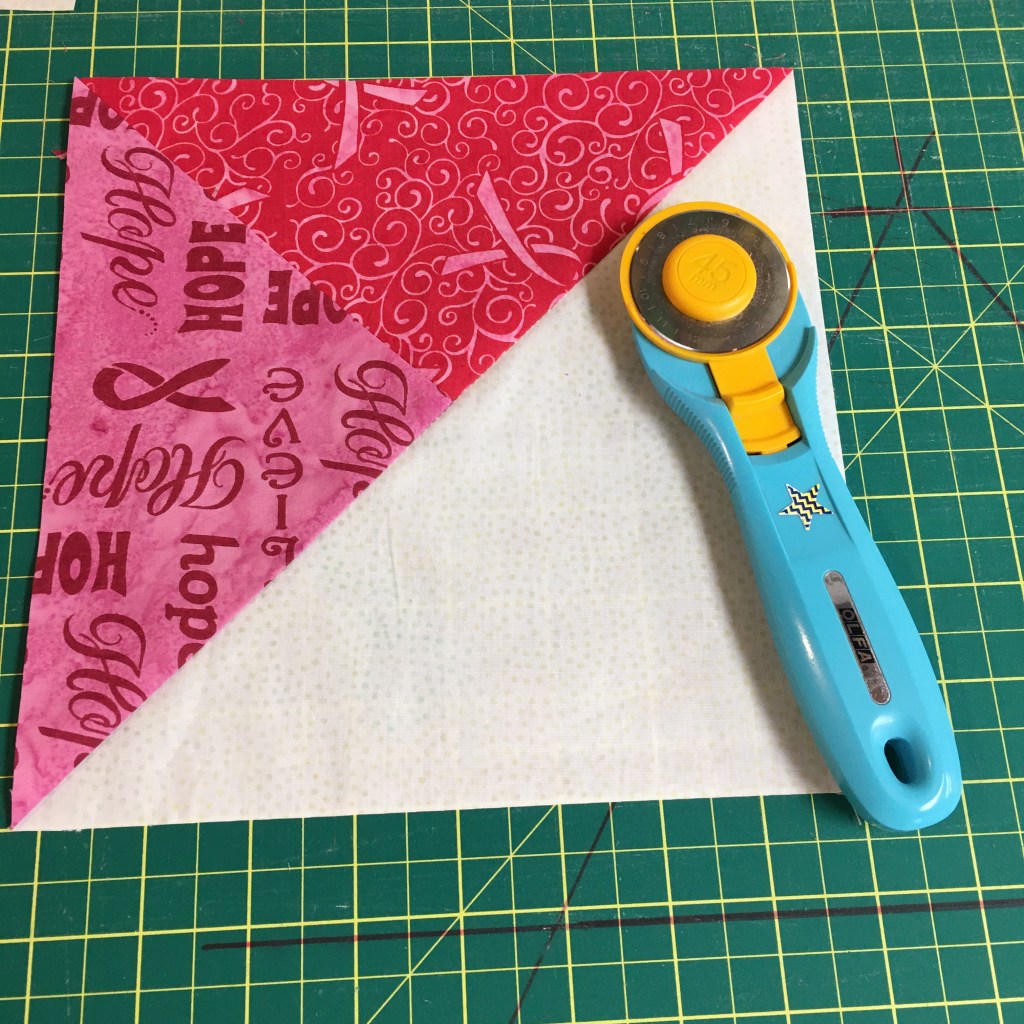
After pressing all of the 10″ squares, I paired them up and sewed them into half-square triangles. Here they are cut in half.
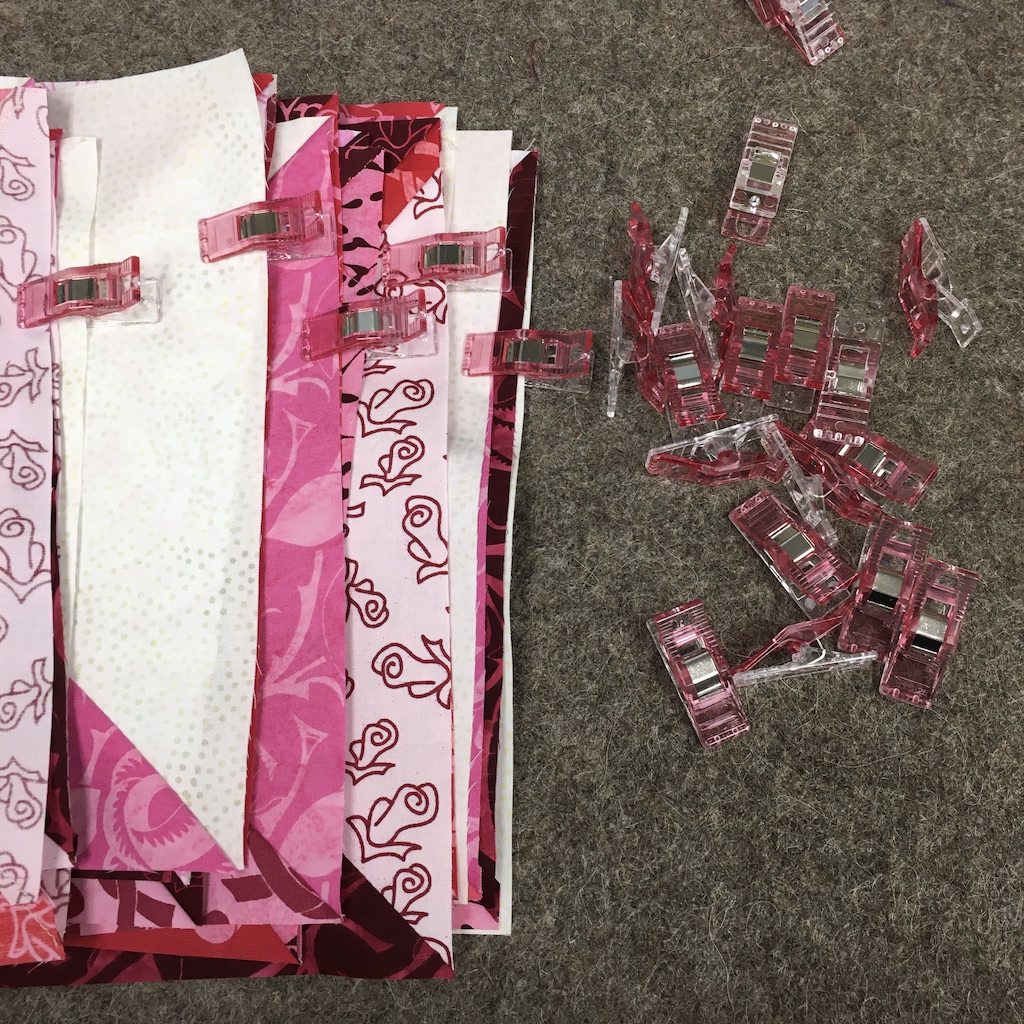
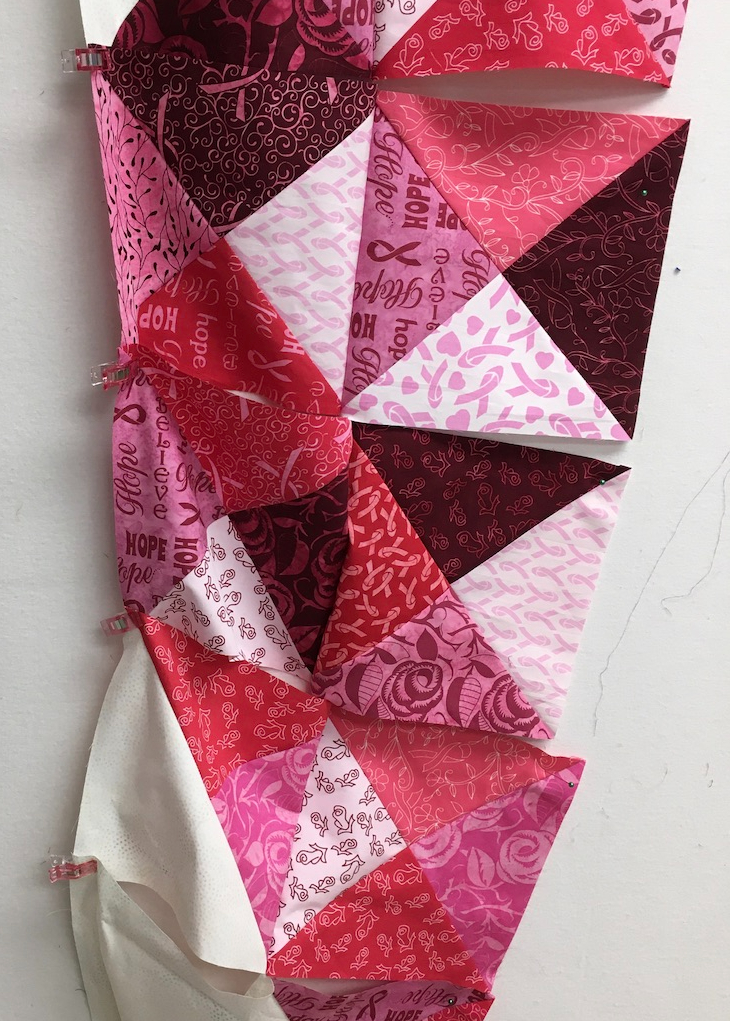
I paired the Half-Square triangles (HST) with either a background square or another HST, then trimmed them to 8 1/2″.
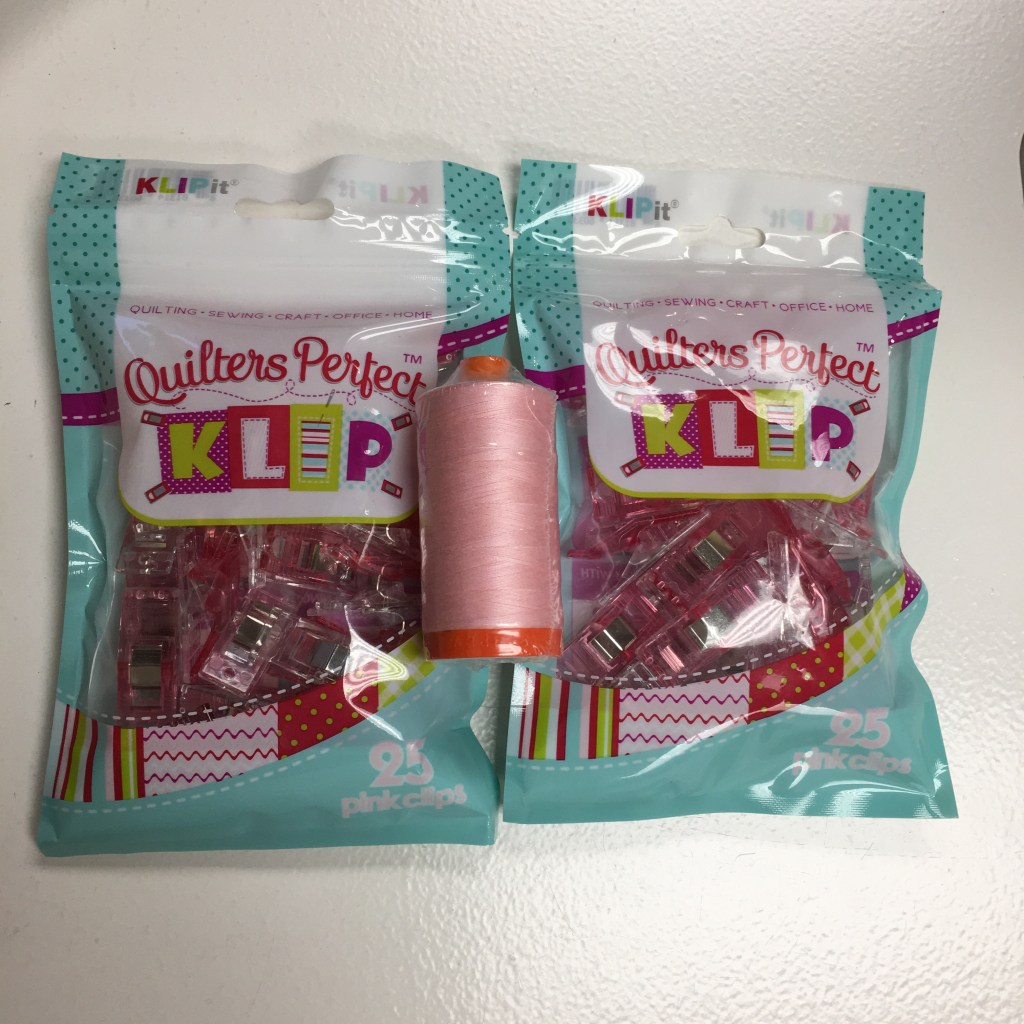
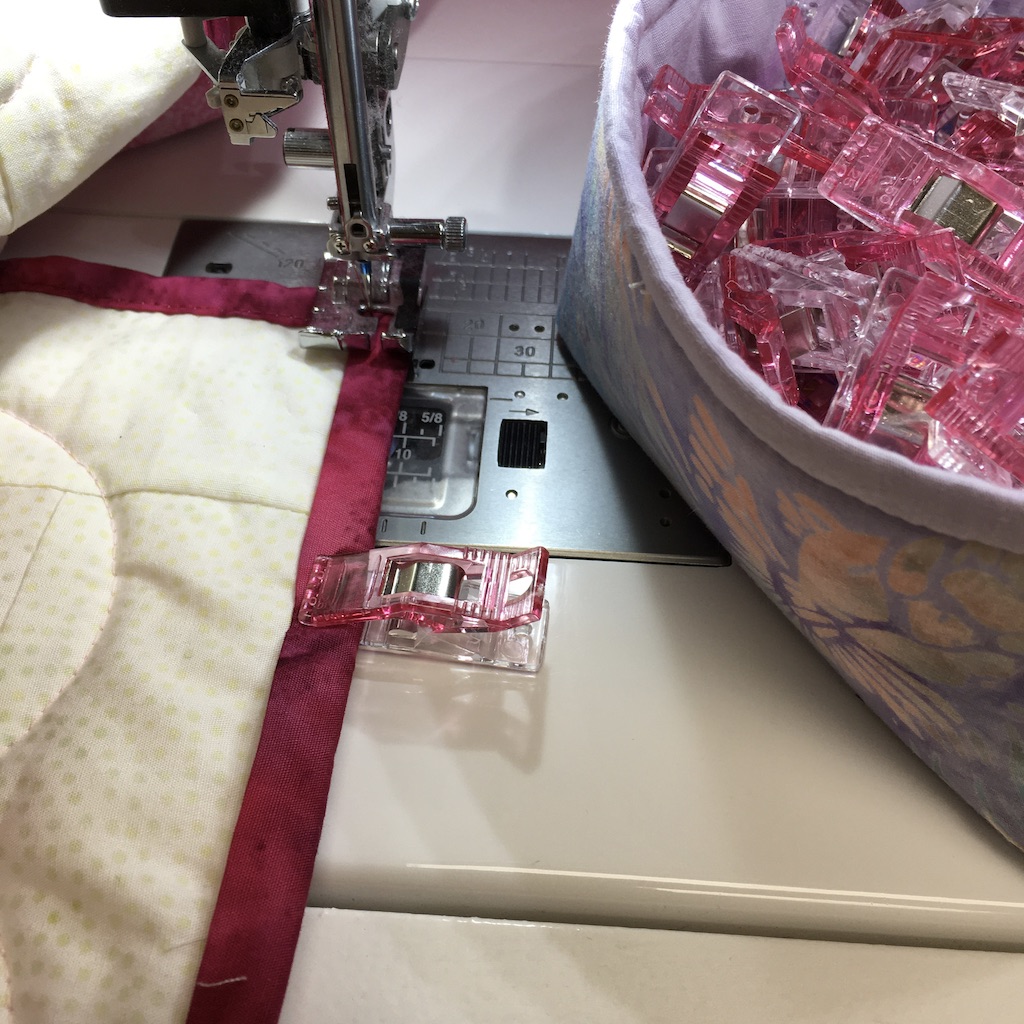
The Klips were used to keep groups of HST together and to hold the edges when webbing the quilt.
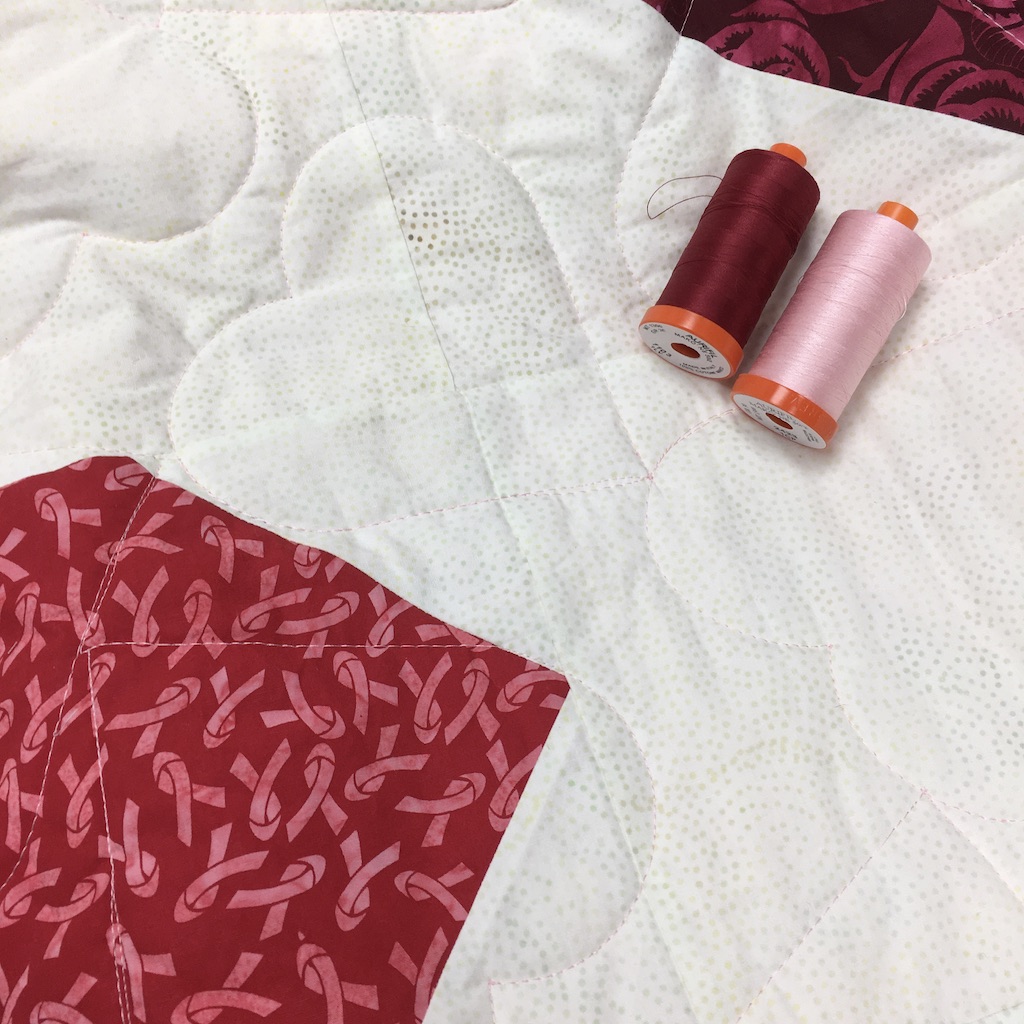
I used Aurifil # 2423 (baby pink) for the quilting and #2460 Dark Carmine Red for the binding.
I used the Silly Moon 6″ Cupid ruler for most of the quilting … there were a few spots where the smaller Cupids were used.
The Klips were also used for holding the binding in place. These Klips are a great size and work well for this. With 2 packages of Klips, I was able to hold all of the quilt binding in place before I started sewing it down!
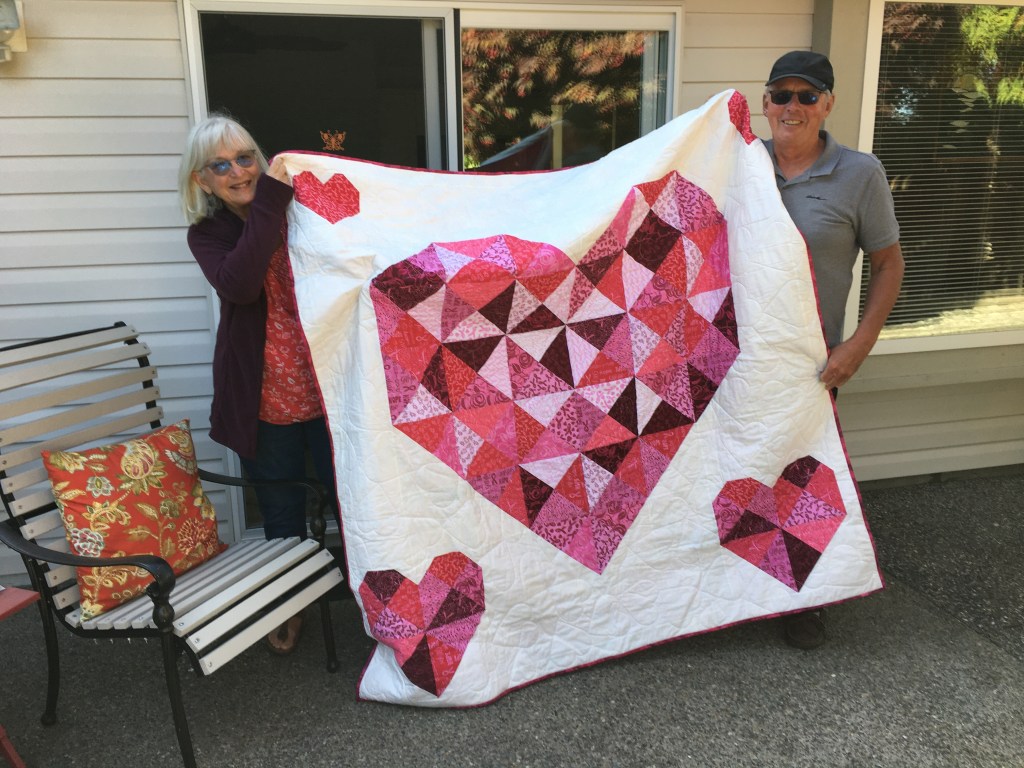
Here is the completed quilt!
My Story
So, why did I volunteer to make a quilt for breast cancer?
First, my mother-in-law, who died before I met my husband lived in an area with very little health information. She had breast cancer, but did not visit the doctor until it was too late. So sad!
Second, in my nursing class of 55 graduates, 3 have died from different forms breast cancer. That’s a lot, considering that, as far as I know, there have been no other deaths.
I was anticipating that this quilt will provide comfort to someone who is struggling with breast cancer! I had no idea who it would go to.
My husband and I recently went on a week-long camping trip to Vancouver Island. Just before we left, I put the quilt in the camper. While on the island, we connected with some dear friends that we hadn’t seen in a long time. As we were chatting, M. mentioned that her daughter discovered a lump in her breast and ended up having a double mastectomy. The daughter is in her 40s and lives in Ontario. Unfortunately, the Ontario government decided to save money and not do screening mammograms until women are over 50. This lump would have been found sooner if they had not changed their policy! Consequently, following the double mastectomy, and later a hysterectomy, chemotherapy and radiation were part of the treatment. The daughter is not considered cancer free at the moment. With near tears in my eyes, my hubby got the quilt out of the camper and it is now on it’s way to the daughter in Ontario! Some may call this a coincidence, but I firmly believe that it was a God-incidence! It was definitely meant to be!
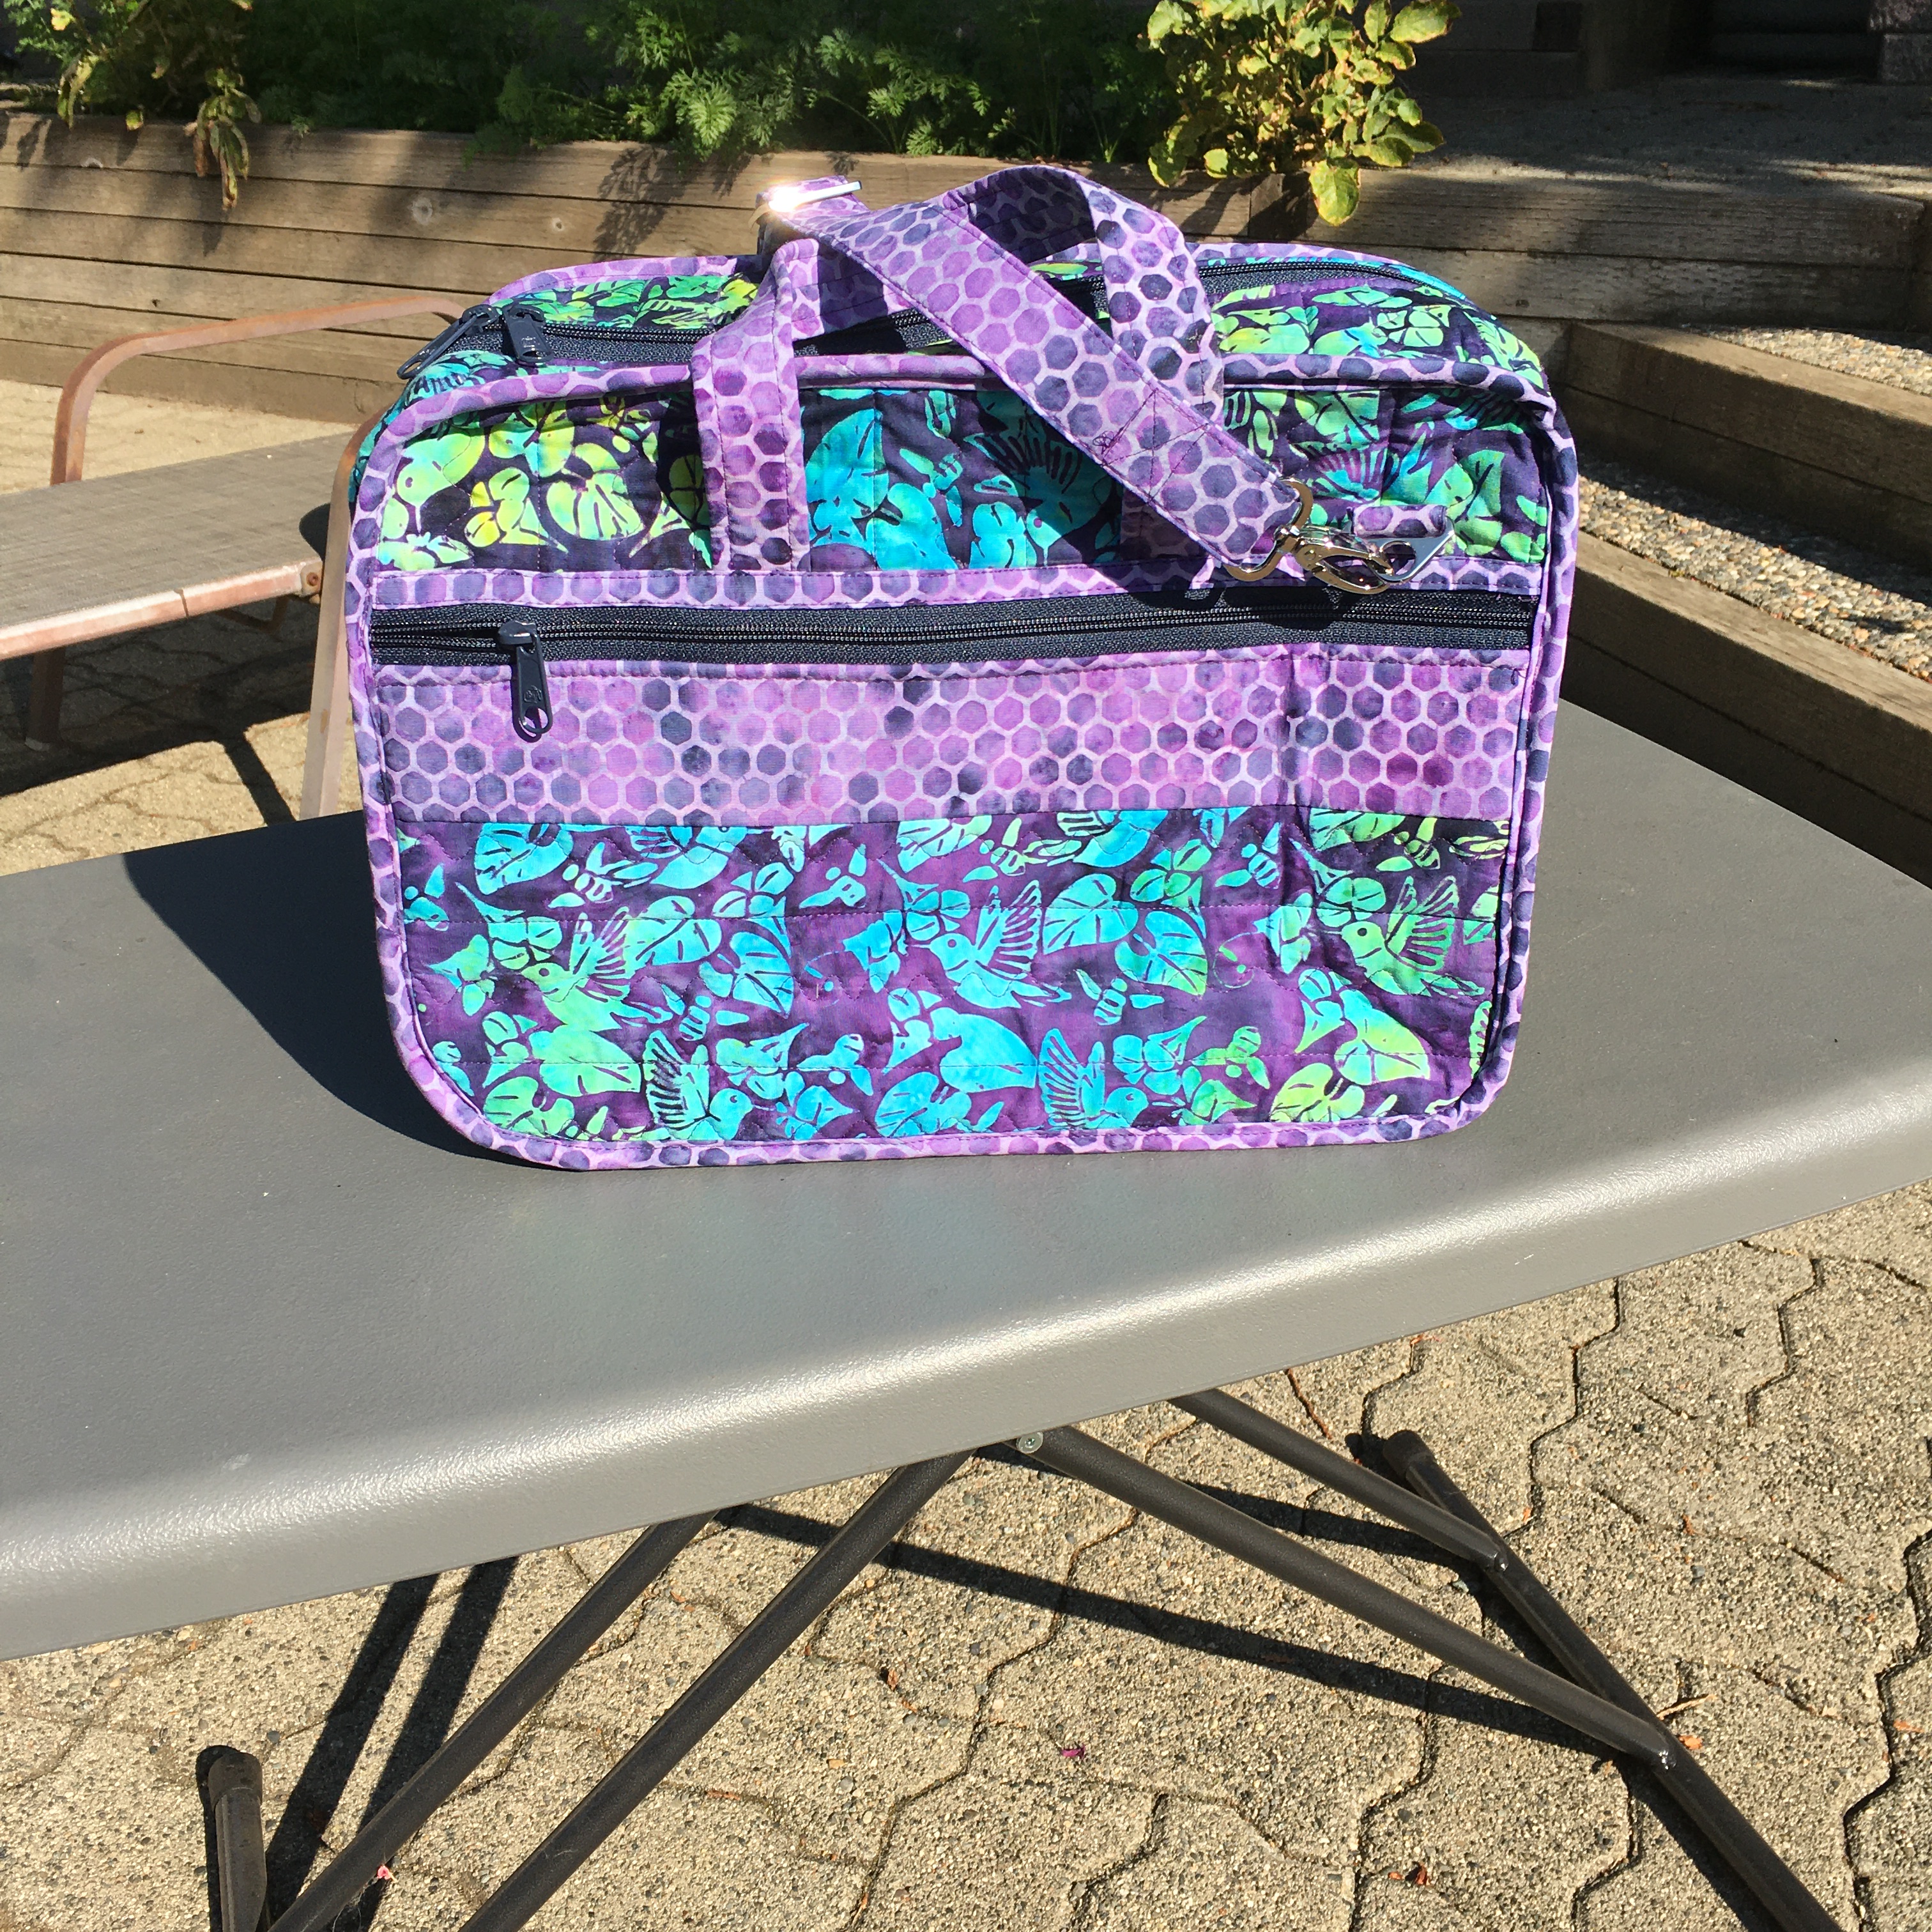
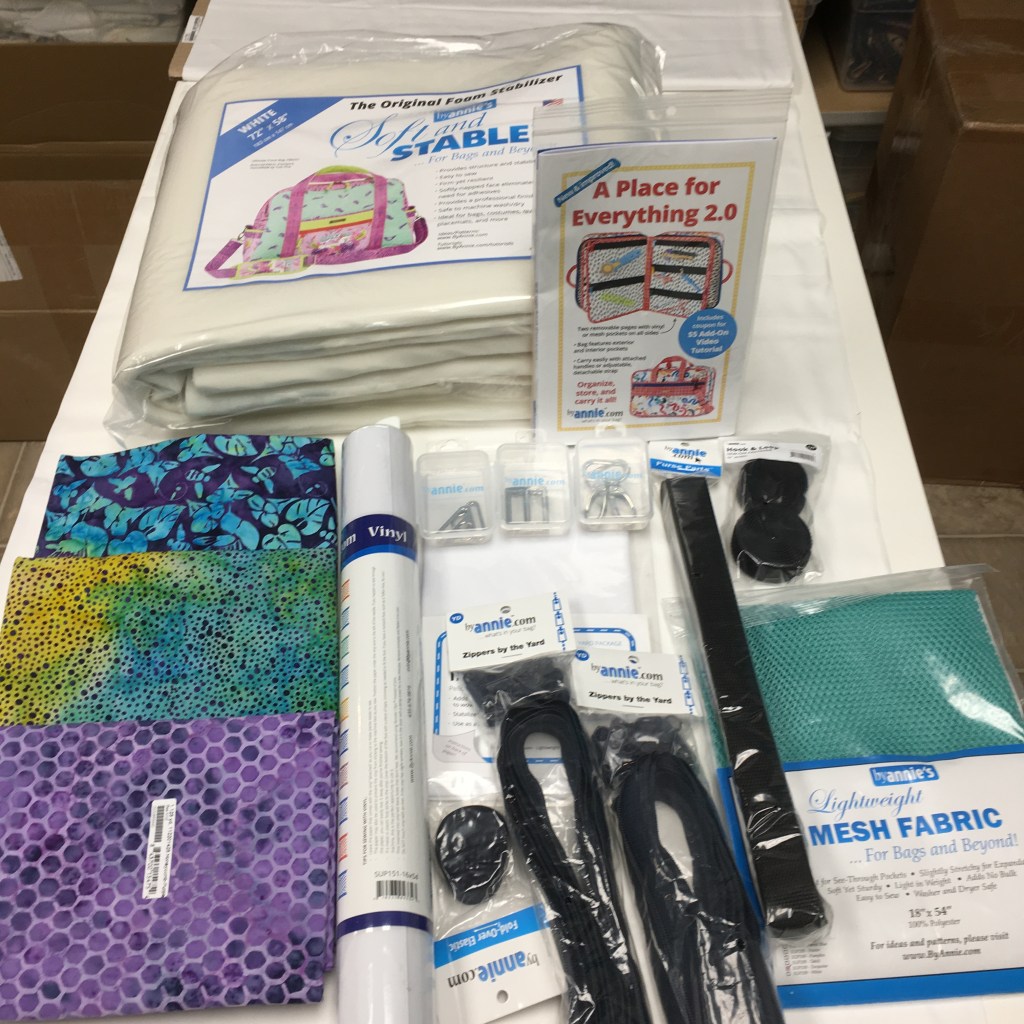
ByAnnie sent me EVERYTHING I need to make “A Place for Everything 2.0.” The Island Batik fabrics are Humming Bird Nectar, Dots-Multi Blue Green and Honeycomb – Purple, all from the “Bee Kind” fabric collection. (the Bee Kind fabric collection should be available in stores now. I’m loving the fabrics! (I should, I got to pick them out!)
The “A Place for Everything” pattern comes with a coupon for an Add-on Video. These videos were invaluable. They don’t replace the pattern, but they certainly make certain steps a LOT easier!
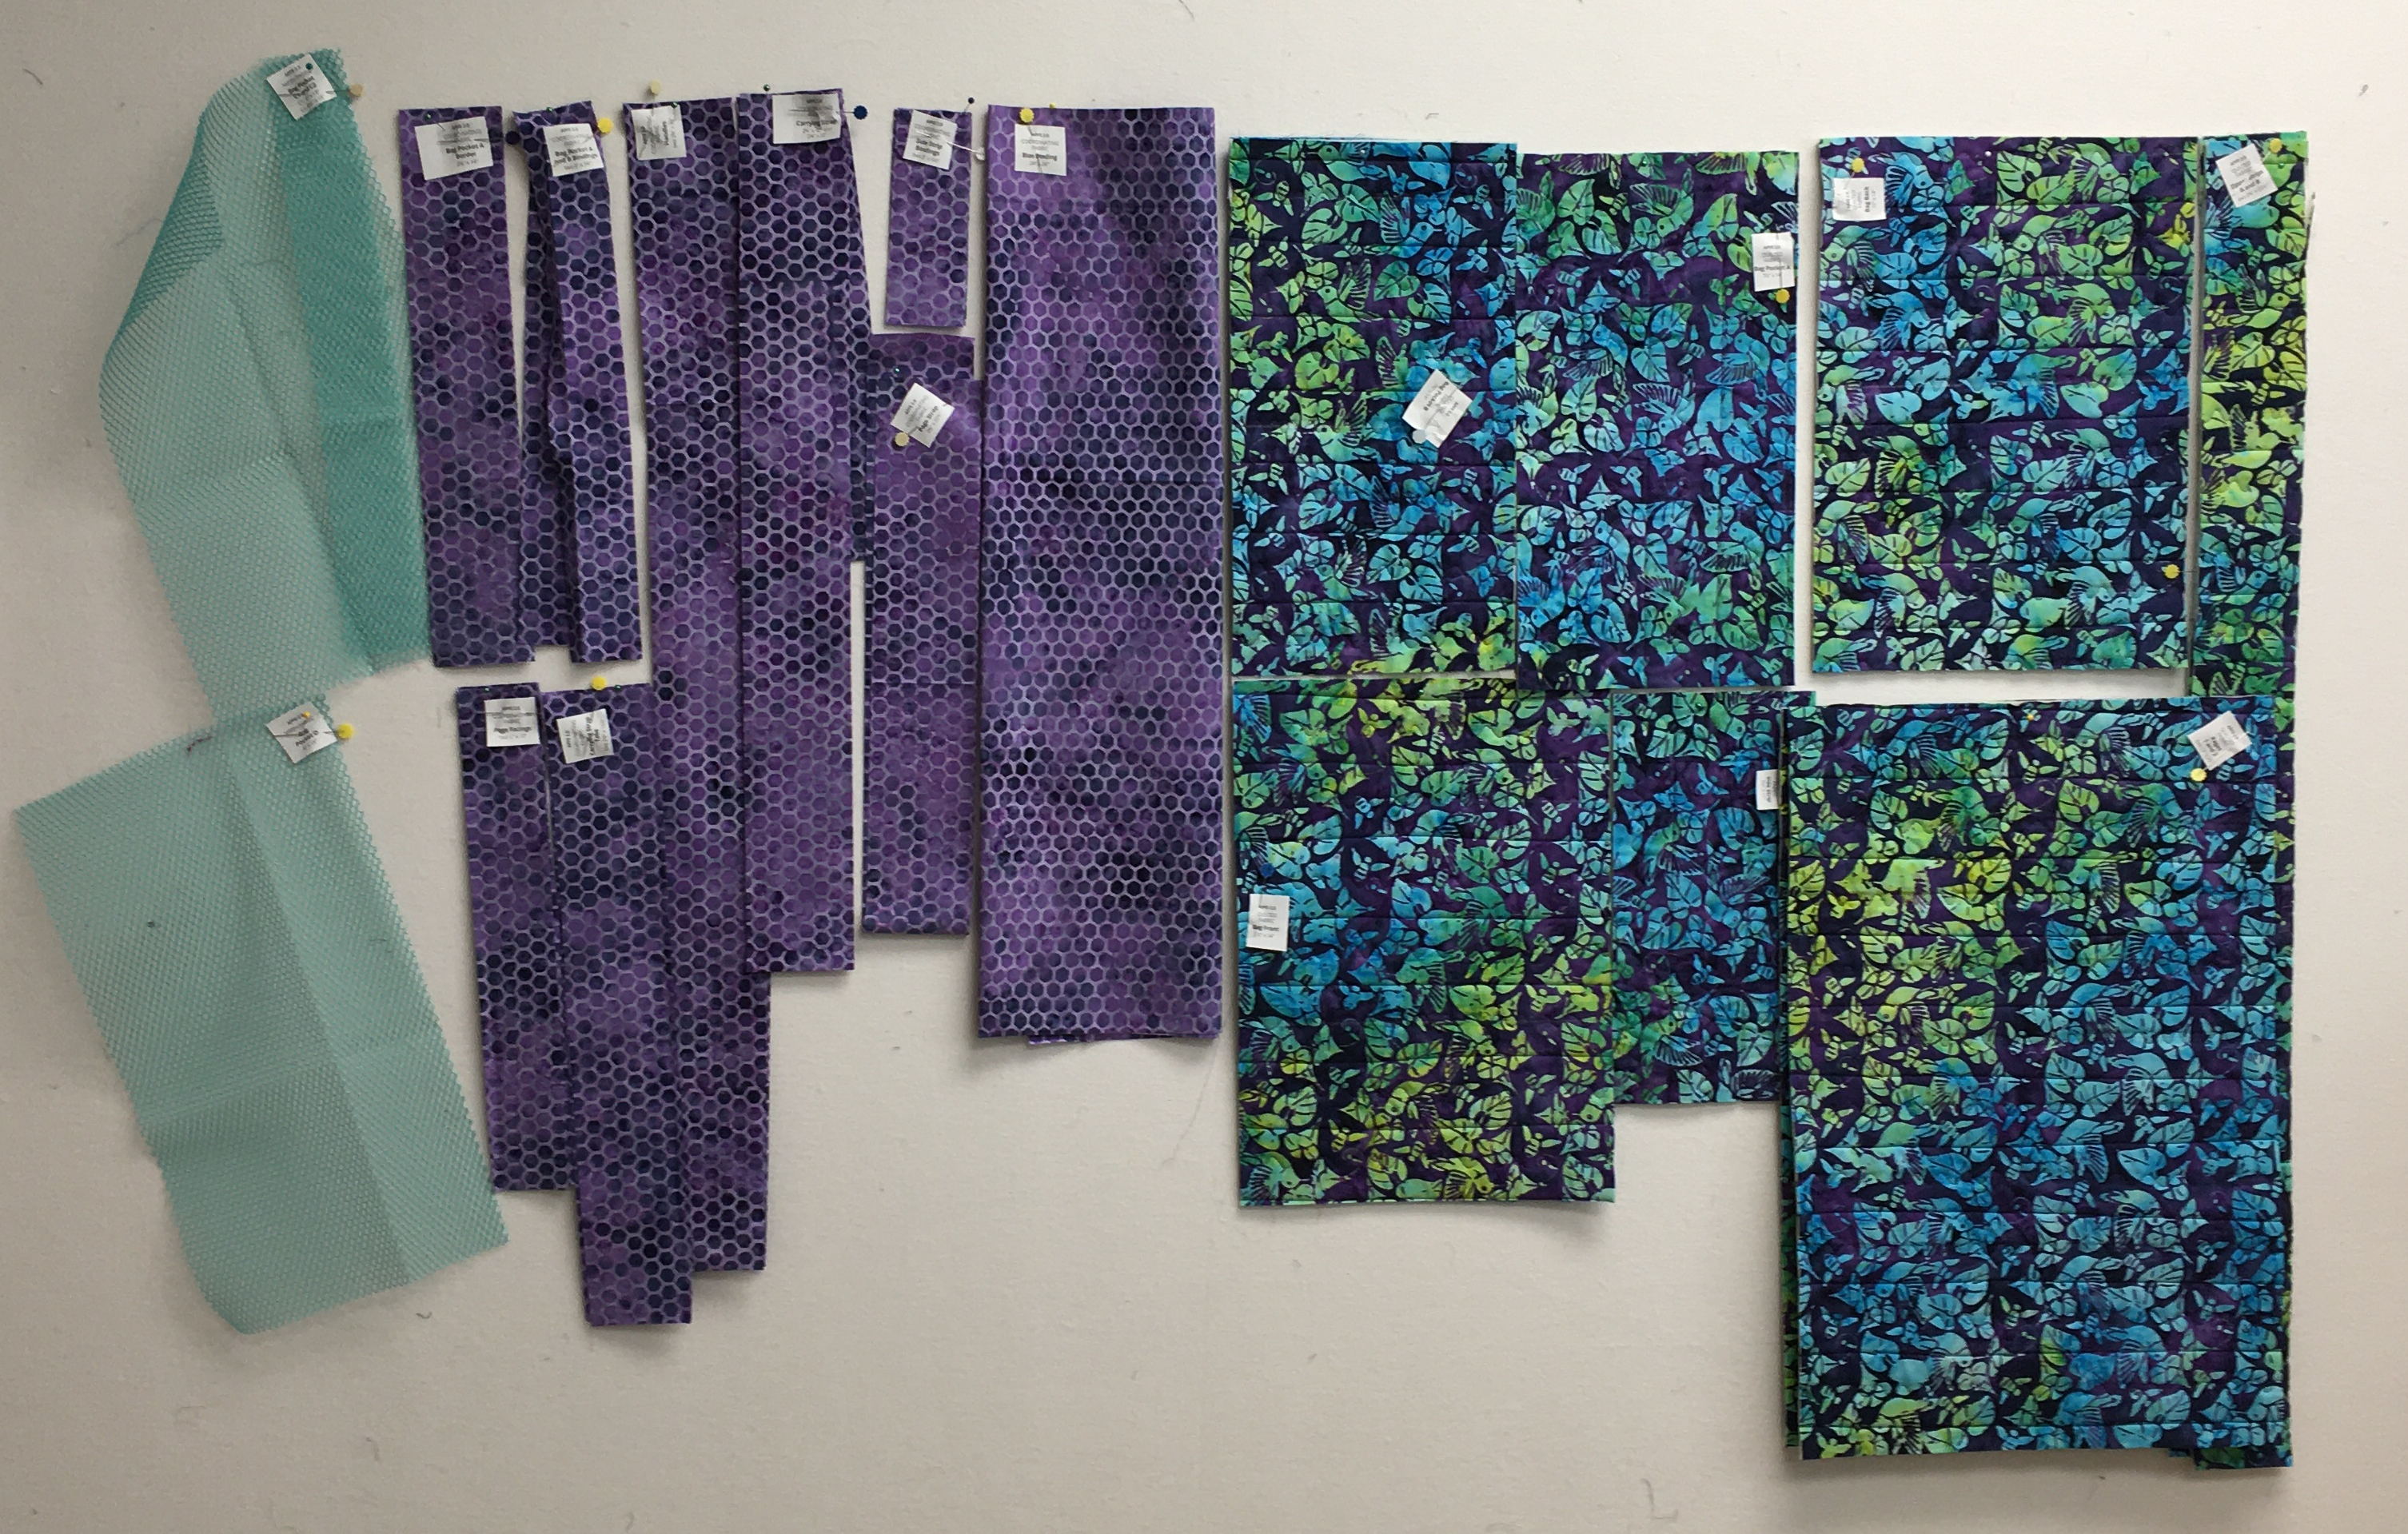
By Annie patterns come with a label chart on the back. I find that it is extremely important to photocopy this sheet and use it to label EVERYTHING as you cut it. When you do this, there is no second guessing if a piece of fabric is the correct one – it says it on the label!
Here is a picture of most things cut, labelled and pinned on my design wall for easy access. The clear vinyl is not on the design wall as I didn’t want to poke holes in it.
I started with quilting the Humming Bird Nectar fabric and the Dots-Multi Blue Green with Soft & Stable between. 505 spray does not adhere to the Soft & Stable and since I really dislike pins, I used Elmer’s Disappearing Purple glue stick and the fabric stuck like a charm. The fabric was quilted with my walking foot, using a serpentine line, alternating with a straight line. I used Aurifil Thread: #4225 (Eggplant).
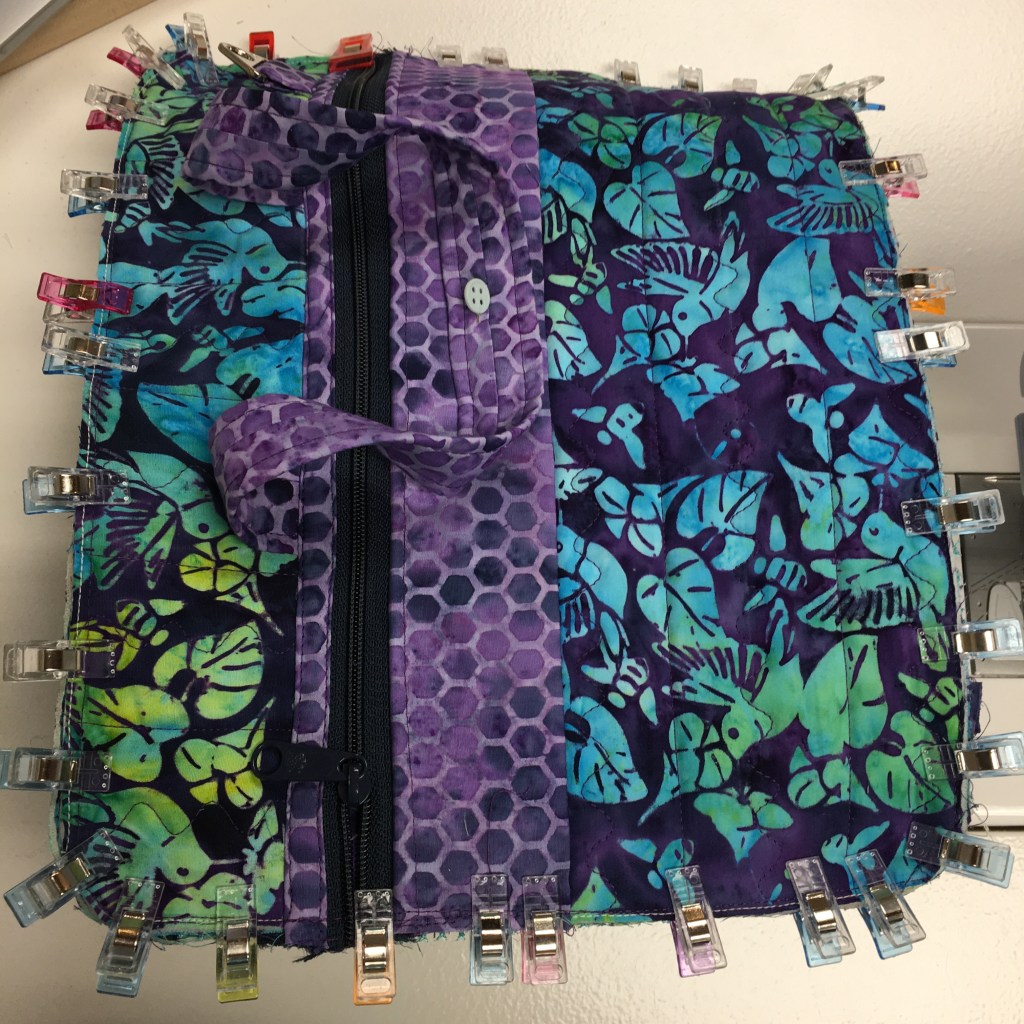
Then, I started to assemble the various parts of the bag … following the directions.
Here’s the parts, prior to the bag construction: Most of the zippers are in, the pages, with vinyl and mesh are constructed. The straps are made … all ready for the bag assembly!
I used clips (as suggested in the instructions and videos) and it sure makes sewing the bag together much easier! The clips come off easily and they don’t poke my fingers! {grin}
I was pretty excited when the bag was finally put together! And I’m in LOVE with my “A Place for Everything” bag! I plan to use this bag to store all my ruler quilting rulers!
Things to think about when making ByAnnie bags
Read the instructions.
Read the instructions AGAIN!
Follow the cutting diagrams in the pattern – this is especially important when cutting the mesh fabric!
Take your time.
Do each step in the order written in the pattern.
Watch the add-on videos before starting the bag making process.
Watch any other appropriate byAnnie videos.
Take your time.
Enjoy the process and you will thoroughly enjoy the finished bag!
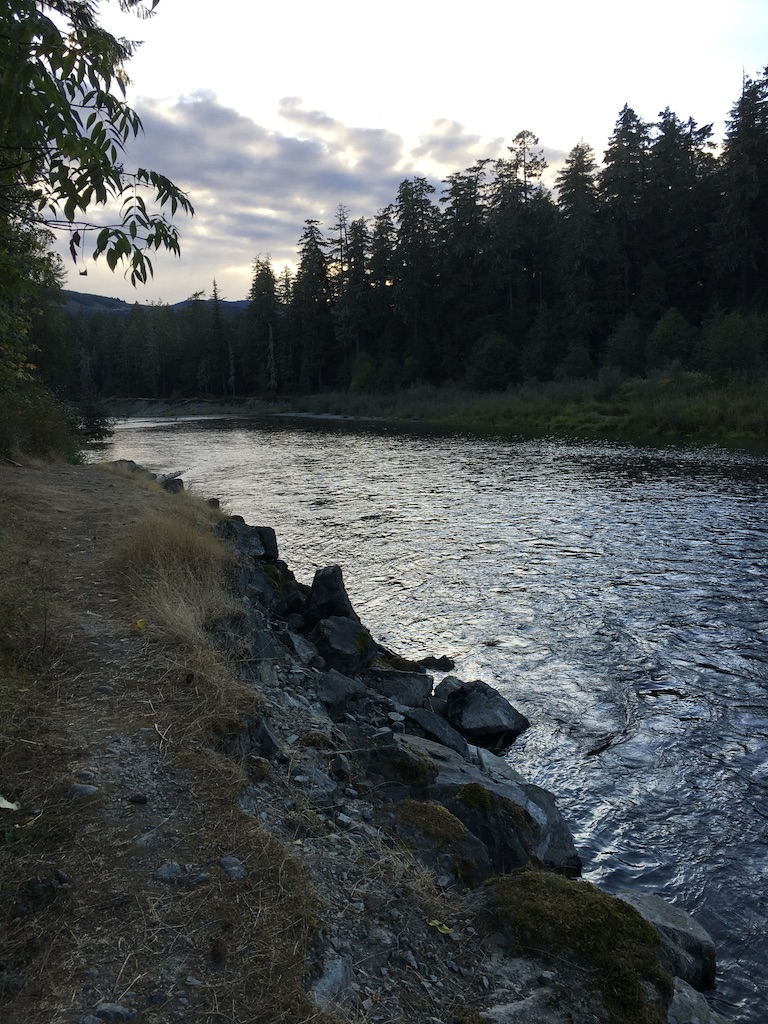
We went over to Vancouver Island for a week of camping! Except for one rainy day, the weather was perfect!
We enjoyed French Beach, Port Renfrew, Stoltz Pool, the Malahat Skywalk, Rathtrevor’s Beach and a quick drive up to Courtenay to see our old home. I found that the Malahat Skywalk was absolutely stunning! Of course, I’m biased because my daughter’s structural engineering firm designed it. But, I think I still would have enjoyed it!
Holiday Shopping
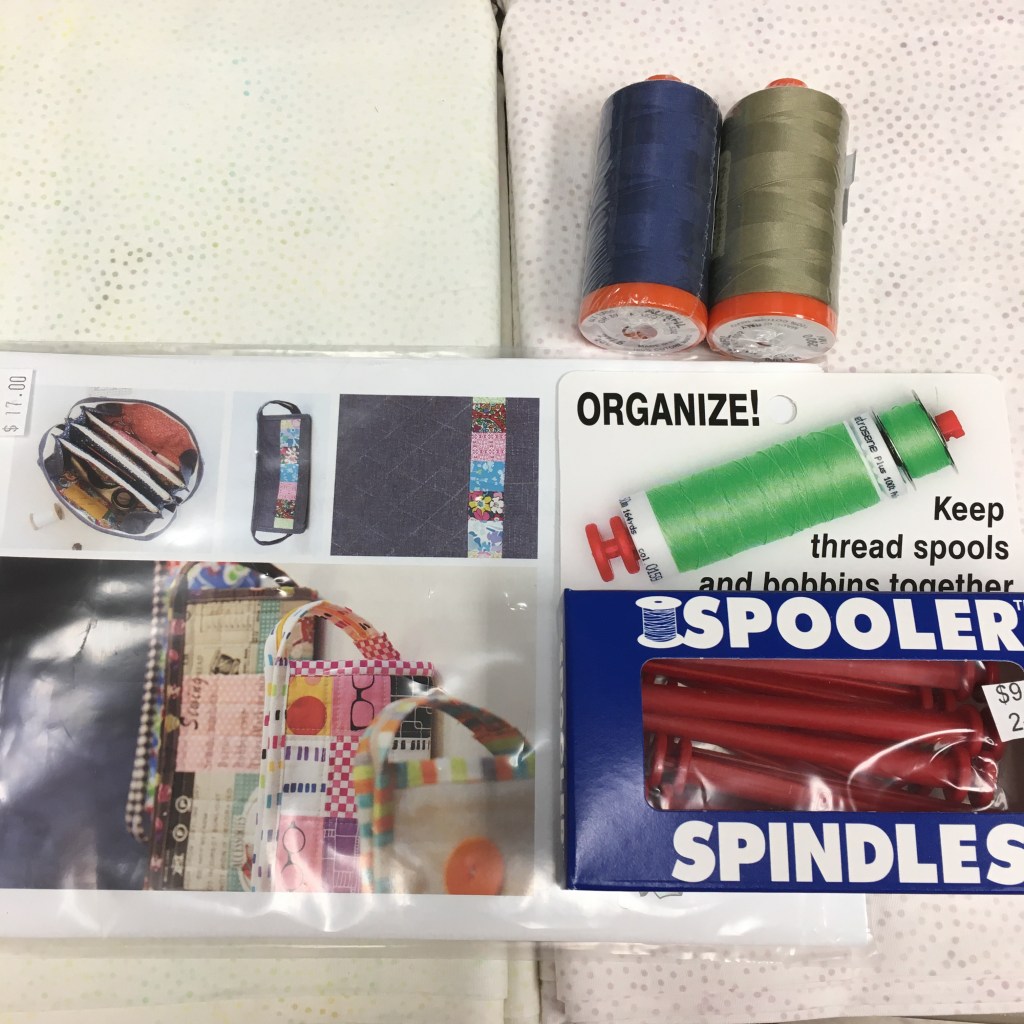
We only stopped at a few quilt stores. Unfortunately, I did not take any pictures of the stores. At Bib and Tucker in Victoria, I found some Island Batik neutrals (Almond and Egg white) and bought 2 yards of each, plus some Aurifil thread. Then at Sweet Pea in Parksville, I bought a pattern. Huckleberries in Courtenay had some spool bobbin thingies that I thought I’d try. I’ll let you know how they work out.
Favourite finish in September
Meadow Mist has a linky party each month for our favourite finishes … Mine was an Island Batik challenge using Deb Tucker tools and the “Flourish” fabric collection. You can read about it HERE.
New Classes
I will be teaching several classes at Essem in November. You can register for them HERE.
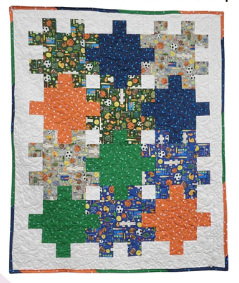
November 2 & 9: Puzzle Quilt
This is a 2 day class. From the book, Fat Quarter Baby. This looks like a super easy quilt, but when you deviate from the absolute directions in the book, there is a bit of a challenge. However, it is a very doable quilt to make – with my handy hints! This was made with a Fat Quarter Bundle that Semina put together!
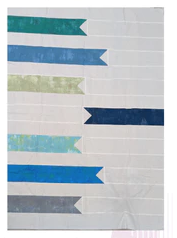
November 16: Travel Posts
From the book, Color Block Quilt Making. This quilt is fairly easy to make. And you might get the top done in a day! It’s a nice lap sized quilt!
I made the top with Grunge fabrics … Semina will make you a kit if you want!
November 23: Scrappy 4 Patch and Easy Angle.
This quilt has many different layouts and sizes … All use the same basic block and use the Easy Angle Ruler. The class will have you making half square triangles with ease and you’ll be well on your way to finishing the top!
You can use your scraps … or choose to make a 2 colour quilt (like the blue one).
November 30: Winter Branches Table Runner
This is an easy table runner to make and you should finish the top in class. It’ll be perfect for Christmas gifts! Semina can make you a kit, or you can use your own fabrics.
Stitching Time
Kate, from Life in Pieces, is hosting “Stitching Stuff” and the goal is to sew for at least 15 minutes a day. I use Kate’s guideline, but my personal goal is to sew for 30 minutes a day. On those “blah” days, it does motivate me to sit at my machine and 30 minutes often turns into several hours. Thank you Kate for the motivation!
January – September: 234 / 272
Oct : 0 / 2
Total: 234 / 274
Percentage = 85%
Stash Report
Donna at Quilt Paint Create hosts a weekly linky party where you can display your stash numbers. This has really kept my stash from growing (somewhat!) Before I buy anything, I am always mindful of the fact that I need to report it on my blog … That sometimes stops me in my tracks!
The Spicy Colour Challenge is from Patterns by Jen. Each month she has a unique block based on the Spice of the month. The pattern is free for the month … after the month is over, you can purchase the month’s block for a small fee … OR you can purchase the entire pattern from Jen!
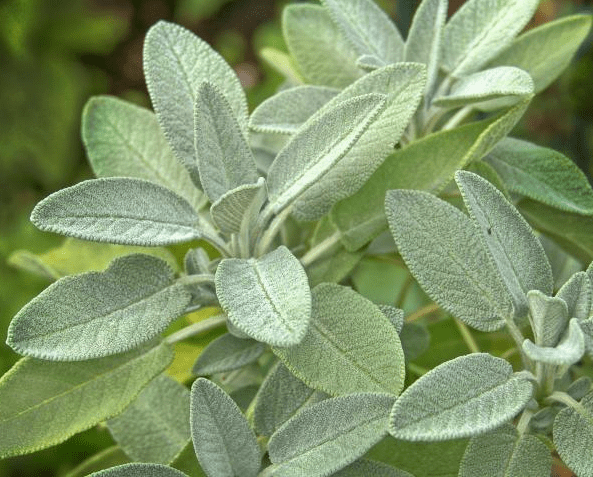
October’s spice is SAGE.
Sage is a plant that I have grown in my garden for years! Here in the Pacific Wet Coast (south western British Columbia) it grows easily. I use it mostly for poultry dishes … especially stuffing for chicken and turkey. YUM!!! I don’t need to dry or freeze it, because even in the winter it’s ready for picking!
Here is my Sage block – made with Island Batik fabrics!
And a picture of all 11 blocks … waiting for the last 2 blocks to assemble into a beautiful quilt!
Visit the other quilters who are featuring a sage block!
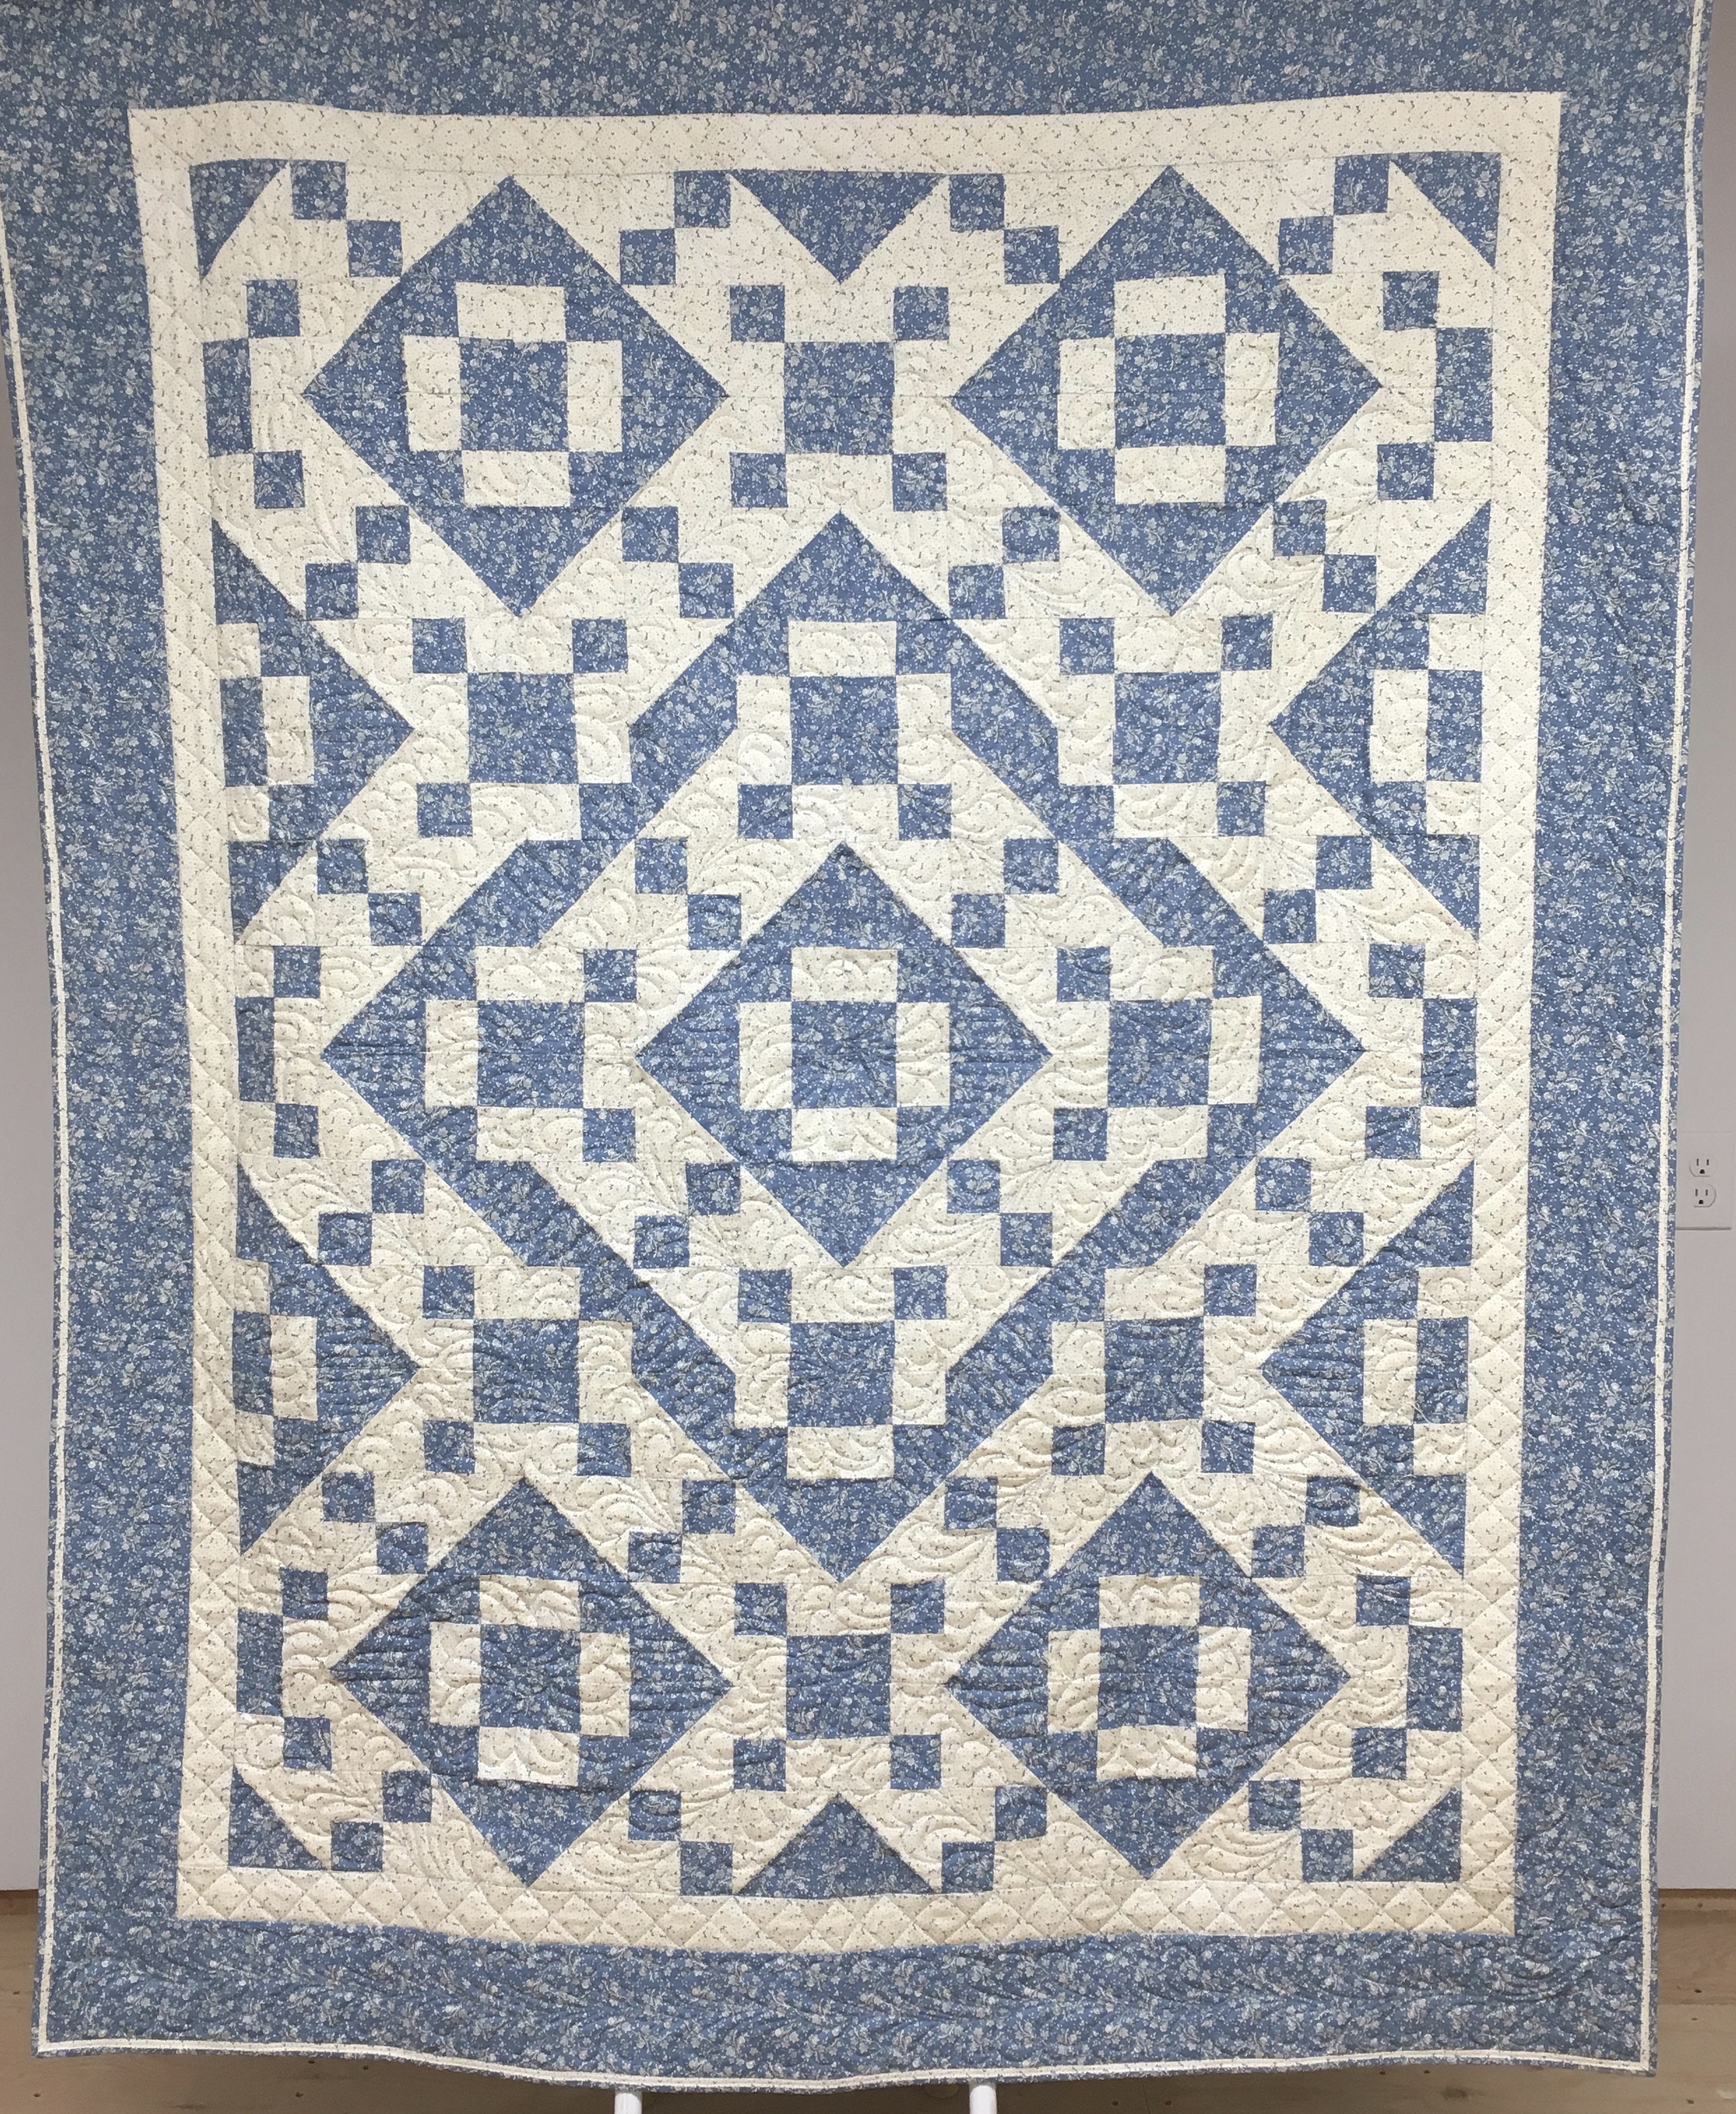
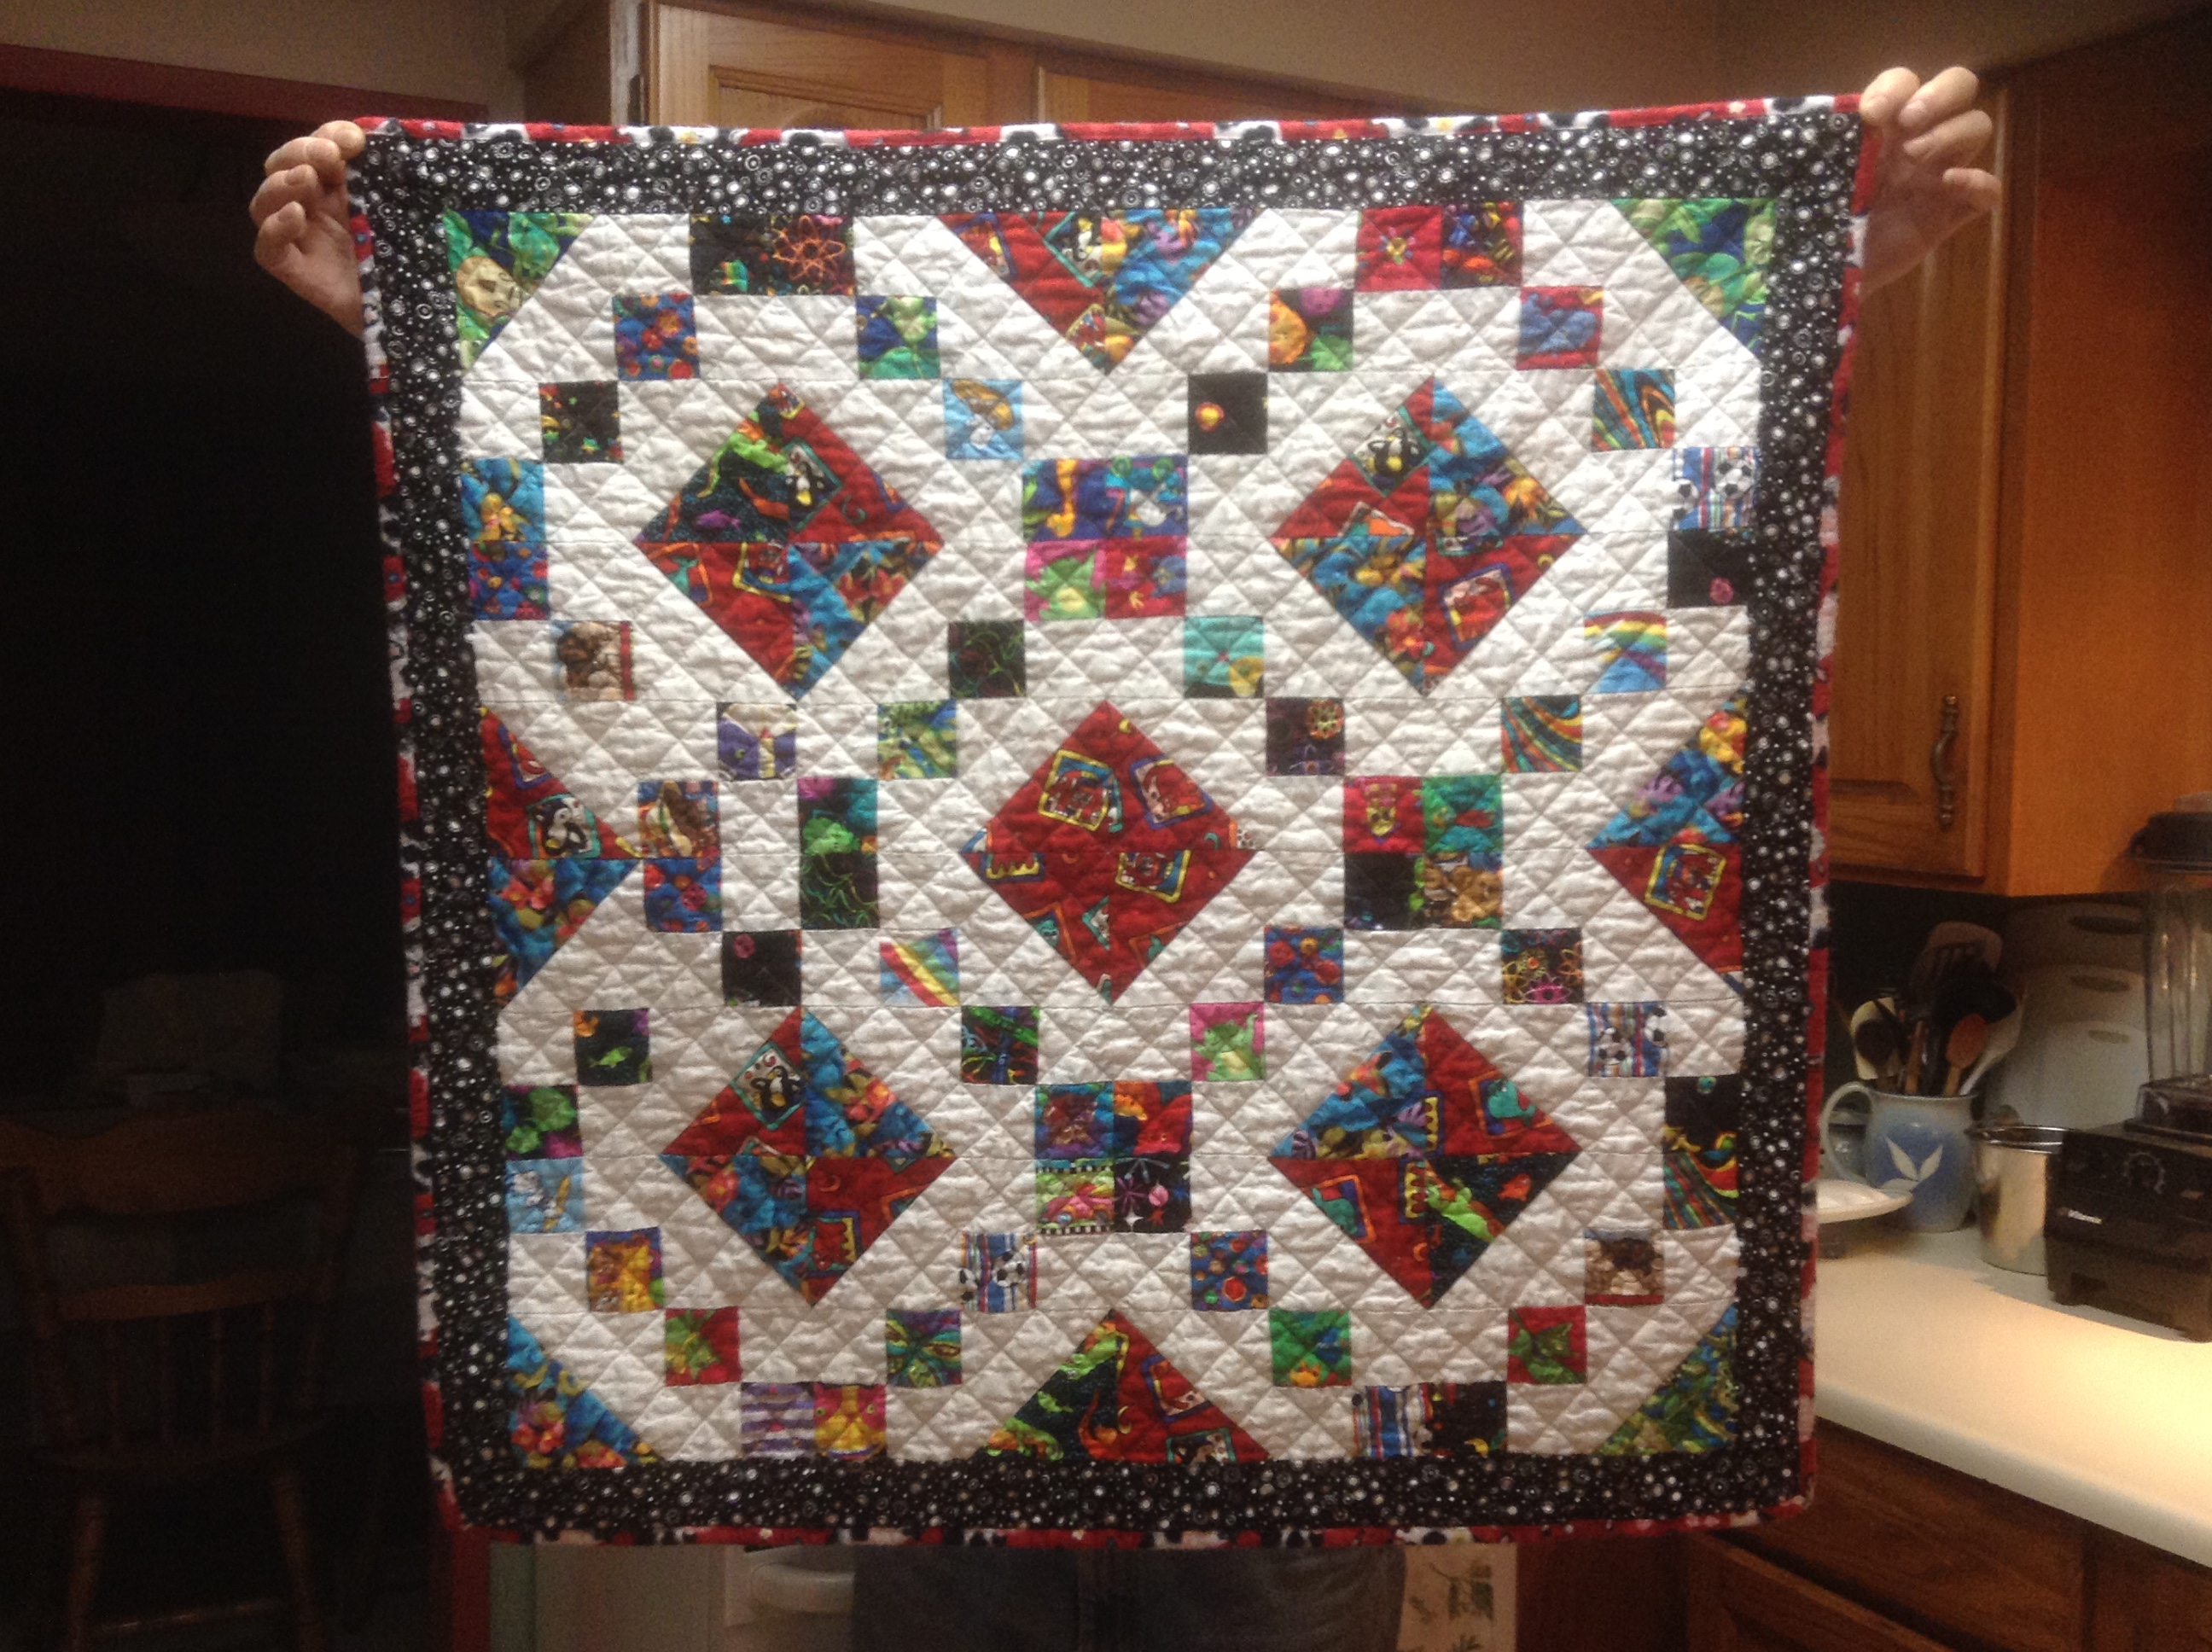
Both of these are quilts made with Island Batik fabrics. The one on the left was made for a Storm at Sea challenge and you can read about it HERE. The one on the right was made recently for a Gadget Blog hop and you can read about it HERE. Both quilts use Hobbs batting and are pieced either on my Featherweight or my Janome M7 and are quilted on my domestic Janome M7.
Well, I didn’t finish ANY UFOs this month. None, Nada, not a one …
However, I did finish 3 new starts … I finished my October Island Batik project … which you will see in October. I also finished the Pinktober quilt for the blog hop happening in October to honour breast cancer patients. My day is October 13th. As well, my gadget quilt was finished. It was a fun quilt to make. You can read about it HERE.
I have 2 more UFOs to finish before the end of the year and 3 new starts … for me, I think it’s doable! I hope!
Earlier in the month, I posted my September Island Batik project using a Studio 180 tool, Corner Pop, along with a few other tools that I own. I LOVE Studio 180 tools! You can read more about this quilt HERE.
This has been a super fantastic blog hop with ambassadors using new fabric collections and a Studio 180 tool. Every quilt has been totally different and amazing. This is the lineup for this week.
Kate, from Life in Pieces, is hosting “Stitching Stuff” and the goal is to sew for at least 15 minutes a day. I use Kate’s guideline, but my personal goal is to sew for 30 minutes a day. On those “blah” days, it does motivate me to sit at my machine and 30 minutes often turns into several hours. Thank you Kate for the motivation!
January – Aug: 209 / 242
Sept: 24 / 25
Total: 233 / 267
Percentage = 87%
Stash Report
Donna at Quilt Paint Create hosts a weekly linky party where you can display your stash numbers. This has really kept my stash from growing (somewhat!) Before I buy anything, I am always mindful of the fact that I need to report it on my blog … That sometimes stops me in my tracks!
No shopping, but the quilt I made for the Gadget blog hop used 2 yards of fabric for the backing. You can read about it HERE.
Oh me, oh my! What a blog hop this promises to be!!! Gadgets, gadgets, gadgets … I have a few! Do I need to pick just one??? Carol, from Just Let me Quilt, organized this blog hop and I signed up right away!!!
But before I started, I decided that I needed to actually define what a “gadget” is. According to Mirriam-Webster a gadget is “an often small mechanical or electronic device with a practical use but often thought of as a novelty.”
Hmmm, to me, I have always considered a gadget something that makes my quilting easier. Sometimes the “gadget” is electronical, sometimes mechanical, but always is practical and useful. Hence, I’m going with my own definition of “gadget.”
I will show you the gadgets that I used for this project. I doubt this will make me the Queen of Gadgets, but even I was surprised at how many I actually used!
Gadget #1
EQ8
I used EQ8 to design this quilt using Island Batik’s “Pumpkin Spice,” a signature collection for Sarah Fabian, designed by Kathy Engle. I had received a 10″ stack, along with a 2 yard cut of “Celery” (which I used for the background) and a 2 yard cut of “Bluegrass” which I used for the binding.
And yes, just in case you were wondering, I recently upgraded from EQ7 to 8. A tiny learning curve, but lots of features I really really like! Well worth upgrading! Wish I’d done it sooner!