
Clue #2: Flying Geese
This is a “No Waste” method of making flying geese. And, once you do it, you will like it! Promise!
Step #1
Take the (72 ) 2 7/8” squares of Contrast #1 and mark them down the middle.

Step #2
Take (18) 5 1/4″ background squares
Lay the Contrast #1 squares on top of the background square with right sides together.
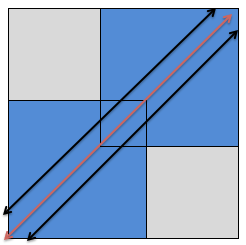
Line up the drawn lines of the Contrast #1 squares as shown in red in the picture. Sew a ¼” line on each side of the marked squares (shown in black in the picture.)
Step #3
Cut on the drawn (red) line. Press towards Contrast #1. You will have 2 pieces that are like the picture. (I know it’s weird, but bear with me!)

Step #4
Take a 2 7/8” Contrast #1 square and place it on each of the Step #3 pieces (as shown in the picture. Sew ¼” line away from the marked centres. (the black line)

Step #5
Cut along the centre (red line) and press towards Contrast #1
You will have 4 Flying geese from each 5 ¼” neutral square.
The flying geese block should look like this and there should be 4 flying geese blocks from each 5 1/4″ square.

Make 72 Flying Geese If you wish, label them “Flying Geese.” Set aside
Now … wasn’t that easy? And you don’t have any pesky waste triangles to worry about!
Schedule
Here is the schedule and links to the previously posted clues.
July 3 Cutting Instructions
July 6 Clue #1
July 10 Clue #2
July 13 Clue #3
July 17 Clue #4
July 20 Clue #5
July 24 Clue #6
July 27 Clue #7
July 31 Clue #8
August 3 Clue #9
August 7 Clue #10
Linky Party: August 24

Pingback: Summer 2021 Mystery Quilt: Clue #5 | Quilting Gail
Hi, Gail, I am wondering: what are the size of the flying geese units at the end of this step? TIA … 🙂 Pat
LikeLiked by 1 person
Hi Pat,
As you make the flying geese, they should end up 4 1/2″ x 2 1/2″ … and when in the quilt will finish at 2″ x 4″.
LikeLike
Pingback: Summer 2021 Mystery Quilt: Clue #4 | Quilting Gail
Pingback: Summer 2021 Mystery Quilt: Clue #3 | Quilting Gail
I’m sorry , I just don’t understand clue #2. Do I put the 2 7/8″ square on the corner of the 5″ square and then another 5
” square on top of the 2″ square?? It can’t be that hard but I just don’t get it and don’t want to quit just yet…help please
LikeLiked by 2 people
Hi,
Sorry that the directions aren’t clear.
You lay one 2 7/8″ square on one corner of the 5 !/4″ square and the other in the opposite corner. If you look at the diagram, the blue squares are the 2 7/8″ squares, laid on top of the 5 1/4″ square … right sides together. Then you sew 1/4″ on both sides of the previously drawn line. Then cut down the middle on the drawn line.
Does this make sense?
Please let me know.
LikeLike
Thank you.my aging brain finally figured it out this afternoon. I made a sample and it turned out beautifully, you’re right, easy peasy!!
LikeLiked by 1 person
YEAH!!!! I’m so happy that it worked for you! 🙂
LikeLike
Pingback: Summer Days | Quilting Gail