A Little Sewing

PHD in 2018 Update

We have a late-comer to our PHD in 2018 group!  It’s Deana from Dreamworthy Quilts.  This post lists her UFOs with the actual month that she started the quilts.  WOW – I’m impressed!  I think she had said something to me at an earlier date, but I forgot!  Her post from December (HERE) has her list.

PHD in 2018 is now CLOSED.

Project Update

One of the UFOs I brought with me is the Necessary Clutch.  I worked on it a bit while my sister was in the hospital.  She’s home now and doing pretty good.

Anyhow,  it’s a fantastic wallet.  The write up states,The Necessary Clutch Wallet isn’t just your ordinary wallet. Carry your cell phone/mobile, cheques, cash, cards, coins and still have room for your favorite lipstick or even personal items. With its closed ends, everything is safe and secure and there is never any worry about anything sliding out.”   You can access the pattern HERE.

The first picture shows the exterior and flap with the snap in place.  The lining is in the upper left corner.  The 2nd picture shows the credit card slots and the zipper pouch.   Will I get this finished?  Time will tell.

Linking to:

To see what other’s in the quilting world are working on – click on the following links:


Progress with no finishes

Image result for free sewing clip art

PHD Update:

Well, the quilting on my PHD #2 (Flannel Fat Quarters) is still in progress … almost done.

On Ringo Lake … Half of the top is pieced together … Those pesky little brown triangles were not fun.  I’m sure I took each one of them out at least once!  Hopefully they will behave on the second half of the quilt!IMG_1330

That’s all that’s been happening!

Linking to:

Happy Quilting
Gail

Sewing, but no finishes!

PHD in 2018

We have another blogger joining us in this challenge.  She’s a fellow Canadian from the east coast.  Her blog is “Laughing Gas Quilts.”  Can you guess what she does for a job? In her comment, she said, “What goal directed, box ticking, overachiever can resist the lure of a certificate of achievement?”  LOVE it!

Are you interested in getting your PHD in 2018?  You can see the details HERE.  You have until January 10 to join and send me your list via instagram, Pinterest or Blog.

Progress Report
IMG_1272

Scrappy Irish Chain:  quilting is happening  … there are 49 blocks to put feather wreaths in and 50 blocks that need outlining.  Oh me … I like doing the feather wreaths, but outlining the blocks is boring, boring, boring …  Sew, I’ve set myself a goal of doing 7 feather wreaths a day and an hour of outlining.  Hopefully in 2 or 3 days, I’ll have the quilting done.


IMG_1273

On Ringo Lake:  I’m starting to work on Clue 8 – the blocks …  This picture contains all of the pieces I need for the main blocks.

I think I’m going to like this quilt!

Within hours of the “reveal” some people were posting pictures of their completed tops.  I have no idea how they did it!  There are several steps in the final clue and I know that it will take me a lot longer than a few hours to have this quilt to a flimsy stage!

Link-ups

To see what others in the quilty world are working on wander over to these blogs:

Happy Quilting
Gail


Getting ready to Quilt

IMG_1257I’ve been working on Bonnie Hunter’s “On Ringo Lake” and am almost caught up on the clues.  This is a picture of the start of Clue 5.  It is done.


PHD in 2018

PHD in 2018I’m going to work on my quilting PHD in 2018.  Look HERE for details.  You can join me if you want to!


IMG_1223
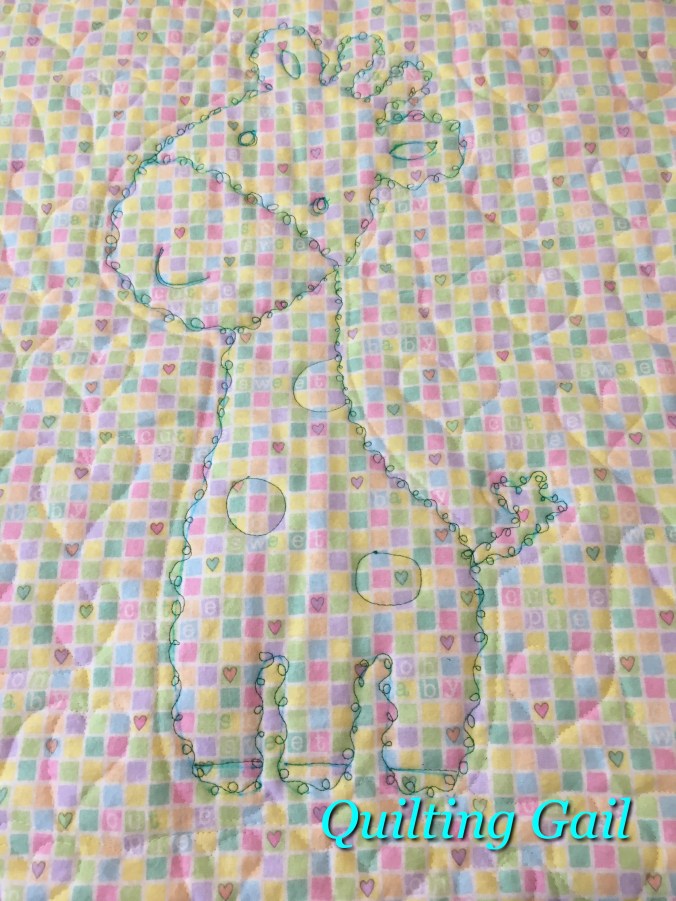
I was looking at the projects on top of the filing cabinet and analyzed why I’m not thrilled about them.  See the container on the top left, that says “Paper Piecing + 2 baby quilts?”  Well, the purple that you see in the corner is the border of the quilt that was paper pieced. (Which I did without sewing on the paper!)  It needed to have the back pieced.  There wasn’t quiet enough to cover the whole back … but I knew that I had enough fabric from the front of the quilt that it could easily be pieced together.

IMG_1261Sew … since I want to tackle projects that are on top of the filing cabinet first, I pulled that container down.  I had to laugh at the label that I made ahead of time and put in the box.  I don’t mind the label stating it’s one year earlier, but not 2.  In my last trunk show, I told the audience that my labels have the date that the label was made, not necessarily when the quilt was finished.

But, this quilt now has a destination – so I decided that I would put the label right on the back of the quilt.  Image result for stress clip art freeI actually pieced the backing and then did the label.  That was nerve-wracking!
In retrospect – I should have embroidered first, then pieced the back.

IMG_1262

But the back is pieced, and the label is done.  Just need to sandwich it and quilt it.   Now, I don’t feel reluctant to work on this project.


A Chance to win Silk Batting

Quilt Books & Beyond is having a give-away. Click on the link for a chance to win Silk Batting and a Quilting Book.

Link-ups

To see what others in the quilty world are working on wander over to these blogs:

Happy Quilting
Gail

SaveSave

A Friday Finish

IMG_1246IMG_1248


In November, I showed a picture of a table runner, in progress, that was being made with a charm pack that I received from Benartex fabrics. (See HERE).  The charm pack called, “A Moose for Christmas” is super cute.  I ended up making a table runner, a candle mat and 2 coasters.  I think there are only two 5″ squares left over.   It was fun to play around with the half-square triangles!

Link-ups

To see what others in the quilty world are working on wander over to these blogs:

Happy Quilting
Gail

SaveSaveSaveSaveSaveSave

Friday’s Finishes

The 4 Christmas placemats that I took to demonstrate binding on are done … and no, I did not get them completed while I was teaching everyone how to do it. They got finished this morning.

IMG_1141-1

I also finished up a UFO baby quilt!  This is pattern, by Anita Grossman Solomon, is from a 2006 Quiltmaker magazine. I think I made this UFO when the magazine first came out … so it’s an 11 year old UFO!  You actually make 3 quilts at the same time.  The other 2 quilts were gifted a LONG time ago.  This one had such a plain centre, I wasn’t sure what to do.  But this giraffe outline – quilted with a contrasting colour was a perfect finish for the quilt.  If you want to make this quilt, it is now a free quilt on Craftsy.  Click HERE.

IMG_1142-1

And here is a close up of the giraffe.

IMG_1146

Link-ups

To see what others in the quilty world are working on wander over to these blogs:

Happy Quilting
Gail

SaveSaveSaveSave

Glue Basting

There are no quilt finishes today – However, I do have a quilt glue-basted.

I had a couple of inquiries as to how I baste with Elmer’s School Glue, so I thought I’d show you.   A few years ago, I saw a post that someone sprayed with diluted glue to baste their quilts.  I tried it.  Well, it didn’t work for me … the sprayer got plugged up and by the time the glue was diluted enough to go through the sprayer – it was diluted too much and wouldn’t stick.   Then, I was at the dollar store one day and saw a jug for paint and a 4″ paint brush.  I bought them and tried it out.   I dilute the glue (1 part glue / 4 parts water) and paint it on.  If it’s not diluted – it’s like a rock to sew through.  1 to 4 ratio seems to be just about perfect.  Enough glue to stick – but not too much.

Here’s my process:

  • Place flannel sheet on top of the bed  (to protect the bedding)Glue Basting 2-1
  • lay out the quilt (bottom, batting, top)
  • fold top back by half
  • lightly paint the batting
  • press with an iron
  • repeat on the other side
  • repeat on the back
  • Quilt when it’s dry.  (I usually let it set for at least 12 hours).


The above pictures were taken with flannel. Glue Basting 2-2 You don’t see the glue or moisture when you use flannel.  When using cotton, it shows up – big time!  You can definitely see where the moisture comes through.  This is OK.  It usually disappears by the time it’s dry.  If the glue is super heavy or not diluted enough – you’ll still see it after it’s dry.  This is OK – just take your time quilting it and it’ll wash out.  (If you don’t wash your quilts before giving or using them, then don’t use this method.)

This process makes the quilt quite stiff, which is actually very nice for quilting!  However, as the quilt is manipulated through the machine, it does loose it’s stiffness.

I have not used this method on any quilt that is larger than 50″x 50″.

Link-ups

To see what others in the quilty world are working on wander over to these blogs:

Happy Quilting
Gail


SaveSave

A baby quilt finish!

This is a UFO that was languishing for quite a while … the blocks are left overs from a jelly roll quilt and some creative piecing as there was not enough blocks to complete a whole quilt …  It was fun to make!  I did quilt it with wavy serpentine lines.  Pretty boring!  In hindsight – I should have just done an all-over free-motion and it would have been faster!  And my machine did not like doing the serpentine lines.  When I started, I had tension issues and I finally changed the needle.  That helped.  Then towards the end of the quilting, it started skipping stitches.  Groan.  So the machine has gone back to the machine doctor … they have a great warranty on their work.  It was only the beginning of August when I got it back, so it should be a free repair.IMG_1044

Link-ups

To see what others in the quilty world are working on wander over to these blogs:

Happy Quilting
Gail

A Kansas Troubles UFO finish!!

IMG_1019While I was quilting my Kansas Troubles, Irish Chain,  I ran out of quilting thread … the spool you see in the picture was emptied and I had less than 1/2 a bobbin … groan … I asked a bunch of friends to find out where I could buy it.  I usually buy it from the Canadian distributer (Carola’s) when she has a booth at quilt shows.   The local stores (within 75 km) that sell Aurifil didn’t have this colour. {Although, one did contact me later to say they did have it.}

BUT:  Joy – oh – joy … Carola was doing a trunk show at a local guild meeting on Tuesday with a pop-up store.  I phoned the store and Carola brought the colour I need to the guild meeting.  YEAH!!!

I ended up winding 3 bobbins and managed to finish the quilt.   Sew, finally, my scrappy, Kansas Troubles Irish Chain is done.

In some ways, I feel like I’ve been fighting to get this quilt done.  But, with almost a steady stream of company (sometimes up to 13 people in a 2-3 bedroom house), it’s actually a wonder that I managed to get it done at all!  I know that I have enjoyed making this quilt.  It’s a special quilt to me! Not only because it’s from my favourite line of fabrics, but because my dear friend, “D” gave me the jelly roll that is the main portion of this quilt.  It’s backed with flannel, so it’ll be nice and cosy during the winter months! This quilt is 104″ x 82″.

img_1035.jpg

Here’s a look at the quilting from the back of the quilt. It’s not a great picture because the late afternoon sun was shining through the trees (that’s what the lighter areas are). You can see a close up of a feathered wreath from the front of the quilt HERE.

IMG_1029

Link-ups

To see what others in the quilty world are working on wander over to these blogs:

Happy Quilting
Gail

SaveSave

Sarah’s finish

I have been away in Alberta at a wonderful wedding and have not finished any quilts in the past few weeks.  (And yes, the bride & groom loved their quilt! See the quilt HERE)
However, my sister sent me this picture of a quilt made by a 16 year old friend, Sarah.  I am totally impressed with the colour choices that she used for the sashing and border!

Here’s what Sarah has to say:
Yes I made this quilt last year in the quilting 4-H project. The inspiration I had for this quilt was when our family would go down to the Kitchner area to visit relatives, I would always see tons of Mennonites and they have always fasinated me. I brought the quilt this year to the 4-H Regional Fair in Thorhild and won first place which I was really happy about. I also brought it to the Westlock quilters guild show last year. 
I would love for you to put it on your blog! I hope that it will motivate people of my generation to take up the hobby of quilting, a skill that has been slowly dying in the past few decades.
So Sarah – here’s your first quilt on my blog. I’m looking forward to featuring more of your quilts!  To my readers: Let me know when you show this quilt to other people of Sarah’s generation and I will pass it on to her.
sarahs-quilt-1.jpg

Link-ups

To see what others in the quilty world are working on wander over to these blogs:

Happy Quilting
Gail

SaveSave

A finish for Friday!

This is a UFO from 2012.  It’s the third time I’ve made this pattern by Debbie Caffery (Good Night Sweetheart).  The first 2 times were for 2 wedding gifts for a niece and nephew that got married 1 week apart in 2009.  Although this was a UFO that has been languishing – I thought it would be appropriate to finish it for another wedding gift.  It’s a sister to the nephew that got married in 2009.  Figured they might as well have the same pattern!

If you’ve been following my blog – this is the quilt that had a misbehaving block in it … all fixed now!)

Sarah & Mitchell

Link-ups

To see what others in the quilty world are working on wander over to these blogs:

Happy Quilting
Gail

A Friday Finish – YEAH!!!

Shakespeare in the Park

I am very excited to be finished my “Shakespeare in the Park“!  It’s a pattern by Judy Martin in her book “The Creative Pattern Book.”  This pattern was frustrating.  I found the directions often did not make sense to me.  And, of course, I made it bigger, so then I had to figure out how many extra blocks to make. Adding the extra border was easy to do! In the end, I’m glad I persevered.  I did a scrappy binding. My husband was not too sure about it, but when it was finished, he said that it was the perfect binding!  🙂  I love this quilt – now that it is finished!

IMG_0819

Pink Snail’s Trail

A flimsy is completed.  Ready for sandwiching and quilting. A few posts ago, I showed 2 lay-outs for a snail’s trail (or monkey wrench) quilt.  Most everyone commented that I should do this layout and I’m glad I did!  I think it will be fun to quilt this one!

IMG_0827

Now that I’ve posted the picture, I realize that I still need to add a border.

Link-ups

To see what others in the quilty world are working on wander over to these blogs:

Happy Quilting
Gail

Sewing Quilts Faster

The Process

People often ask me how I make so many quilts in the time I have.  Often big quilts, scrappy quilts with little pieces.  I always called it “Two at a Time.”  Bonnie Hunter at Quiltville has made this technique famous in the quilting world by calling it “Leaders and Enders.” Her book “Adventures with Leaders and Enders” is available at her website.  (Click here).  I did “Blue Ridge Beauty” as a true Leader and Ender.  When you need to make over 400 4-patches and over 400 half-square triangles, it can be daunting.  I did it one or 2 units at a time.  It took me 3 years – but once I had all the units together, it went together quickly.  And this is the result.  A quilt I love! L 'n E-6

When sewing scrappy quilts – especially everything including the kitchen sink (batiks, reproductions, modern, calicos, all colours, all prints etc) – all I do is have a plan, cut a bunch of scraps and sew them a few at a time, according to the plan.  All while I’m sewing on my main project.

My current plan is a scrappy double Irish Chain, using 2″ squares.   Many of these squares came from other people – the scraps they were going to throw away.  (I gather them from the garbage at retreats and sewing days and some people give me little bags of their scraps).

Leah Day has a free pattern that you can use.  (Click here).  Leah’s pattern uses 2 ½” squares as the base. And, true to me, I changed it.  I’m making it smaller, do not have the alternating white patches in the blocks, and have no idea how big the quilt will finish.  All I know is that it will have an odd number of blocks across and down. This will make the quilt symmetrical.

I have my unit pieces partially gathered and sitting by my machine.

L 'n E-3

I’m sewing them into different units:

  • 4 patches (kitchen sink variety)
  • background and a print (2 patch)
  • a strip of background, 3 prints, background (only partially shown)
  • a print on each end of a 5″x 2″ rectangleL 'n E-4

These units will get sewn into the blocks.  I have 4 blocks completed.

L 'n E-5

Link-ups

To see what others in the quilty world are working on wander over to these blogs:

Happy Quilting
Gail

Friday … a little progress, a solved mystery

Shakespeare in the Park  

img_0518
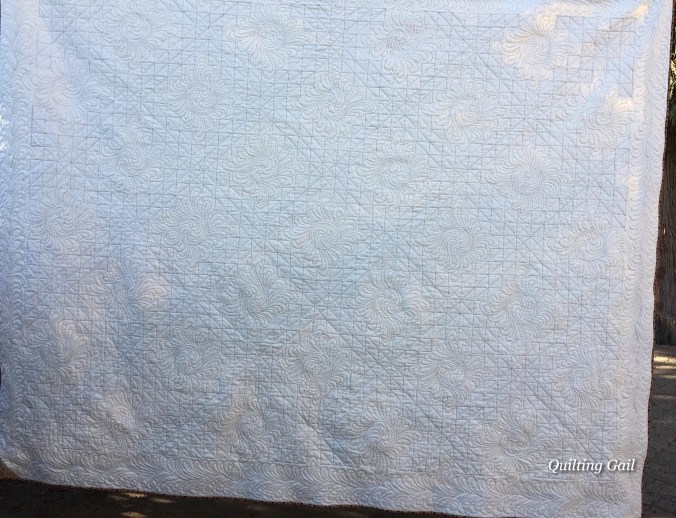
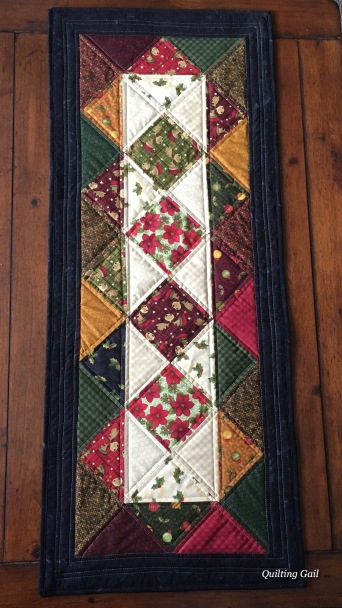
I’ve started quilting this beast.  And a beast it is!

After I quilted about 3 blocks, I was totally unhappy with what I had done.  So, hours and hours later, I finally had those tiny, tiny stitches ripped out.  I then decided to quilt in the ditch … a huge undertaking when quilting with a free-motion quilt foot … There are 41 large blocks (snail tail & large stars) and I think I have about 6 of them done.  I have no idea how many small stars are on the outside.   Needless to say, I’ve got a long way to go!  Sigh … I will be glad when this quilt is finished.


A Mystery Solved

People often ask me about thread. (Ha!  As if I know much!)  I’ve always felt that it’s OK to use polyester thread.  The rumour that it cuts cotton fabric just never made sense to me. Nor have I seen any evidence of it.

Today, on Bonnie Hunter’s blog, (scroll down, down, down), she discusses thread and then goes on to talk about how polyester batting is what shreds fabric.  I had an ah-ha moment.  Yes, I’ve seen this. Even in my older quilts … I knew it wasn’t the thread when the fabric is shredded within the piece, not near the seam.  Bonnie goes on to say that she never uses polyester batting.

Link-ups

To see what others in the quilty world are working on wander over to these blogs:

Happy Quilting
Gail

Friday: I have a sandwich!

Shakespeare in the Park  

Is now sandwiched!  It is HUGE! I couldn’t get a full picture of it on my living room floor. img_0486

I find that when I use Hobbs 80/20,  the spray basting doesn’t stick as well as when I use Warm and Natural.  And the backing will sometimes shift. So once this was spray basted (with 505) I pinned it.  I know I will be cursing all the pins when I go to quilt it, but at least it will not shift.

My machine is packed up – ready for a “Zendoodling” class tomorrow, so I won’t start quilting this until Sunday at the earliest.

Here’s a Helpful Hint:  If you look on the lower right corner of the picture, you will see that the corner is pinned to the front.  This seems to help prevent the extra backing from folding under and being sewn onto the back.

To see what others in the quilty world are working on wander over to these blogs:

Happy Quilting
Gail